| Sv translation | |||||||||||||||||||||||||||||||
|---|---|---|---|---|---|---|---|---|---|---|---|---|---|---|---|---|---|---|---|---|---|---|---|---|---|---|---|---|---|---|---|
| |||||||||||||||||||||||||||||||
IntroductionHave you ever thought about how you can reduce the workload of your employees and still achieve a high level of customer satisfaction? Self services are the answer! These can help you automate processes and enable customer service even out of normal hours. As an example, we show you how to build a self service application for recording electricity meter readings. Neccesary promptsFirst of all, the necessary prompts are created. The following table shows the prompts required.
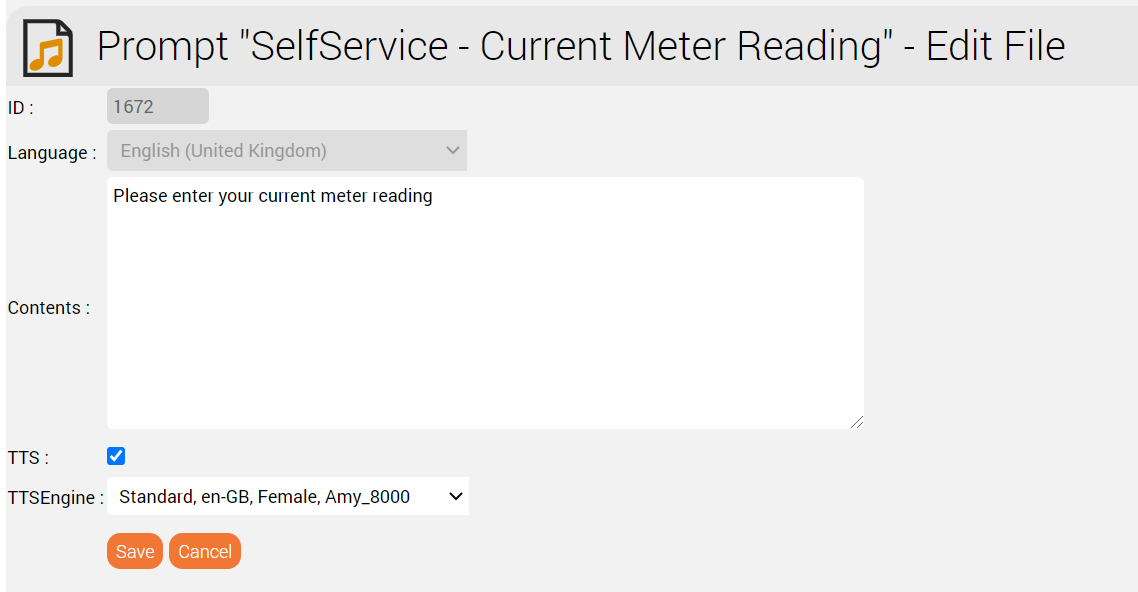
TTSYou can create the prompts quickly and easily using a TTS engine if you have subscribed to our TTS service. This is shown in the screenshot below.
List - Checking Meter Numbers and Recording ResultsA list is used to check the meter numbers and store the results. The list is pre-loaded with all existing meter numbers. This can, for example, be manually loaded into the system, or imported using an FTP job. The results in the list list could be automatically processed by exporting the list to an FTP server. The fields in the list are as follows:
This is shown in the screenshot below.
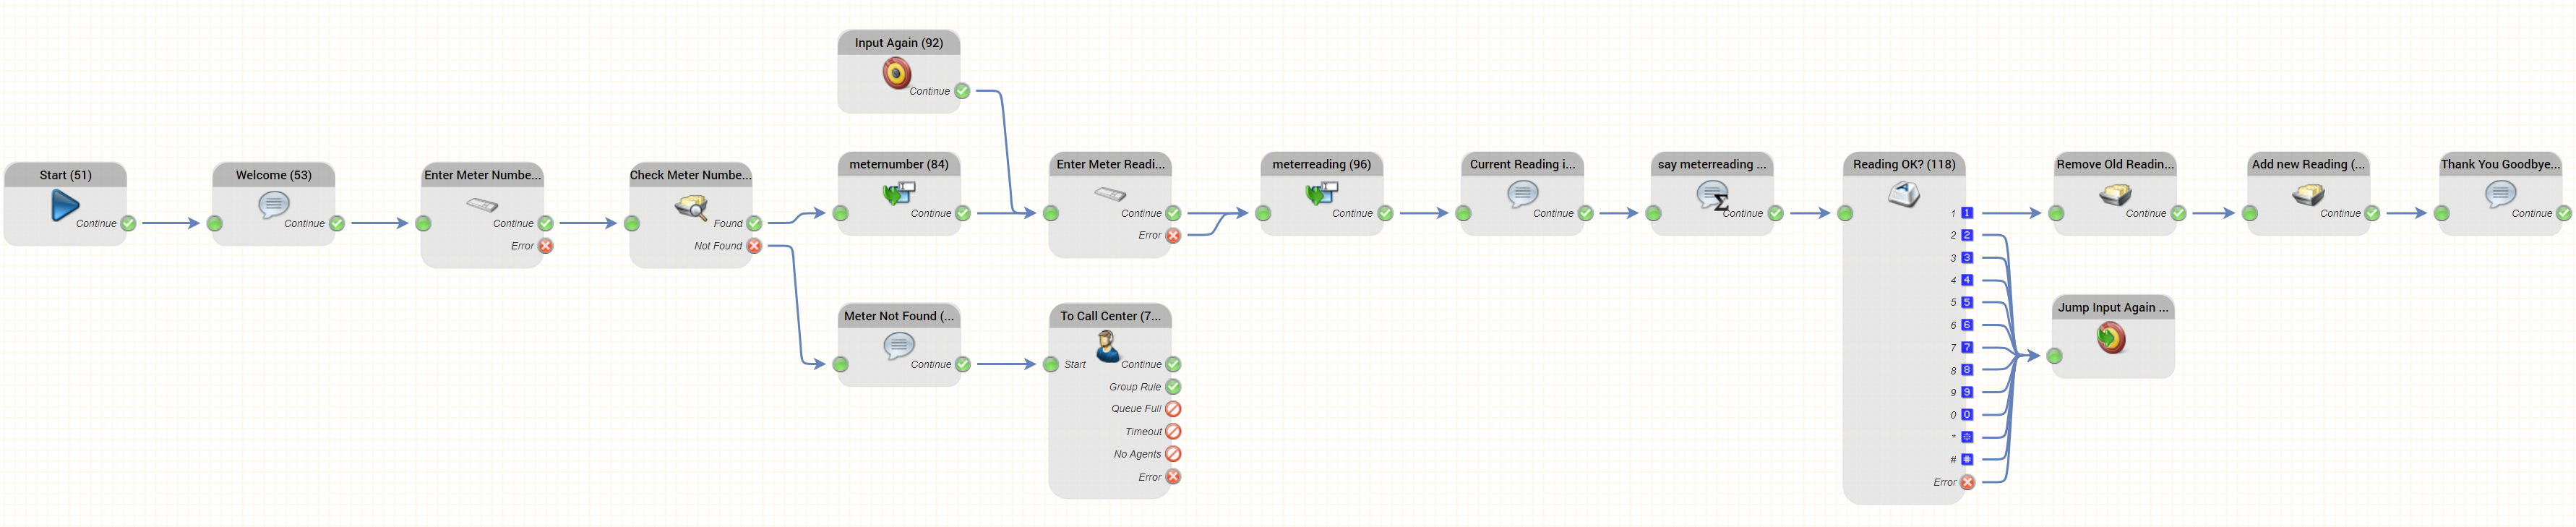
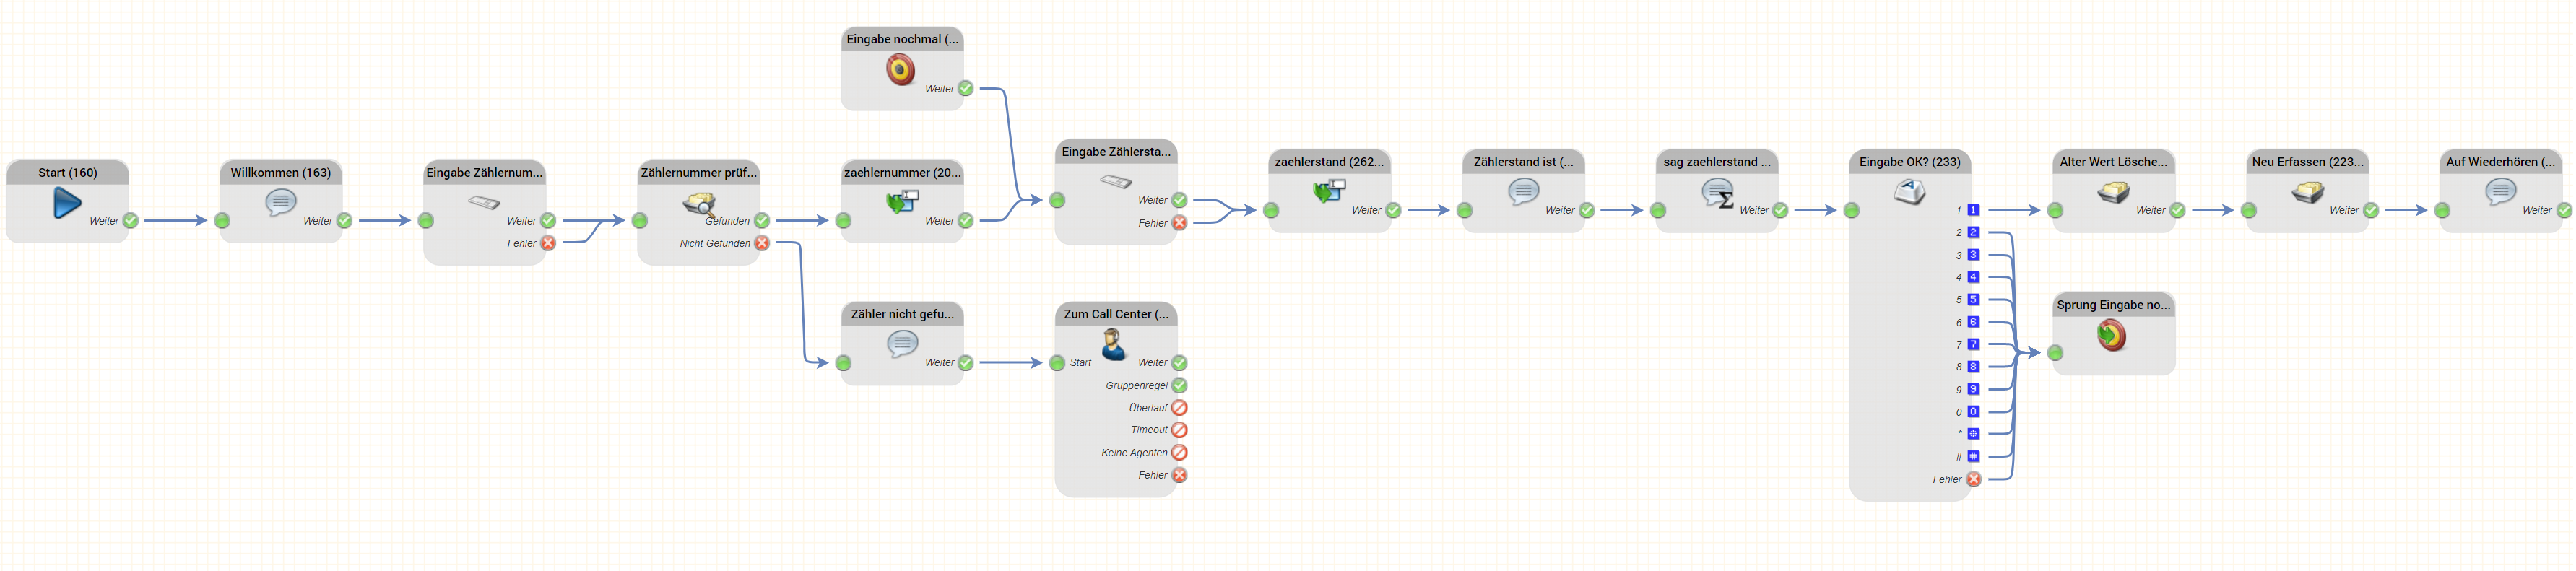
Possible Call-Flow for the Self ServiceThe call flow for the self service might look like this:
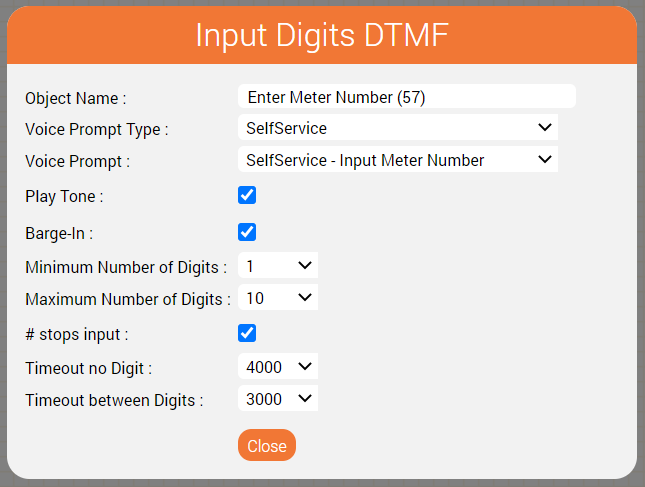
An Explanation of the Important Objects UsedIn this section we explain the key objects used in the call flow above and how it works. Note - not all objects are explained - a basic familiarity with the jtel IVR is assumed. Enter Meter Number / Enter Meter ReadingThese use Input Digits DTMF objects to ask the customer to enter the meter number and the meter reading. Here is the parameterisation for entering the meter number.
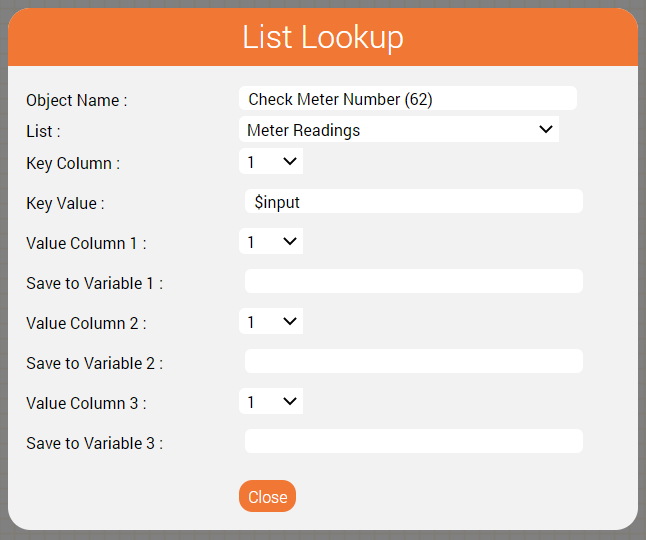
An audio beep is played after the prompt, to inform the caller that now is the time to start typing in the meter number (Play Tone). However, Barge-In is also selected so the announcement does not have to be listened to completely, but can be interrupted by starting to type in the meter number. The minimum and maximum number of digits can be used for a plausibility check, for example, if the meter number may have a maximum of 10 digits then this can be specified as the upper limit. Further details on this object can be found here: Input Digits DTMF Check Meter NumberThe meter number is checked for validity by looking up the value - $input - in the List "Meter Readings". All meter numbers should be loaded into this list in order that the service may work as built here.
This object has two outputs.
Further details on this object can be found here: List Lookup Remember the inputs: meternumber / meterreadingIf the meter number is found, we need to remember this for later. This is achieved by saving $input to a variable $meternumber using the Declare Variable object meternumber in the call flow above.
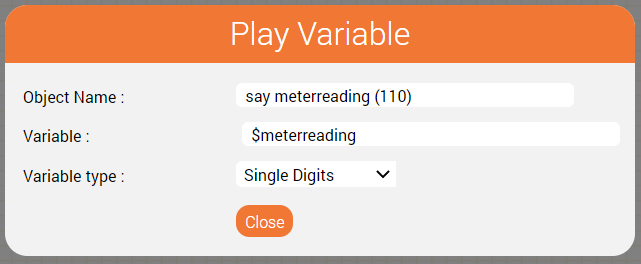
Similarly, when the meter reading is entered, this is saved to a variable $meterreading in the Declare Variable object meterreading. Further details on this object can be found here: Declare Variable Saying the Current Meterreading: say meterreadingThis object is used to output the current meter reading as a concatenation of single digits. It is used after the "Current Reading is" prompt is played. It is parameterised like this:
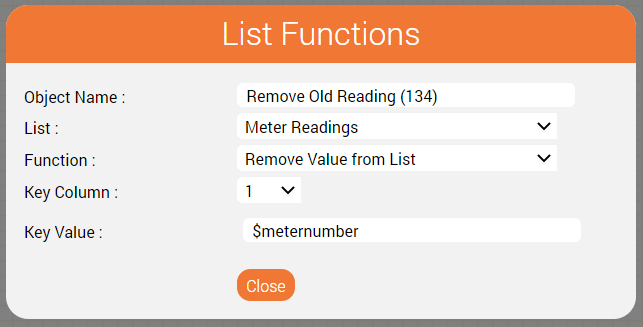
Further details on this object can be found here: Play Variable. Saving the result: Remove old Reading / Add new ReadingThe meter reading is saved to the same list in our example call flow. This involves deleting the old entry and adding a new entry with the same meter number using two instances of the List Functions object. Removing the old entry is performed like this:
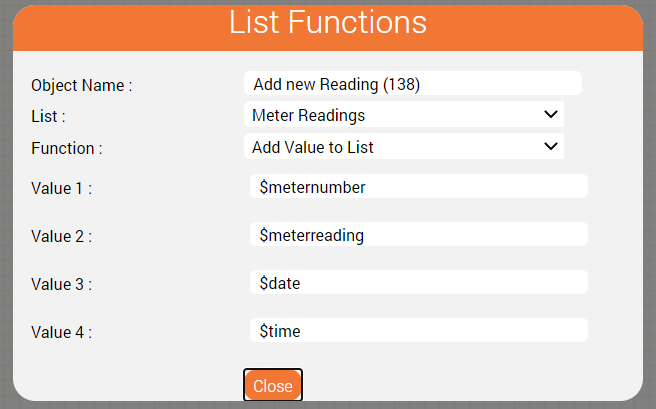
And the new reading is added like this:
Keeping it Tidy: Jump Input Again / Input AgainThese two objects are used to define a point in the routing, to which the call flow can jump, and to perform the actual jump from the end of the call flow to the middle. Of course, one could just connect the two objects directly together, but the number of connectors involved will mean the end result might look somewhat untidy. Further details on these two objects are found on the following pages: Jump to Target, Target ConclusionWe hope this tutorial has given you some insight as to how a simple self service can be built using the jtel system. The logic can be changed and adapted as the use case requires. Here are some examples:
|


| Sv translation | |||||||||||||||||||||||||||||||
|---|---|---|---|---|---|---|---|---|---|---|---|---|---|---|---|---|---|---|---|---|---|---|---|---|---|---|---|---|---|---|---|
| |||||||||||||||||||||||||||||||
EinführungHaben Sie schon einmal darüber nachgedacht, wie Sie die Arbeitsbelastung Ihrer Mitarbeiter reduzieren und trotzdem eine hohe Kundenzufriedenheit erreichen können? Self Services sind die Antwort! Diese können Ihnen helfen, Prozesse zu automatisieren und einen Kundenservice auch außerhalb der normalen Geschäftszeiten zu ermöglichen. Als Beispiel zeigen wir Ihnen, wie Sie eine Self-Service-Anwendung für die Erfassung von Stromzählerständen erstellen können. Notwendige AnsagenZunächst werden die notwendigen Ansagen erstellt. Die folgende Tabelle zeigt die benötigten Ansagen.
TTSSie können die Prompts schnell und einfach mit einer TTS-Engine erstellen, wenn Sie unseren TTS-Service abonniert haben. Dies ist auf dem folgenden Screenshot zu sehen.
Liste - Überprüfung der Zählernummern und Aufzeichnung der ErgebnisseEine Liste wird verwendet, um die Zählernummern zu überprüfen und die Ergebnisse zu speichern. Die Liste ist mit allen vorhandenen Zählernummern vorgeladen. Diese kann z.B. manuell in das System geladen oder über einen FTP-Auftrag importiert werden. Die Ergebnisse in der Liste können automatisch verarbeitet werden, indem die Liste auf einen FTP-Server exportiert wird. Die Felder in der Liste sind wie folgt:
Dies ist in der nachstehenden Abbildung dargestellt.
Möglicher Call-Flow für den Self-ServiceDer Ablauf für den Self-Service könnte wie folgt aussehen:
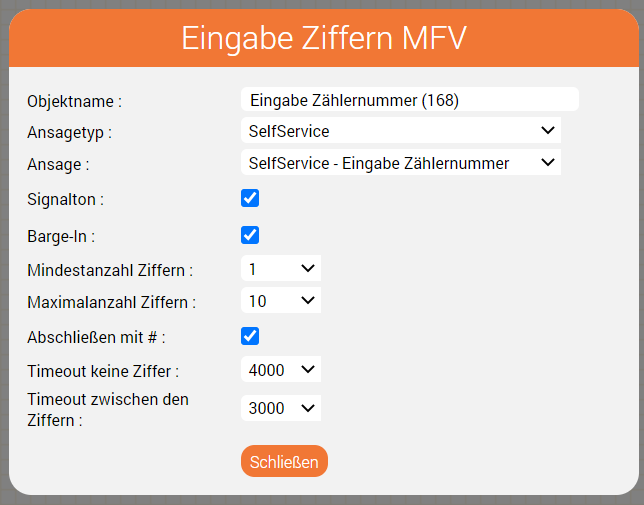
Erläuterung der wichtigsten verwendeten ObjekteIn diesem Abschnitt erklären wir die wichtigsten Objekte, die im obigen Ablauf verwendet werden, und wie er funktioniert. Hinweis: Es werden nicht alle Objekte erklärt - eine grundlegende Vertrautheit mit dem der jtel IVR wird vorausgesetzt. Eingabe Zählernummer / Eingabe ZählerstandDiese verwenden Eingabe Ziffern MFV Objekte, um den Kunden aufzufordern, die Zählernummer und den Zählerstand einzugeben. Hier ist die Parametrierung für die Eingabe der Zählernummer.
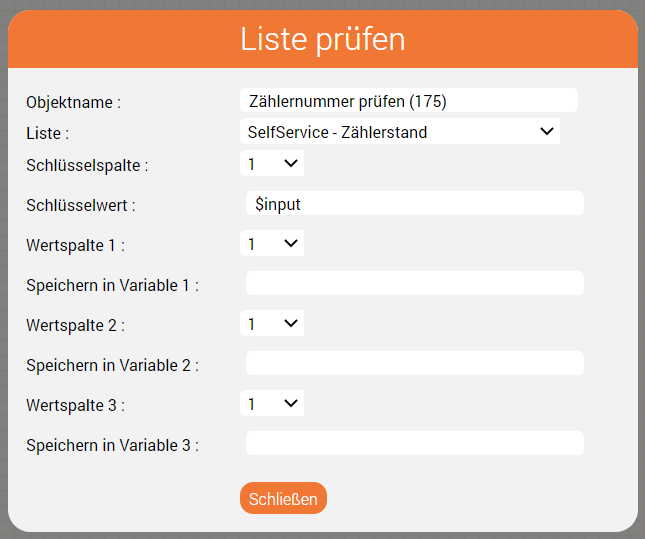
Nach der Aufforderung zur Eingabe der Zählernummer ertönt ein Signalton, um den Anrufer darauf hinzuweisen, dass es nun an der Zeit ist, die Zählernummer einzugeben (Signalton). Allerdings ist auch Barge-In ausgewählt, so dass die Ansage nicht vollständig angehört werden muss, sondern durch die Eingabe der Zählernummer unterbrochen werden kann. Die mindestMindest- und maximalzahl Maximalzahl der Ziffern kann für eine Plausibilitätsprüfung verwendet werden, z.B. wenn die Zählernummer maximal 10 Ziffern haben darf, kann dies als Obergrenze angegeben werden. Weitere Details zu diesem Objekt finden Sie hier: Input Digits DTMFEIngabe Ziffern MFV Zählernummer prüfenDie Zählernummer wird auf ihre Gültigkeit geprüft, indem der Wert - $input - in der Liste "SelfService - Zählerstand" nachgeschlagen wird. Alle Zählernummern sollten in diese Liste geladen werden, damit der Dienst so funktionieren kann, wie er hier aufgebaut ist.
Dieses Objekt hat zwei Ausgaben.
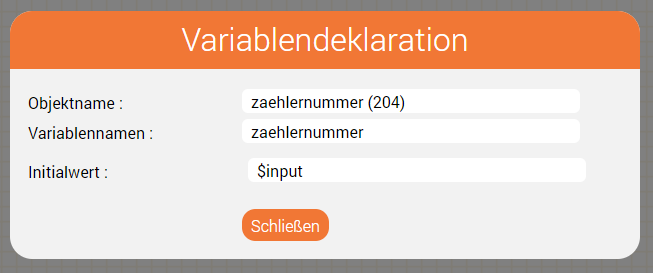
Weitere Einzelheiten zu diesem Objekt finden Sie hier: Listenoperationen. Eingaben speichern: zaehlernummer / zaehlerstandWenn die Zählernummer gefunden wird, müssen wir uns diese für später merken. Dies wird erreicht, indem $input in einer Variablen $zaehlernummer gespeichert wird, indem das Objekt Variablendeklaration im obigen Aufrufablauf an der Stelle "zaehlernummer" verwendet wird.
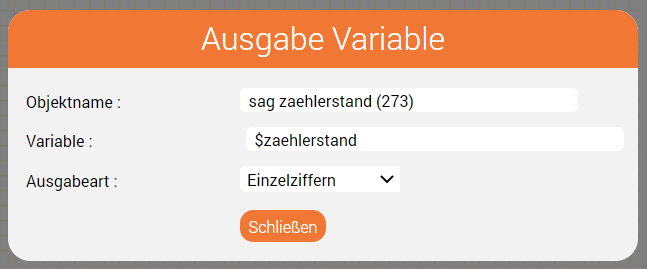
Ebenso wird bei der Eingabe des Zählerstands dieser in einer Variablen $zaehlerstand in der Variablendeklaration "zaehlerstand" gespeichert. Weitere Einzelheiten zu diesem Objekt finden Sie hier: Variablendeklaration. Ausgabe aktueller Zählerstand: sag zählerstandMit diesem Objekt wird der aktuelle Zählerstand als Verkettung von Einzelziffern ausgegeben. Es wird verwendet, nachdem die Ansage "Zählerstand ist" ausgegeben wurde. Remember the inputs: meternumber / meterreadingIf the meter number is found, we need to remember this for later. This is achieved by saving $input to a variable $meternumber using the Declare Variable object meternumber in the call flow above.
Similarly, when the meter reading is entered, this is saved to a variable $meterreading in the Declare Variable object meterreading. Further details on this object can be found here: Declare Variable Saying the Current Meterreading: say meterreadingThis object is used to output the current meter reading as a concatenation of single digits. It is used after the "Current Reading is" prompt is played. It is parameterised like this:
Saving the result: Remove old Reading / Add new ReadingThe meter reading is saved to the same list in our example call flow. This involves deleting the old entry and adding a new entry with the same meter number using two instances of the List Functions object. Removing the old entry is performed like this:
And the new reading is added like this:
Keeping it Tidy: Jump Input Again / Input AgainThese two objects are used to define a point in the routing, to which the call flow can jump, and to perform the actual jump from the end of the call flow to the middle. Of course, one could just connect the two objects directly together, but the number of connectors involved will mean the end result might look somewhat untidy. Further details on these two objects are found on the following pages: Jump to Target, Target ConclusionWe hope this tutorial has given you some insight as to how a simple self service can be built using the jtel system. The logic can be changed and adapted as the use case requires. Here are some examples: Es wird wie folgt parametriert:
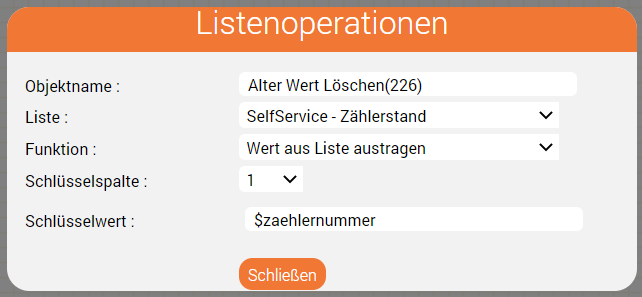
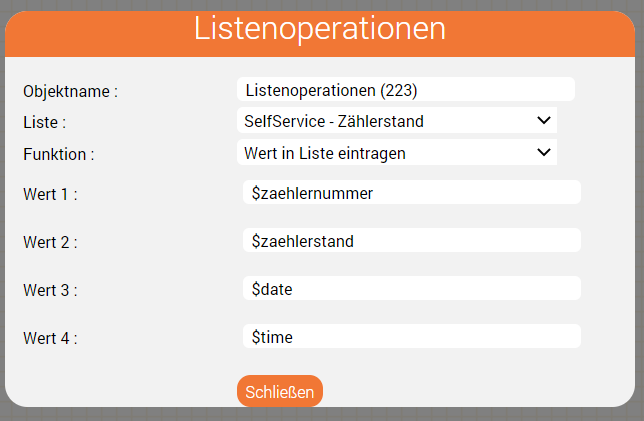
Einzelheiten zu diesem Objekt finden Sie hier: Ausgabe Variable Speichern des Ergebnisses: Alter Wert Löschen / Neu ErfassenDer Zählerstand wird in unserem Beispiel-Aufrufablauf in derselben Liste gespeichert. Dazu wird der alte Eintrag gelöscht und ein neuer Eintrag mit der gleichen Zählernummer hinzugefügt, wobei zwei Instanzen des Objekts Listenoperation verwendet werden. Das Entfernen des alten Eintrags wird wie folgt durchgeführt:
Und der neue Eintrag wird wie folgt hinzugefügt:
Für Ordnung sorgen: Sprung Eingabe nochmal / Eingabe nochmalDiese beiden Objekte werden verwendet, um einen Punkt im Routing zu definieren, zu dem der Anruffluss springen kann, und um den eigentlichen Sprung vom Ende des Anrufflusses zur Mitte durchzuführen. Natürlich könnte man die beiden Objekte auch einfach direkt miteinander verbinden, aber die Anzahl der beteiligten Konnektoren führt dazu, dass das Endergebnis etwas unordentlich aussehen könnte. Weitere Einzelheiten zu diesen beiden Objekten finden Sie auf den folgenden Seiten: Zielobjekt, Sprung zu Zielobjekt. SchlussfolgerungWir hoffen, dass dieses Tutorial Ihnen einen Einblick gegeben hat, wie ein einfacher Selbstbedienungsdienst mit dem jtel System erstellt werden kann. Die Logik kann je nach Anwendungsfall geändert und angepasst werden. Hier sind einige Beispiele:
|


| Sv translation | |||||||||||||||||||||||||||||||
|---|---|---|---|---|---|---|---|---|---|---|---|---|---|---|---|---|---|---|---|---|---|---|---|---|---|---|---|---|---|---|---|
| |||||||||||||||||||||||||||||||
Introduction:Avez-vous déjà réfléchi à la façon dont vous pouvez réduire la charge de travail de vos employés tout en atteignant un niveau élevé de satisfaction client ? Les self-services sont la réponse ! Ceux-ci peuvent vous aider à automatiser les processus et à activer le service client même en dehors des heures normales. À titre d'exemple, nous vous montrons comment créer une application en self-service pour enregistrer les relevés des compteurs d'électricité. Annonces nécessaires:Tout d'abord, les annonces nécessaires sont créées. Le tableau suivant montre les annoncerequises.
TTS Vous pouvez créer les invites rapidement et facilement à l'aide d'un moteur TTS si vous êtes abonné à notre service TTS. Ceci est montré dans la capture d'écran ci-dessous.
Liste - Vérification des numéros de compteur et enregistrement des résultatsUne liste est utilisée pour vérifier les numéros de compteur et stocker les résultats. La liste est pré-chargée avec tous les numéros de compteur existants. Cela peut, par exemple, être chargé manuellement dans le système ou importé à l'aide d'une tâche FTP. Les résultats de la liste de liste pourraient être traités automatiquement en exportant la liste vers un serveur FTP. Les champs de la liste sont les suivants :
This is shown in the screenshot below.
Call-Flow possible pour le self-serviceLe flux d'appels pour le self-service peut ressembler à ceci :
Une explication des objets importants utilisésIn this section we explain the key objects used in the call flow above and how it works. Note - not all objects are explained - a basic familiarity with the jtel IVR is assumed. Entrer le numéro du compteur / Entrer le relevé du compteur Ceux-ci utilisent des objets DTMF de chiffres d'entrée pour demander au client d'entrer le numéro de compteur et la lecture du compteur. Voici le paramétrage pour la saisie du numéro de compteur.
Un bip sonore est émis après l'invite, pour informer l'appelant qu'il est maintenant temps de commencer à taper le numéro du compteur (Play Tone). Cependant, Barge-In est également sélectionné de sorte que l'annonce n'a pas besoin d'être écoutée complètement, mais peut être interrompue en commençant à taper le numéro du compteur. Le nombre minimum et maximum de chiffres peut être utilisé pour un contrôle de plausibilité, par exemple, si le numéro de compteur peut avoir un maximum de 10 chiffres, cela peut être spécifié comme limite supérieure. Plus de détails sur cet objet peuvent être trouvés ici: Chiffre de saisie DTMF Vérifier le numéro de compteur La validité du numéro de compteur est vérifiée en recherchant la valeur - $input - dans la liste "Meter Readings". Tous les numéros de compteur doivent être chargés dans cette liste afin que le service puisse fonctionner comme construit ici.
Cet objet a deux sorties.
Plus de détails sur cet objet peuvent être trouvés ici: List Lookup Rappelez-vous les entrées: numerocompteur / relevecompteur Si le numéro de compteur est trouvé, nous devons nous en souvenir pour plus tard. Ceci est réalisé en enregistrant $input dans une variable $numerocompteur à l'aide de l'objet Declare Variable meternumber dans le flux d'appels ci-dessus.
De même, lorsque le relevé de compteur est entré, il est enregistré dans une variable $meterreading dans l'objet Déclarer la variable relevecompteur. De plus amples détails sur cet objet peuvent être trouvés ici : Declare Variable Dire le relevé de compteur actuel : dire relevé de compteur Il est paramétré comme ceci :
De plus amples détails sur cet objet peuvent être trouvés ici : Play Variable Enregistrement du résultat : Supprimer l'ancienne lecture / Ajouter une nouvelle lecture La lecture du compteur est enregistrée dans la même liste dans notre exemple de flux d'appels. Cela implique la suppression de l'ancienne entrée et l'ajout d'une nouvelle entrée avec le même numéro de compteur à l'aide de deux instances de l'objet List Functions. La suppression de l'ancienne entrée s'effectue comme ceci :
Et la nouvelle lecture est ajoutée comme ceci :
Garder les choses en ordre : sauter à nouveau l'entrée / entrer à nouveau Ces deux objets sont utilisés pour définir un point dans le routage, auquel le flux d'appels peut sauter, et pour effectuer le saut réel de la fin du flux d'appels au milieu. Bien sûr, on pourrait simplement connecter les deux objets directement ensemble, mais le nombre de connecteurs impliqués signifiera que le résultat final peut sembler quelque peu désordonné. Vous trouverez plus de détails sur ces deux objets dans les pages suivantes : Sauter à la cible, Target ConclusionNous espérons que ce tutoriel vous a donné un aperçu de la façon dont un simple libre-service peut être construit à l'aide du système jtel. La logique peut être modifiée et adaptée selon le cas d'utilisation. Voici quelques exemples:
|


