| Sv translation | |||||||||||||||||||||||||||||||
|---|---|---|---|---|---|---|---|---|---|---|---|---|---|---|---|---|---|---|---|---|---|---|---|---|---|---|---|---|---|---|---|
| |||||||||||||||||||||||||||||||
IntroductionHave you ever thought about how you can reduce the workload of your employees and still achieve a high level of customer satisfaction? Self services are the answer! These can help you automate processes and enable customer service even out of normal hours. As an example, we show you how to build a self service application for recording electricity meter readings!. Neccesary promptsFirst of all, the necessary prompts must be are created. The following table shows the prompts required.
TTSYou can create the prompts quickly and easily using a TTS engine if you have subscribed to our TTS service. This is shown in the screenshot below.
List - Checking Meter Numbers and Recording ResultsA list is used to check the meter numbers and store the results. The list is pre-loaded with all existing meter numbers. This can, for example, be manually loaded into the system, or imported using an FTP job. The results in the list list could be automatically processed by exporting the list to an FTP server. The fields in the list are as follows:
This is shown in the screenshot below.
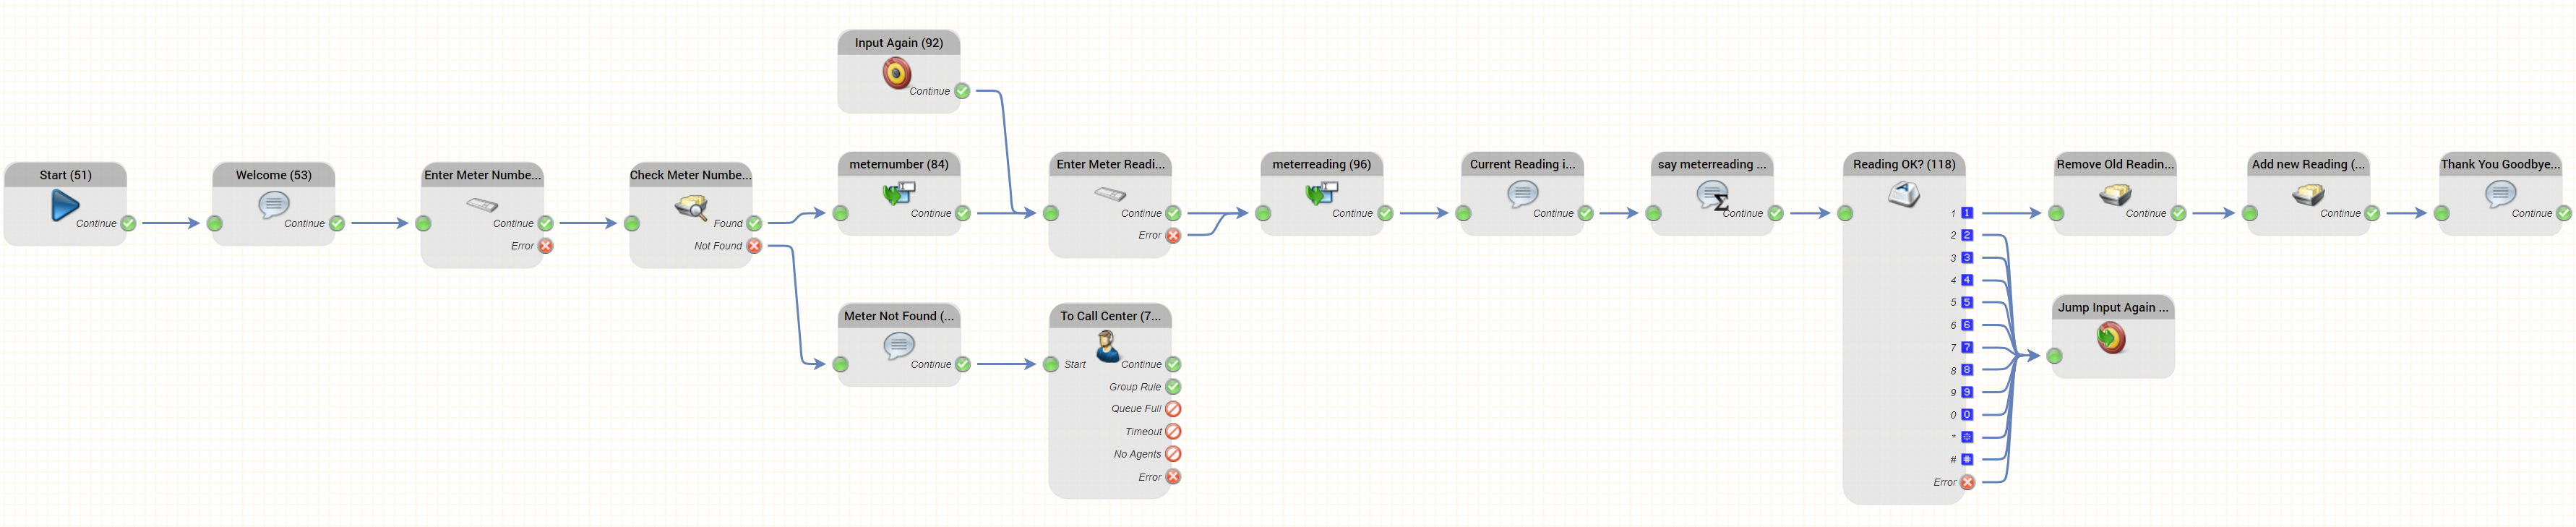
Possible Call-Flow for the Self Service
The call flow for the self service might look like this:
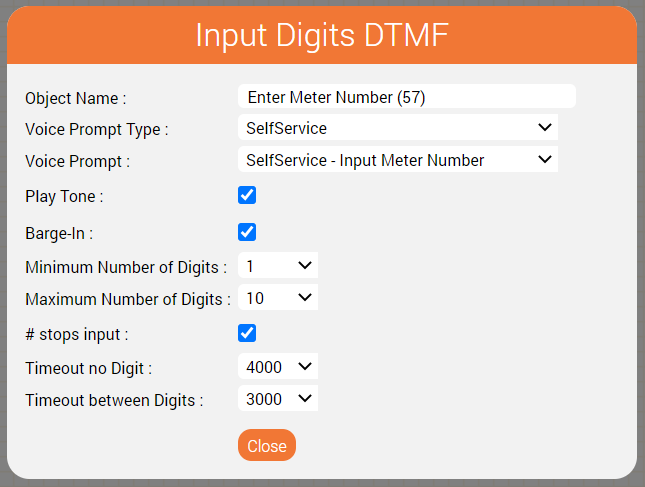
An Explanation of the Important Objects UsedIn this section we explain the key objects used in the call flow above and how it works. Note - not all objects are explained - a basic familiarity with the jtel IVR is assumed. Enter Meter Number/ Enter Meter ReadingThese use Input This uses an Input Digits DTMF object objects to ask the customer to enter the meter number and the meter reading.
The counter number can only be entered after the beep because the check mark behind the field Beep is set. Here is the parameterisation for entering the meter number.
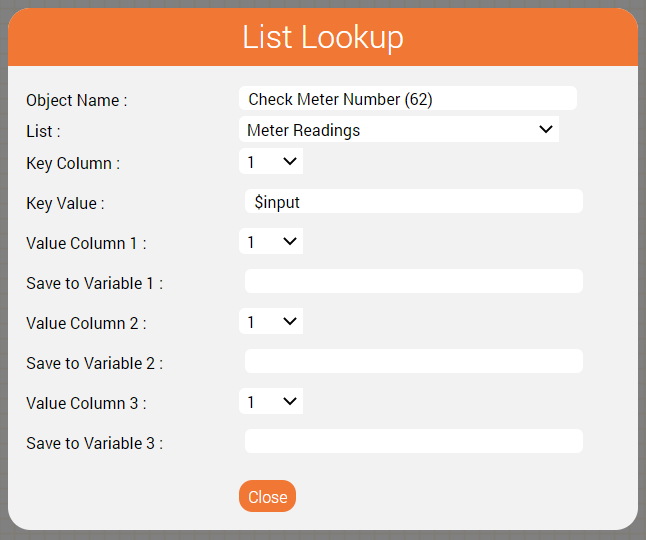
An audio beep is played after the prompt, to inform the caller that now is the time to start typing in the meter number (Play Tone). However, Barge-In is also selected so the Barge-In means that this announcement does not have to be listened to completely, but can be interrupted by starting to type in the meter number. The minimum and maximum number of digits can be used for a plausibility check, for example, if the meter number may have a maximum of 10 digits then this can be specified as the upper limit. Further explanations details on this object can be found in the WIKI under the following link:here: Input Digits DTMF - jtel Portal WIKI - jtel Public WIKI 2. Object List Lookup - This object checks the input of the meter number ($input) against the entries in the Self Service Meter Reading list. Check Meter NumberThe meter number is checked for validity by looking up the value - $input - in the List "Meter Readings". All meter numbers should be loaded into this list in order that the service may work as built here.
This object has two outputs.
Further explanations details on this object can be found in the WIKI under the following link. following link: List Lookup - jtel Portal WIKI - jtel Public WIKI 3. Objekt Declare variable - Saving the entered meter number in the variable meter number, whereby the caller's input is in the variable $input and is therefore used as the initial value.
Further explanations can be found in the WIKI under the following link. following link: Declare Variable - jtel Portal WIKI - jtel Public WIKI 4. Object Play voice in combination with the object Output Variable
Further explanations can be found in the WIKI under the following link. following link: Play Voice - jtel Portal WIKI - jtel Public WIKI To play the input back to the caller, an announcement is played that reads out the variable counter reading.
Further explanations can be found in the WIKI under the following link. following link: Play Variable - jtel Portal WIKI - jtel Public WIKI 5. Object Input Menu DTMF This object is used to confirm that the counter reading was entered correctly by pressing selection 1 or to repeat the entry by pressing any other selection.
Further explanations can be found in the WIKI under the following link. following link: Input Menu DTMF - jtel Portal WIKI - jtel Public WIKI 6. Object Jump to Target This object is used to jump to a defined point in the routing. In our example, to the target object Input meter reading.
Further explanations can be found in the WIKI under the following link. following link: Jump to Target - jtel Portal WIKI - jtel Public WIKI 7. Object target oject A target object is defined when the routing becomes complex and the arrows between the objects are no longer comprehensible at first glance.
Further explanations can be found in the WIKI under the following link. following link: Target - jtel Portal WIKI - jtel Public WIKI 8. Object Log Entry Durch die Nutzung dieses Objektes wird ein Logeintrag im Callog erzeugt und die Fehleranalyse erleichtert.
Further explanations can be found in the WIKI under the following link. following link: Logeintrag - jtel Portal WIKI - jtel Public WIKIhere: List Lookup Remember the inputs: meternumber / meterreadingIf the meter number is found, we need to remember this for later. This is achieved by saving $input to a variable $meternumber using the Declare Variable object meternumber in the call flow above.
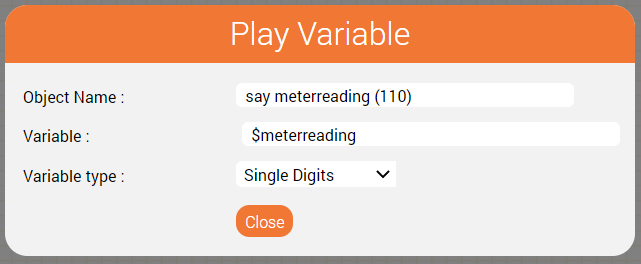
Similarly, when the meter reading is entered, this is saved to a variable $meterreading in the Declare Variable object meterreading. Further details on this object can be found here: Declare Variable Saying the Current Meterreading: say meterreadingThis object is used to output the current meter reading as a concatenation of single digits. It is used after the "Current Reading is" prompt is played. It is parameterised like this:
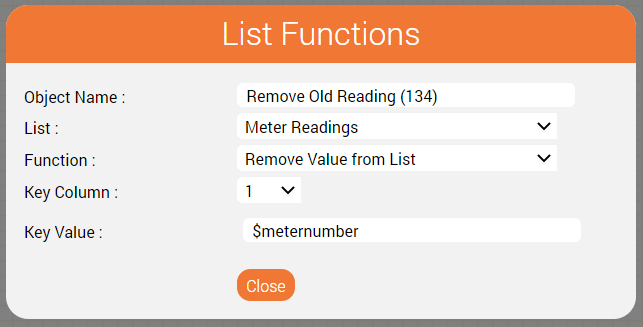
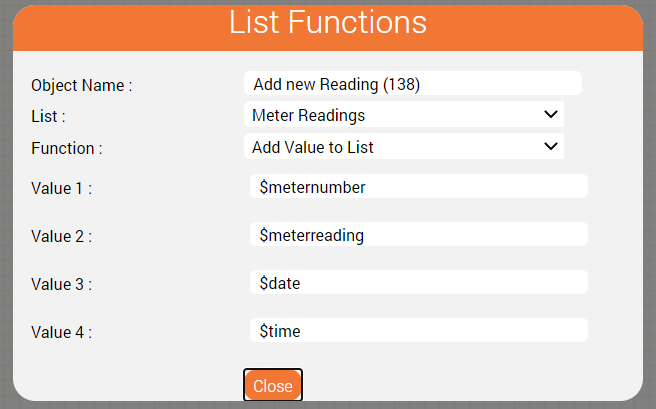
Saving the result: Remove old Reading / Add new ReadingThe meter reading is saved to the same list in our example call flow. This involves deleting the old entry and adding a new entry with the same meter number using two instances of the List Functions object. Removing the old entry is performed like this:
And the new reading is added like this:
Keeping it Tidy: Jump Input Again / Input AgainThese two objects are used to define a point in the routing, to which the call flow can jump, and to perform the actual jump from the end of the call flow to the middle. Of course, one could just connect the two objects directly together, but the number of connectors involved will mean the end result might look somewhat untidy. Further details on these two objects are found on the following pages: Jump to Target, Target ConclusionWe hope this tutorial has given you some insight as to how a simple self service can be built using the jtel system. The logic can be changed and adapted as the use case requires. Here are some examples:
|


| Sv translation | ||
|---|---|---|
| ||
EinführungHaben Sie jemals darüber nachgedacht wie Sie Ihre Mitarbeiter entlasten können und trotzdem eine enorme Kundenzufriedenheit erreichen können? Haben Sie Prozesse, die Sie automatisieren können oder wollen? Wir zeigen Ihnen anhand dieses Beispiels wie Sie zum Beispiel die Eingabe eines Zählerstandes automatisieren können. Notwendige Ansagen:
2. Fehleransage Zählernummer falsch - Hinweis, dass die eingegebene Zählernummer nicht existiert.
3. Eingabe Zählerstand - Aufforderung zur Eingabe des Zählerstandes
4. Eingegebener Zählerstand - Ansage um den Eingabewert nochmal zu wiederholen.
5. Zählerstand OK? - Ansage, um dem Anrufer die Möglichkeit zu geben, die Eingabe zu bestätigen oder nochmal zu wiederholen.
6. Danke und auf Wiederhören - Verabschiedung
Listen
Die Einträge in der Liste sind folgend: Feld 1 = Zählerstandsnummer Feld 2 = Zählerstand Feld 3 = Datum an dem der Zählerstand eingegeben wurde Feld 4 = Uhrzeit zu der der Zählerstand eingegeben wurde.
Mögliche Konfiguration des Self-Service
Erklärung der verwendeten Objekte1.Objekt Eingabe Ziffern MFV - Aufforderung zur Eingabe der Zählernummer bzw. des Zählerstandes
Die Zählernummer kann erst nach dem Signalton eingegeben werden, da der Haken hinter dem Feld Signalton gesetzt ist. Barge-In bedeutet, dass diese Ansage nicht vollständig angehört werden muss, sondern unterbrechbar ist. Über die Mindestanzahl und Maximalanzahl der Ziffern kann eine Plausibilitäts-Prüfung erfolgen, wenn zum Beispiel die Zählernummer maximal 10 Stellen haben darf. Weitere Erklärungen finden sich im WIKI unter dem folgenden Link: Eingabe Ziffern MFV - jtel Portal WIKI - jtel Public WIKI 2. Objekt Liste prüfen - Dieses Objekt prüft die Eingabe der Zählernummer ($input) gegen die Einträge der Liste Self Service Zählerstand.
Dieses Objekt hat zwei Ausgänge. Gefunden - die Eingabe der Zählernummer wurde mit der Liste verglichen und die Zählernummer wurde gefunden. Nicht gefunden - die Eingabe wurde mit der Liste verglichen und nicht gefunden. In diesem Fall kann keine Self Service durchgeführt werden und der Anrufer wird in unserem Beispiel zu einem Mitarbeiter verbunden mit dem Hinweis, dass die Zählersnummer nicht gefunden wurde. Weitere Erklärungen finden sich im WIKI unter dem folgenden Link: Liste Prüfen - jtel Portal WIKI - jtel Public WIKI 3. Objekt Variablendeklaration - Speichern der eingegebenen Zählernummer in der Variablen Zählernummer, wobei die Eingabe des Anrufers in der Variablen $input steht und deshalb als Initialwert genutzt wird.
Weitere Erklärungen finden sich im WIKI unter dem folgenden Link: Variablendeklaration - jtel Portal WIKI - jtel Public WIKI 4. Objekt Ansage in Kombination mit dem Objekt Ausgabe Variable
Weitere Erklärungen finden sich im WIKI unter dem folgenden Link: Ausgabe Ansage - jtel Portal WIKI - jtel Public WIKI Um dem Anrufer die Eingabe nochmal vorzuspielen, wird eine Ansage gespielt, die die Variable Zählerstand vorliest.
Weitere Erklärungen finden sich im WIKI unter dem folgenden Link: Ausgabe Variable - jtel Portal WIKI - jtel Public WIKI 5. Objekt Eingabe Menü MFV Eingabe Menü MFV - jtel Portal WIKI - jtel Public WIKI Dieses Objekt wird genutzt, um durch Drücken der Auswahl 1, zu bestätigen, dass die Eingabe des Zählerstandes korrekt war oder durch drücken jeder anderen Auswahl die Eingabe zu wiederholen.
Weitere Erklärungen finden sich im WIKI unter dem folgenden Link: Eingabe Menü MFV - jtel Portal WIKI - jtel Public WIKI 6. Objekt Sprung zu Zielobjekt Dieses Objekt wird genutzt, um im Routing an einen definierten Punkt zu springen. In unserem Beispiel zum Zielobjekt Eingabe Zählerstand.
Weitere Erklärungen finden sich im WIKI unter dem folgenden Link: Sprung zu Zielobjekt - jtel Portal WIKI - jtel Public WIKI 7. Objekt Zielobjekt Ein Zielobjekt wird dann definiert, wenn das Routing komplex wird und die Pfeile zwischen den Objekten nicht mehr auf den ersten Blick nachvollziehbar sind.
Weitere Erklärungen finden sich im WIKI unter dem folgenden Link: Zielobjekt - jtel Portal WIKI - jtel Public WIKI 8. Objekt Logeintrag Durch die Nutzung dieses Objektes wird ein Logeintrag im Callog erzeugt und die Fehleranalyse erleichtert.
Weitere Erklärungen finden sich im WIKI unter dem folgenden Link: |


