| Sv translation | ||
|---|---|---|
| ||
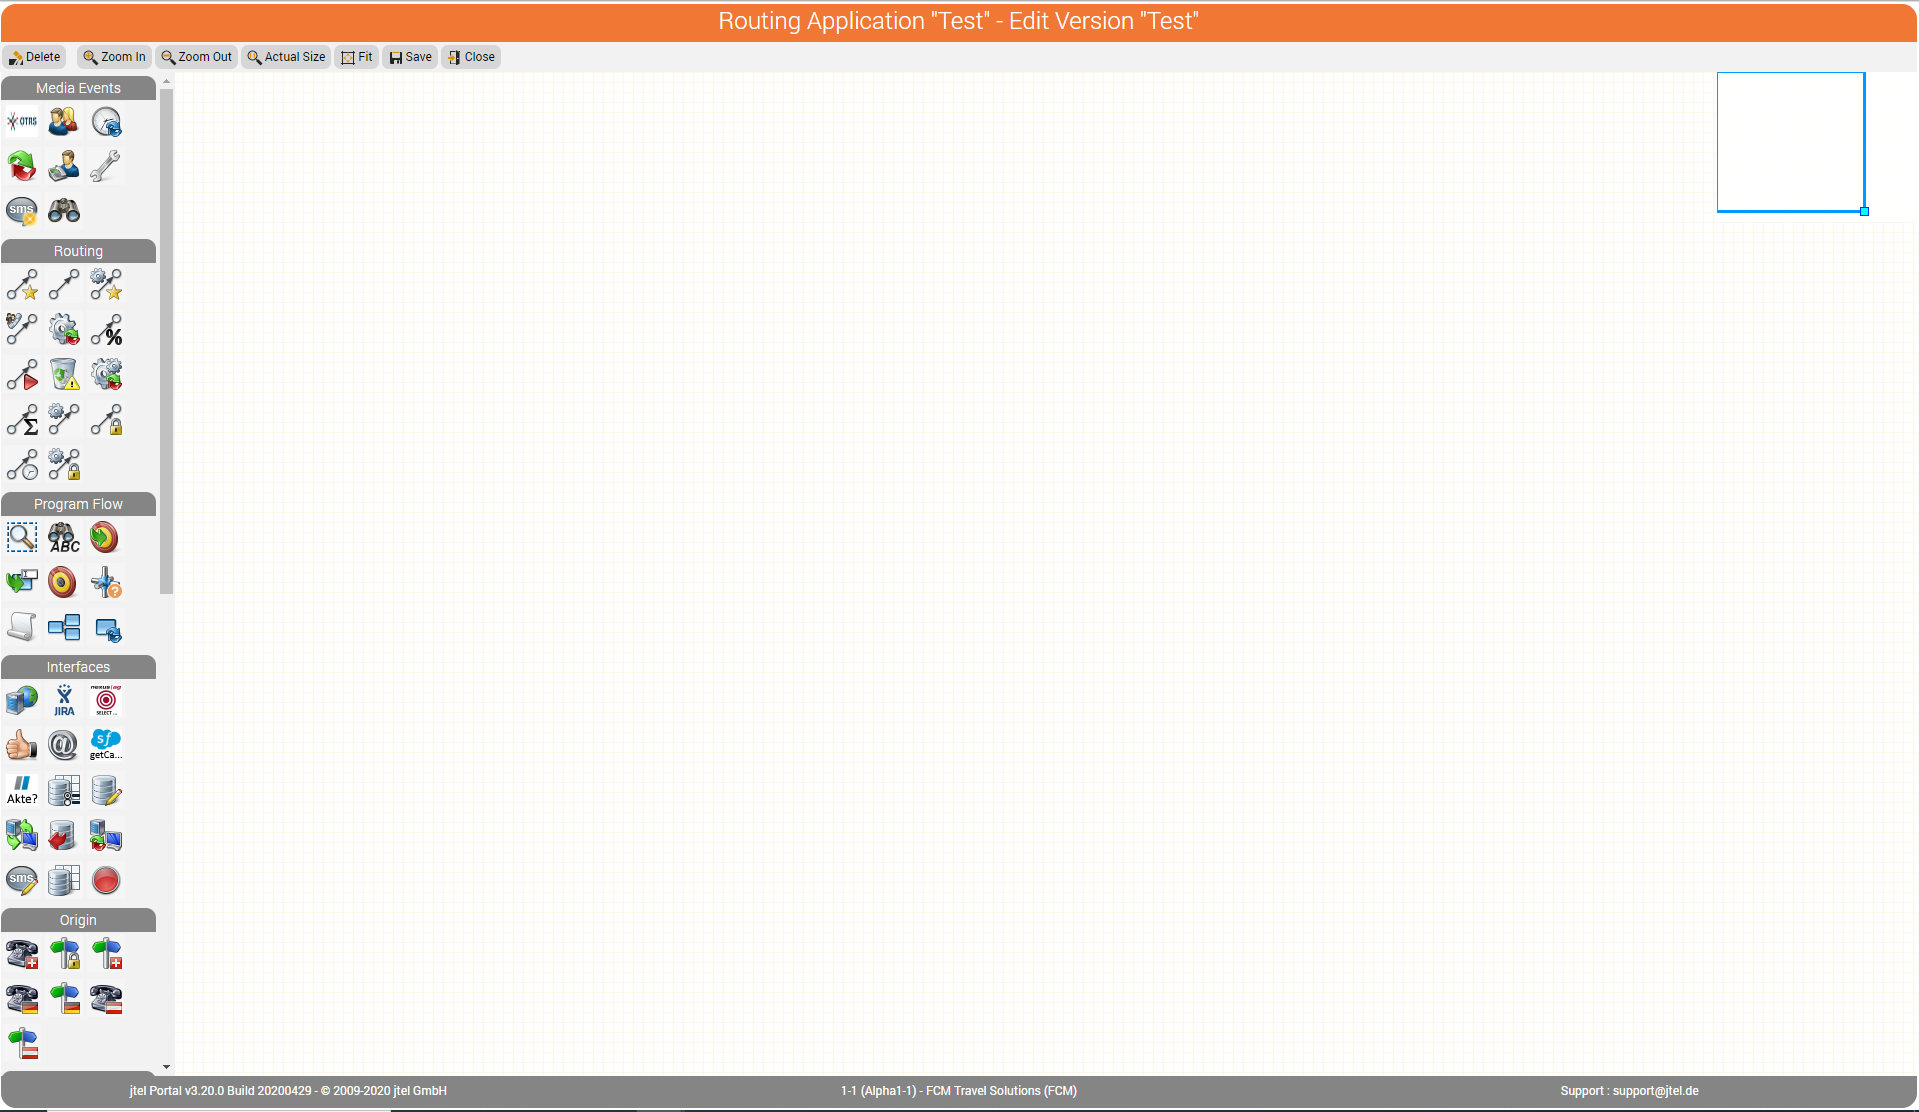
In the version control screen, click Edit in the row of the version you want to edit. After a short load time, a new window is shown containing the graphical editor for routing applications. Note: You must allow for the opening of popup windows in your browser. If necessary, manually change your browser options accordingly. In Safari, you will not always be warned that a popup has been surpressed. Tip: Whilst you are working in the routing application, you can continue to work in the first browser window. This is, for example, useful if you need to create an additional prompt or destination number. Use the first browser window to create these. When you open an object in the editor window, the newly created elements will be available. The editor offers several functions at the top of the screen as buttons. Note, that with every Save of the routing application, a new version is automatically created in version control. If you want to call this application, it must be marked as the active, or test application. On the left side of the screen you can see a library of objects, which are depicted by symbols. If you move the mouse over the object, the name of the type is displayed. The large chequered area is the work area which you use to position routing objects. The work area is unlimited in size, and can be moved in any direction by moving the blue rectangle on the top right. You do not have to try to save space when laying out your program.
To create the example program, proceed as follows:
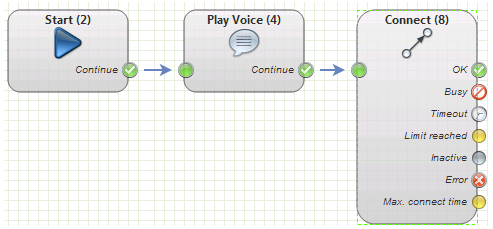
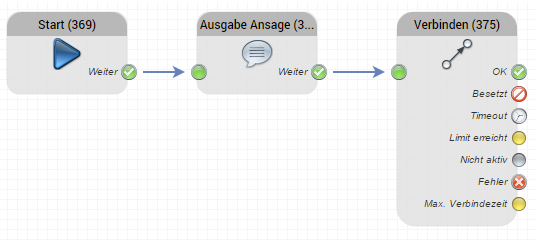
The routing program should look something like this (using the original names of the objects):
If a required parameter is not provided, the object turns red and an error symbol is shown. Yellow signifies objects where a recommended setting is missing, a yellow warning symbol is shown. Information on the error or recommended parameter settings is shown when you move the mouse cursor over the error or warning symbol. That concludes programming a simple routing application. To activate the newly created version, click on active in the corresponding row in the table. In the Active column, you will now see Yes. In the Test column, you set Yes if you want callers from the test number (Test CLI) to access this version. This makes is possible for the programmer of a service to work on a different version of the application to that which normal callers access. The next step is to configure the application to run on a service number. |
| Sv translation | ||
|---|---|---|
| ||
In der Versionsverwaltung klicken Sie Bearbeiten in der Zeile der zu bearbeitenden Version. Nach kurzer Wartezeit erscheint in einem neuen Browserfenster der grafische Editor für Routingapplikationen. Hinweis: Das Öffnen von Pop-up-Fenstern muss in Ihrem Browser erlaubt sein. Passen Sie ggf. die Browseroptionen manuell an. Beim Browser Safari werden Sie auf Pop-ups nicht hingewiesen. Tipp: Während der Arbeit im Editor können Sie gleichzeitig auch im ersten Fenster arbeiten. Dies ist nützlich, wenn Sie erkennen, dass eine Ansage oder eine weitere Zielrufnummer fehlt. Legen Sie diese dann im ersten Fenster im System an. Wenn Sie anschließend im Editor ein Objekt öffnen, sind die neu angelegten Parameter bereits verfügbar. Der Editor bietet am oberen Rand einige Schaltflächen mit Befehlen. Beachten Sie, dass bei jedem Speichern eine neue Version der Routingapplikation angelegt wird. Wenn Sie diese anrufen möchten, muss sie als aktive oder Test-Applikation gekennzeichnet werden. Am linken Rand sehen Sie eine Bibliothek von Objekten, die durch Symbole dargestellt sind. Wenn Sie die Maus auf ein Objekt bewegen, wird der Name dieses Typs unter dem Cursor angezeigt. Die große weiße Fläche ist die Arbeitsfläche, auf der die für Ihr Routing benötigten Objekte angeordnet werden. Die Arbeitsfläche ist beliebig groß und kann in jede Richtung verlängert werden, indem Sie das blaue Rechteck oben rechts verschieben. Sie müssen sich also keine Gedanken über eine platzsparende Anordnung machen.
Für das Beispielprogramm gehen Sie wie folgt vor:
Das Routing sieht nun in etwa so aus (mit den Originalnamen der Objekte):
Wenn ein zwingend notwendiger Parameter nicht angegeben wurde, wird das Objekt rot hervorgehoben und mit einem Fehler-Symbol versehen. Gelb hervorgehoben werden Objekte, wenn ein empfohlener Parameter fehlt. Informationen zu fehlenden Parametern werden angezeigt, wenn Sie mit der Maus über das Fehler-Symbol fahren. Damit ist eine einfache Routingapplikation fertig programmiert. Aktivieren Sie nun in der Tabelle der Versionen die eben bearbeitete Version, indem Sie in der entsprechenden Zeile auf Aktiv klicken. In der Spalte Aktiv steht nun Ja. In der Spalte Test sollte dann Ja stehen, wenn Sie wollen, dass Anrufe von der Testrufnummer (Applikation testen durch) diese Version nutzen. So ist es möglich, dass der Programmierer des Dienstes eine andere Version der Applikation erstellen kann während Anrufer im System die aktive Version der Applikation erreichen. Als nächstes muss die Applikation einer Servicerufnummer zugeordnet werden. |
| Sv translation | ||
|---|---|---|
| ||
Dans l'écran de contrôle des versions, cliquez sur Modifier dans la rangée de la version que vous voulez éditer. Après un court temps de chargement, une nouvelle fenêtre s'affiche contenant l'éditeur graphique pour les applications de routage. Note : Vous devez permettre l'ouverture de fenêtres popup dans votre navigateur. Si nécessaire, modifiez manuellement les options de votre navigateur en conséquence. Dans Safari, vous ne serez pas toujours averti qu'un popup a été surchargé. Conseil: Pendant que vous travaillez dans l'application de routage, vous pouvez continuer à travailler dans la première fenêtre du navigateur. Cela est utile, par exemple, si vous devez créer un numéro d'appel ou de destination supplémentaire. Utilisez la première fenêtre du navigateur pour les créer. Lorsque vous ouvrez un objet dans la fenêtre de l'éditeur, les éléments nouvellement créés seront disponibles. L'éditeur offre plusieurs fonctions en haut de l'écran sous forme de boutons. Notez qu'avec chaque sauvegarde de l'application de routage, une nouvelle version est automatiquement créée dans le contrôle de version. Si vous voulez appeler cette application, elle doit être marquée comme application active, ou application test. Sur le côté gauche de l'écran, vous pouvez voir une bibliothèque d'objets, qui sont représentés par des symboles. Si vous déplacez la souris sur l'objet, le nom du type est affiché. La grande zone en damier est la zone de travail que vous utilisez pour positionner les objets de routage. La zone de travail est de taille illimitée et peut être déplacée dans n'importe quelle direction en déplaçant le rectangle bleu en haut à droite. Vous n'avez pas à essayer de gagner de la place lors de l'élaboration de votre programme.
Pour créer le programme d'exemple, procédez comme suit :
Le programme de routage devrait ressembler à ceci (en utilisant les noms originaux des objets) :
Si un paramètre requis n'est pas fourni, l'objet devient rouge et un symbole d'erreur est affiché. Le jaune signifie les objets pour lesquels un réglage recommandé est manquant, un symbole d'avertissement jaune est affiché. Les informations sur l'erreur ou les paramètres recommandés s'affichent lorsque vous déplacez le curseur de la souris sur le symbole d'erreur ou d'avertissement. Cela conclut la programmation d'une simple application de routage. Pour activer la version nouvellement créée, cliquez sur actif dans la ligne correspondante du tableau. Dans la colonne Actif, vous verrez maintenant Oui. Dans la colonne Test, vous définissez Oui si vous voulez que les appelants du numéro de test (Test CLI) accèdent à cette version. Cela permet au programmeur d'un service de travailler sur une version de l'application différente de celle à laquelle les appelants normaux ont accès. L'étape suivante consiste à configurer l'application pour qu'elle fonctionne sur un numéro de service. |