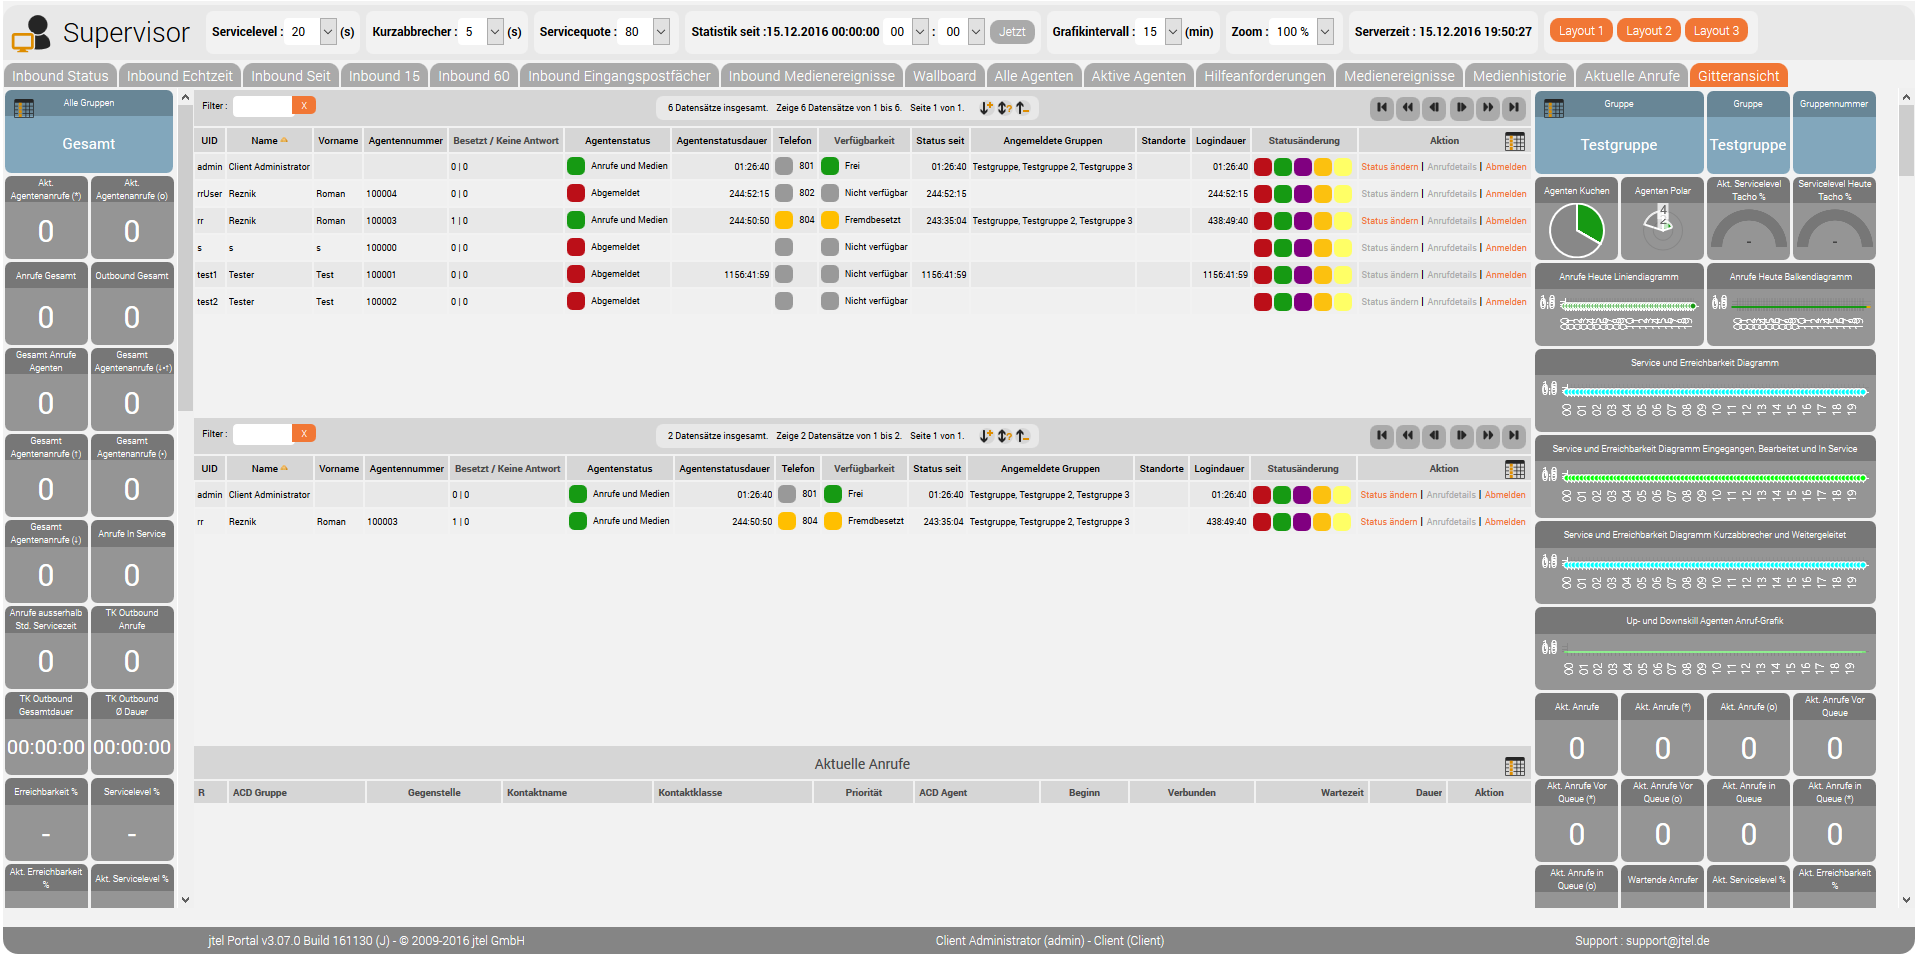
The Supervisor Grid provides a way to display some items in a grid layout.
See the Supported Browsers page at "Grid" for a list of compatible browsers.
The first time you call the Supervisor Grid, the layout is blank. By clicking Layout 1, Layout 2 and Layout 3, you can choose a layout and the settings will be created.
The settings themselves can be made either in the Users - User master data (current user) or for each user in the "Settings" tab, then simply filter by "Grid".
You can completely customise the layout. It is also possible to create the layout from scratch. Only the settings have to be entered.
From release 3.31:
The supervisor grid loading process has been enhanced to deliver a more personalized and consistent user experience. When the supervisor grid is accessed, the system first checks for any saved user-specific grid layout and loads it if available. If no user settings are found, it applies the default Grid 1 settings from the client parameters. If neither user settings nor client parameters exist, the standard Grid 1 layout is automatically saved to both the client and user settings. Additionally, when users switch between different grid layouts using the Grid 1 to Grid 3 buttons, the system will load the corresponding settings from the client parameters if they exist; otherwise, it will load and save the default settings for the selected grid. These improvements ensure that users have a seamless experience when managing supervisor grids.
Authorization
This feature requires the permission portal.Acd.AcdSupervisor.Grid
Layout Principle
The elements are arranged in a grid.
The width corresponds to 100% of the page width, and can be divided into a number of columns.
The height of the grid corresponds to a number of lines with a certain height. If you specify more lines than fit on the page, a scroll bar is rendered. The following settings can be made:
| Setting | Example | Description |
|---|---|---|
| AcdSupervisor.Grid.Columns | 10 | Number of logical columns. |
| AcdSupervisor.Grid.Rows | 20 | Number of logical lines. |
AcdSupervisor.Grid.RowHeight | 41px | The line height. Valid units can be found in the CSS specification, for example, px or em. Note: % currently does not work. This is due to the early stadium of the grid layout in CSS. |
Elements
The following elements can be inserted:
| Element Names | Content |
|---|---|
| AgentsActive | Table "Active Agents". |
| AgentsAll | Table "All Agents" |
| CockpitVariables | Wallboard "Cockpit Variables". |
| CurrentCalls | Table "Current Calls". |
| DiallerCampaigns | Tabelle "Dialler Campaigns". |
| HelpRequests | Table "Help Requests". |
| InboxesGroupData | Table "Inbound Mailboxes". |
| MediaEvents | Table "Inbound Media Events". |
| MediaEventsList | Table "Media Events". |
| MediaHistoryList | Table "Media History". |
| RealtimeGroupData.AgentsAndSkills | Table "Agents" and "Skills" from the real-time statistics. |
| RealtimeGroupData | Table from the "Inbound Real-Time" tab. |
| TodaysGroupData.Skills | Table "Skills" from the daily statistics. |
| TodaysGroupData.Skills15 | Table "Skills" from "Daily Statistics 15 Minuten". |
| TodaysGroupData.Skills60 | Table "Skills" from "Daily Statistics 60 Minuten". |
| TodaysGroupData | Table "Daily statistics". |
| TodaysGroupData15 | Table "Daily statistics 15 minutes". |
| TodaysGroupData60 | Table "Daily statistics 60 minutes". |
| WallboardAll | The wallboard, area "Total". |
| WallboardDiallerCampaigns | The wallboard, area "Dialler Campaigns". |
| WallboardGroups | The wallboard, area "Group". |
Elements Indication
The elements are easily set with the setting AcdSupervisor.Grid.1, AcdSupervisor.Grid.2 and continuously defined. The numbers must be continuous, if there is a gap, no further elements are drawn.
The following syntax is used to specify the element:
ElementName, X, Y, Width, Height, Scaling
The following table is helpful when specifying the X / Y coordinate. The zero point is left above.
| X=1, Y=1 | X=2, Y=1 | X=3, Y=1 |
|---|---|---|
| X=1, Y=2 | X=2, Y=2 | X=3, Y=2 |
| X=1, Y=3 | X=2, Y=3 | X=3, Y=3 |
ElementName
Name of the item from the list of items.
X
Specify the X coordinate in the virtual grid where the element is to be drawn.
Y
Specify the Y coordinate in the virtual grid where the element is to be drawn.
Width
The width of the element, as the number of virtual columns.
Height
The height of the element, as the number of virtual rows.
Scaling
The scaling of the element, as floating-point number with point (no comma use!).
For example, if you specify 0.1, the element is drawn in a tenth of its normal size.
If you specify 5, the element is drawn five times as large.
Example
The following layout is the screenshot below.
| Setting | Value |
|---|---|
| AcdSupervisor.Grid.1 | WallboardAll,1,1,1,20,0.42 |
| AcdSupervisor.Grid.2 | WallboardGroups,9,1,2,20,0.42 |
| AcdSupervisor.Grid.3 | AgentsAll,2,1,7,8,0.75 |
| AcdSupervisor.Grid.4 | AgentsActive,2,9,7,8,0.75 |
| AcdSupervisor.Grid.5 | CurrentCalls,2,17,7,4,0.75 |
| AcdSupervisor.Grid.Columns | 10 |
| AcdSupervisor.Grid.RowHeight | 41px |
| AcdSupervisor.Grid.Rows | 20 |
