Versions Compared

Key

  • This line was added.
  • This line was removed.
  • Formatting was changed.
Sv translation
languageen


Info

The Starface connector must be installed or at least ready to be configured on the telephony server under C:\ drive to complete the following steps

Introduction

To run the jtel starface connector and connect to starface via https, a certificate is required. 

Create Root Certificate

To create the certificate, use a CMD as Administrator. Change to Starface directory and into "Install" and run the command.

Warning

Caution password


Code Block
# Change directory
cd C:\jtelStarface6v2SOAPWindowsService\Install
# Install
makecert.exe -sv SignRoot.pvk -cy authority -r signroot.cer -a sha1 -n "CN=JTEL" -ss my -sr localmachine

Create self-signed Certificate

To then create the self-signed version, run the following command in the same Administrator CMD window

Info

The password will now be required


Code Block
makecert.exe -iv SignRoot.pvk -ic signroot.cer -cy end -pe -n CN="localhost" -eku 1.3.6.1.5.5.7.3.1,1.3.6.1.5.5.7.3.2 -ss my -sr localmachine -sky exchange -sp "Microsoft RSA SChannel Cryptographic Provider" -sy 12

Extract the certificate-hash

Navigate through windows to locate your new self-signed certificate and extract the hash value

Register the service Certificate for the URL

Replace "<hash>" with the hash value in the window and execute the command in an Administrator CMD

Code Block
netsh http add sslcert ipport=0.0.0.0:56745 certhash=<hash> appid={27ff64b1-2005-4a91-9c96-44d1fe51f209}

Test

use the following URL in any browser to test 

Code Block
https://localhost:56745/jtelStarface6v2SOAPServiceLibrary/JTELStarface6v2SOAPService


Sv translation
languagede


Info

Der Starface Connector muss auf dem Telefonie-Server unter C:\ Laufwerk installiert oder zumindest konfigurationsbereit sein, um die folgenden Schritte durchzuführen

Einführung

Um den jtel starface connector auszuführen und sich mit starface über https zu verbinden, wird ein Zertifikat benötigt. 

Root Zertifikat Erstellen

Um das Zertifikat zu erstellen, verwenden Sie eine CMD als Administrator. Wechseln Sie in das Starface-Verzeichnis und führen Sie unter "Installieren" den Befehl aus.

Warning

Achtung passwort


Code Block
# Verzeichnis ändern
cd C:\jtelStarface6v2SOAPWindowsService\Install
# Installieren
makecert.exe -sv SignRoot.pvk -cy authority -r signroot.cer -a sha1 -n "CN=JTEL" -ss my -sr localmachine

Selbst Signiertes Zertifikat Erstellen

Um dann die selbstsignierte Version zu erstellen, führen Sie den folgenden Befehl im gleichen Administrator-CMD-Fenster aus

Info

Das Kennwort ist nun erforderlich


Code Block
makecert.exe -iv SignRoot.pvk -ic signroot.cer -cy end -pe -n CN="localhost" -eku 1.3.6.1.5.5.7.3.1,1.3.6.1.5.5.7.3.2 -ss my -sr localmachine -sky exchange -sp "Microsoft RSA SChannel Cryptographic Provider" -sy 12

Zertifikat-Hash Extrahieren

Navigieren Sie durch die Fenster, um Ihr neues selbstsigniertes Zertifikat zu finden, und extrahieren Sie den Hash-Wert

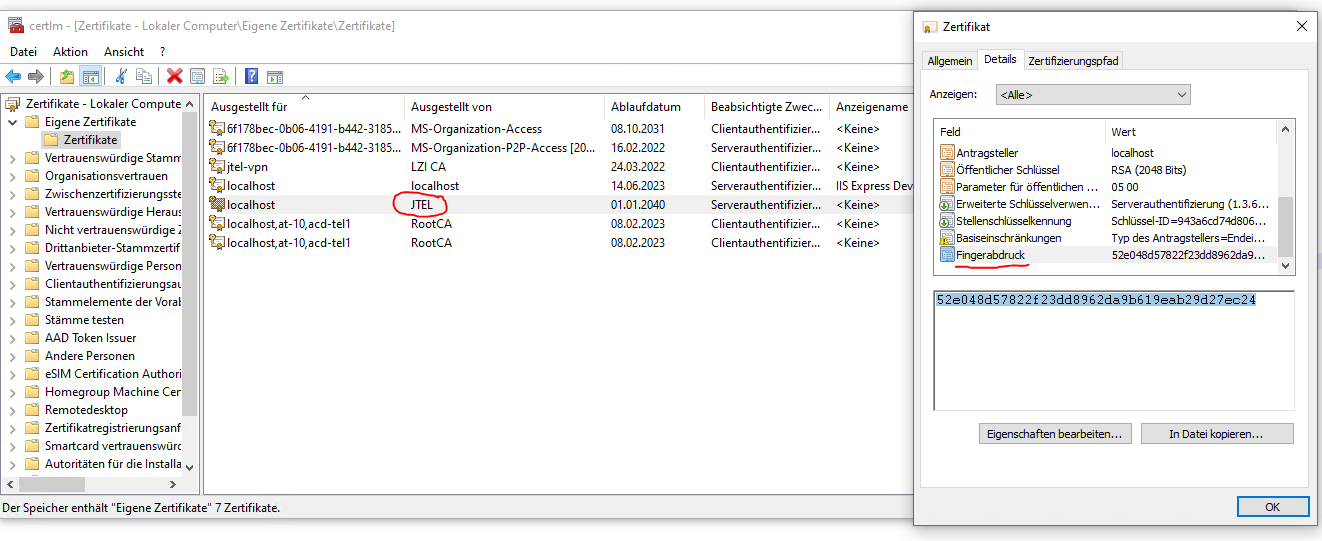
Registrieren Sie das Dienstzertifikat für die URL

Ersetzen Sie "<hash>" durch den Hash-Wert im Fenster und führen Sie den Befehl in einer Administrator-CMD aus

Code Block
netsh http add sslcert ipport=0.0.0.0:56745 certhash=<hash> appid={27ff64b1-2005-4a91-9c96-44d1fe51f209}

Test

Verwenden Sie zum Testen die folgende URL in einem beliebigen Browser 

Code Block
https://localhost:56745/jtelStarface6v2SOAPServiceLibrary/JTELStarface6v2SOAPService


Sv translation
languagefr


Warning
titleTravaux en cours

La page suivante est un travail en cours.