Versions Compared

Key

  • This line was added.
  • This line was removed.
  • Formatting was changed.
Comment: Content imported from a Scroll Translations translation file.
Sv translation
languageen
  1. Download and install the VMWare VSphere Client to a Windows machine, preferably on the customer installation (not the local machine via the VPN - this involves transferring a huge amount of data).

  2. Start the VSphere Client and connect to the ESXi Server from which the machine should be exported.

  3. UNMOUNT the CD-ROM of the virtual machine. This is VERY important. Just change to the client CD-ROM. 


  4. Shutdown the virtual machine.

  5. Select the virtual machine, and then in the menu select File ... Export ... OVF Template. 

  6. Export as a single file OVA.


  7. Transfer the file to a machine "close" to the second ESXi server (in network terms).

  8. Import the OVA to the virtual machine. You can choose the storage on which it should be stored, and if necessary, the mapping of the network interfaces. The rest of the options are mostly self-explanatory.

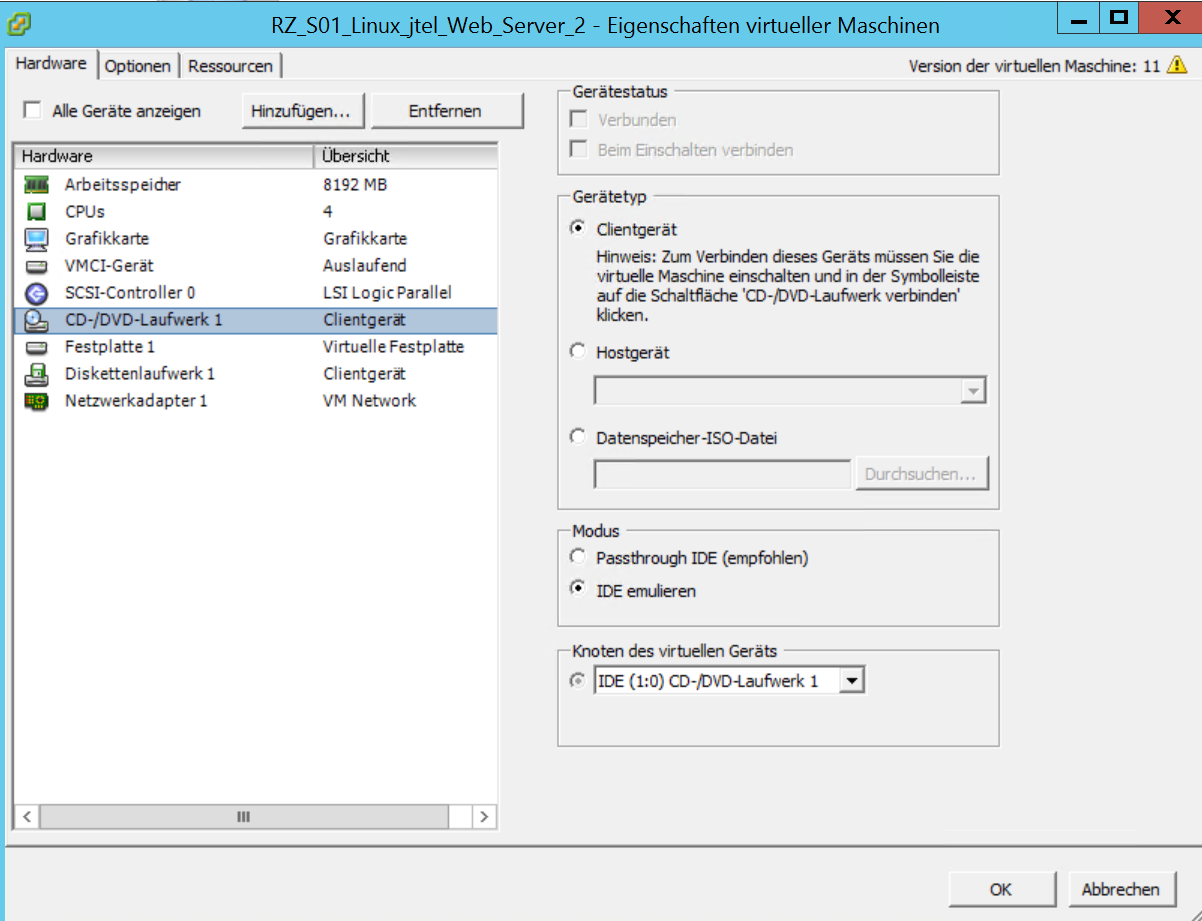
  9. For Linux Machines, you will need to restart the network from the console. Edit the VM settings, and make a note of the MAC Address of the network card.

    1. Start the machine, and open the console of the machine in the VMWare ESXi Client.

    2. Login to the VM. Type ifconfig
      If everything has worked, the machine will be on the network already, and you are done.

    3. Edit the VM Settings in the VSphere Client, and make a note of the MAC address. 

    4. Edit /etc/sysconfig/network-scripts/ifcfg-eth0
      Change the MAC Address of the network card.

    5. Edit /etc/udev/rules.d/70-persistent-net.rules
      Probably, there is a new entry for the network card, which is now eth1, and the old MAC address is in ETH0, like this:


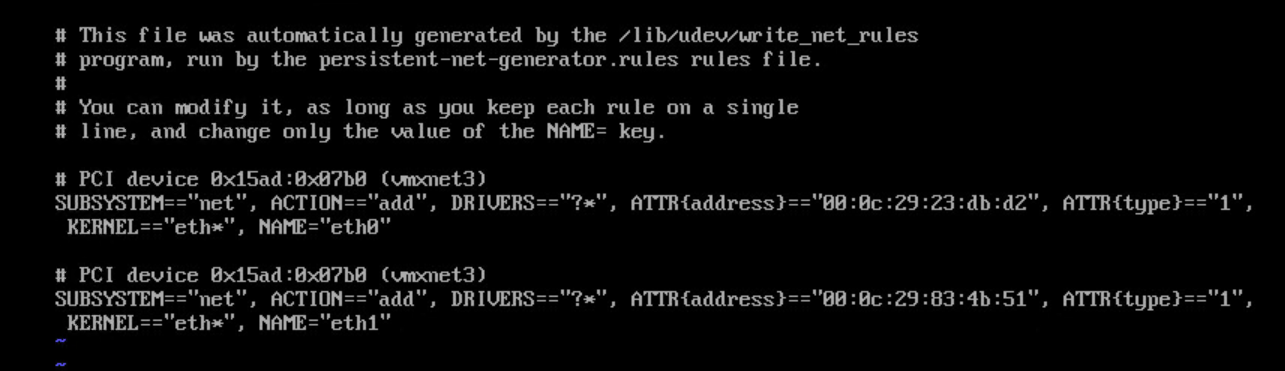
      Delete the entry for the old network card. 
      Change the NAME= part for the new network card to eth0.

    6. reboot
      The network should now be working.

Sv translation
languagede

Status
colourRed
titleThis page is only available in English

Sv translation
languagefr
  1. Téléchargez et installez le VMWare VSphere Client sur une machine Windows, de préférence sur l'installation du client (pas la machine locale via le VPN - cela implique le transfert d'une énorme quantité de données).

  2. Démarrez le client VSphere et connectez-vous au serveur ESXi à partir duquel la machine doit être exportée.

  3. DÉMONTER le CD-ROM de la machine virtuelle. C'est TRÈS important. Il suffit de passer au CD-ROM du client. 


  4. Arrêtez the virtual machine.

  5. Sélectionnez la machine virtuelle, puis dans le menu, sélectionnez Fichier ... Exporter ... Modèle OVF. 

  6. Exportation en un seul fichier OVA.


  7. Transférer le fichier sur une machine "proche" du deuxième serveur ESXi (en termes de réseau).

  8. Importez l'OVA sur la machine virtuelle. Vous pouvez choisir le stockage sur lequel il doit être stocké, et si nécessaire, le mappage des interfaces réseau. Les autres options sont pour la plupart évidentes.

  9. Pour les machines Linux, vous devrez redémarrer le réseau à partir de la console. Modifiez les paramètres de la machine virtuelle et notez l'adresse MAC de la carte réseau.

    1. Démarrez la machine, et ouvrez la console de la machine dans le VMWare ESXi Client.

    2. Connectez-vous à la VM. Tapez ifconfig
      Si tout a fonctionné, la machine sera déjà sur le réseau et vous aurez terminé.

    3. Si tout a fonctionné, la machine sera déjà sur le réseau et vous aurez terminé. 

    4. Modifier /etc/sysconfig/network-scripts/ifcfg-eth0
      Modifier l'adresse MAC de la carte réseau.

    5. Modifier /etc/udev/rules.d/70-persistent-net.rules
      Probablement, il y a une nouvelle entrée pour la carte réseau, qui est maintenant eth1, et l'ancienne adresse MAC est dans ETH0, comme ceci :


      Supprimez l'entrée pour l'ancienne carte réseau. 
      Changer la partie NOM= de la nouvelle carte réseau en eth0.

    6. redémarrer
      The devrait maintenant fonctionner.