| Sv translation | |||||||||||||||||||||
|---|---|---|---|---|---|---|---|---|---|---|---|---|---|---|---|---|---|---|---|---|---|
| |||||||||||||||||||||
Connecting to an Oracle database is probably more complicated than it could or should be. Oracle AccountFirst of all, create an Oracle Account on www.oracle.com. This is required to download the software. Download SoftwareDownload the following packages (use the most recent version you can find - it will connect to older database versions):
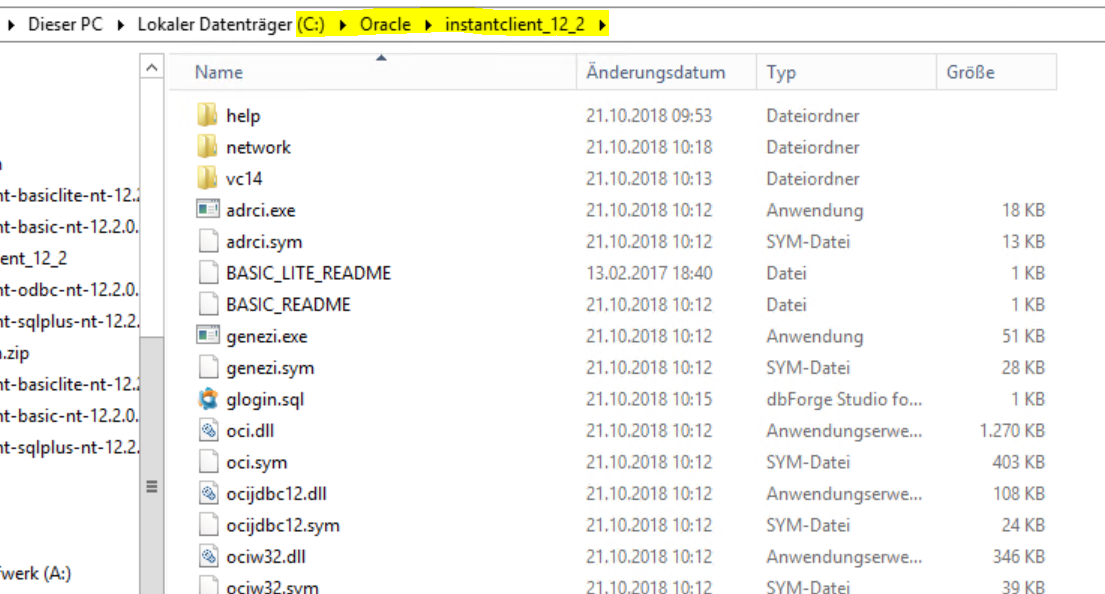
UnpackUnpack all of the files to one directory. It will look something like this:
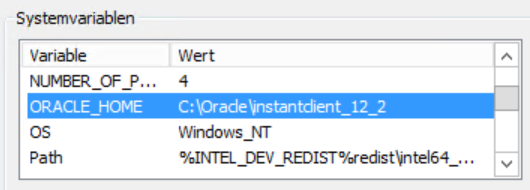
Set Path and Environment VariableSet ORACLE_HOME to the directory in which the client resides:
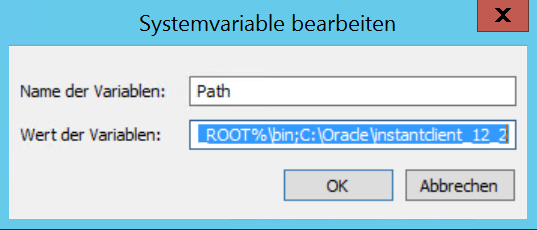
Set the path to also include this directory:
Install ODBC DriverInstall the ODBC driver, using the following command:
Create tnsnames.oraOracle requires a tnsnames.ora file, in the directory ORACLE_HOME\network\admin An example tnsnames.ora file, which can connect to two services (two databases) is shown below:
Test ConnectivityWith a cmd, run the following command:
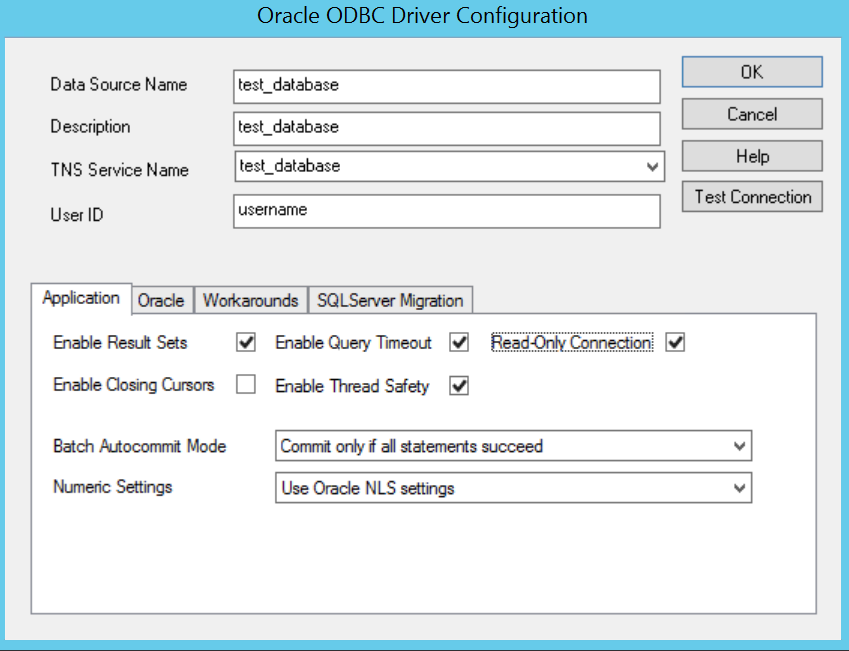
You will get asked for a password, and should be able to connect to the database. From there, you will be able to run some selects, stored procedures to verify connectivity. If you have more than one service (database) configured, test each of them. ODBC ConnectionNow create the ODBC connections. The following dialog shows the settings for the test_database entry above. Note: setting the ODBC connection to Read-Only is recommended, if the jtel system will only read from the database.
ODBC Connections - jtel TEL ServerNow create the ODBC connections in the jtel Telephony Server as usual, if you require these to be opened by the server when it starts. Otherwise, you can connect to the data source later using the Open DSN function within the call flow. |

| Sv translation | |||||||||||||||||||||||
|---|---|---|---|---|---|---|---|---|---|---|---|---|---|---|---|---|---|---|---|---|---|---|---|
| |||||||||||||||||||||||
Connecting to an Oracle database is probably more complicated than it could or should beDie Verbindung zu einer Oracle-Datenbank ist wahrscheinlich komplizierter, als sie sein könnte oder sein sollte. Oracle AccountFirst of all, create an Oracle Account on Erstellen Sie zunächst ein Oracle-Konto auf www.oracle.com. This is required to download the software Dieser ist zum Herunterladen der Software erforderlich. Software DownloadSoftwareLaden Sie die folgenden Pakete herunter (verwenden Sie die aktuellste Version, die Sie finden können - sie stellt eine Verbindung zu älteren Datenbankversionen herDownload the following packages (use the most recent version you can find - it will connect to older database versions):
UnpackUnpack all of the files to one directory. It will look something like this:
Set Path and Environment VariableSet ORACLE_HOME to the directory in which the client resides:
Set the path to also include this directory:
Install ODBC DriverInstall the ODBC driver, using the following command: EntpackenEntpacken Sie alle Dateien in ein Verzeichnis. Es wird in etwa so aussehen:
Pfad- und Umgebungsvariable setzenSetzen Sie ORACLE_HOME auf das Verzeichnis, in dem sich der Client befindet:
Legen Sie den Pfad so fest, dass er auch dieses Verzeichnis einschließt:
ODBC-Treiber installierenInstallieren Sie den ODBC-Treiber mit dem folgenden Befehl:
tnsnames.ora erstellenOracle requires a benötigt eine Datei tnsnames.ora file, in the directory , im Verzeichnis ORACLE_HOME\network\admin An example Eine Beispieldatei tnsnames.ora file, which can connect to two services (two databases) is shown below:, die eine Verbindung zu zwei Diensten (zwei Datenbanken) herstellen kann, ist unten abgebildet:
Test ConnectivityWith a cmd, run the following command: Konnektivität testenFühren Sie mit einem cmd den folgenden Befehl aus:
Sie werden nach einem Passwort gefragt und sollten in der Lage sein, sich mit der Datenbank zu verbinden. Von dort aus können Sie einige ausgewählte, gespeicherte Prozeduren zur Überprüfung der Konnektivität ausführen. Wenn Sie mehr als einen Dienst (Datenbank) konfiguriert haben, testen Sie jeden von ihnen. ODBC-VerbindungErstellen Sie nun die ODBC-Verbindungen. Das folgende Dialogfeld zeigt die Einstellungen für den obigen test_database You will get asked for a password, and should be able to connect to the database. From there, you will be able to run some selects, stored procedures to verify connectivity. If you have more than one service (database) configured, test each of them. ODBC ConnectionNow create the ODBC connections. The following dialog shows the settings for the test_database entry above. Note: setting the ODBC connection to Read-Only is recommended, if the jtel system will only read from the database.
ODBC Connections - jtel TEL Server-Eintrag. Hinweis: Es wird empfohlen, die ODBC-Verbindung auf schreibgeschützt (read only) zu setzen, wenn das Jtel-System nur aus der Datenbank lesen soll.
ODBC-Verbindungen - jtel TEL ServerLegen Sie nun wie gewohnt die ODBC-Verbindungen im jtel Telephony Server an, wenn diese beim Start vom Server geöffnet werden sollen. Andernfalls können Sie die Verbindung zur Datenquelle später über die Funktion Open DSN im Call-Flow herstellen. |
| Sv translation | |||||||||||||||||||||
|---|---|---|---|---|---|---|---|---|---|---|---|---|---|---|---|---|---|---|---|---|---|
| |||||||||||||||||||||
La connexion à une base de données Oracle est probablement plus compliquée qu'elle ne pourrait ou ne devrait l'être. Compte OracleTout d'abord, créez un compte Oracle sur www.oracle.com. Ceci est nécessaire pour télécharger le logiciel. Télécharger le logicielTéléchargez les paquets suivants (utilisez la version la plus récente que vous pouvez trouver - elle se connectera aux anciennes versions de la base de données) :
DécompressezDécompressez tous les fichiers dans un répertoire. Il ressemblera à quelque chose comme ça :
Définir le PATH et la variable d'environnementRéglez ORACLE_HOME vers le répertoire dans lequel le client réside :
Définissez le chemin d'accès pour inclure également ce répertoire :
Installer le pilote ODBCInstallez le pilote ODBC, en utilisant la commande suivante :
Créer tnsnames.oraOracle nécessite un fichier tnsnames.ora, dans le répertoire ORACLE_HOME\network\admin Un exemple de fichier tnsnames.ora, qui peut se connecter à deux services (deux bases de données), est présenté ci-dessous :
Tester la connectivitéAvec un cmd, lancez la commande suivante :
Un mot de passe vous sera demandé, et vous devriez pouvoir vous connecter à la base de données. À partir de là, vous pourrez exécuter des procédures de sélection et de stockage pour vérifier la connectivité. Si vous avez configuré plus d'un service (base de données), testez chacun d'entre eux. Connexion ODBCMaintenant, créez les connexions ODBC. La boîte de dialogue suivante montre les paramètres de l'entrée test_database ci-dessus. Note : il est recommandé de régler la connexion ODBC sur "Lecture seule", si le système jtel ne peut lire que depuis la base de données.
Connexions ODBC - Serveur jtel TELCréez maintenant les connexions ODBC dans le serveur téléphonique jtel comme d'habitude, si vous souhaitez qu'elles soient ouvertes par le serveur au démarrage. Sinon, vous pouvez vous connecter à la source de données plus tard en utilisant la fonction Open DSN dans le flux d'appels Now create the ODBC connections in the jtel Telephony Server as usual, if you require these to be opened by the server when it starts. Otherwise, you can connect to the data source later using the Open DSN function within the call flow. |