| Sv translation | ||||||
|---|---|---|---|---|---|---|
| ||||||
Pre-Requisites
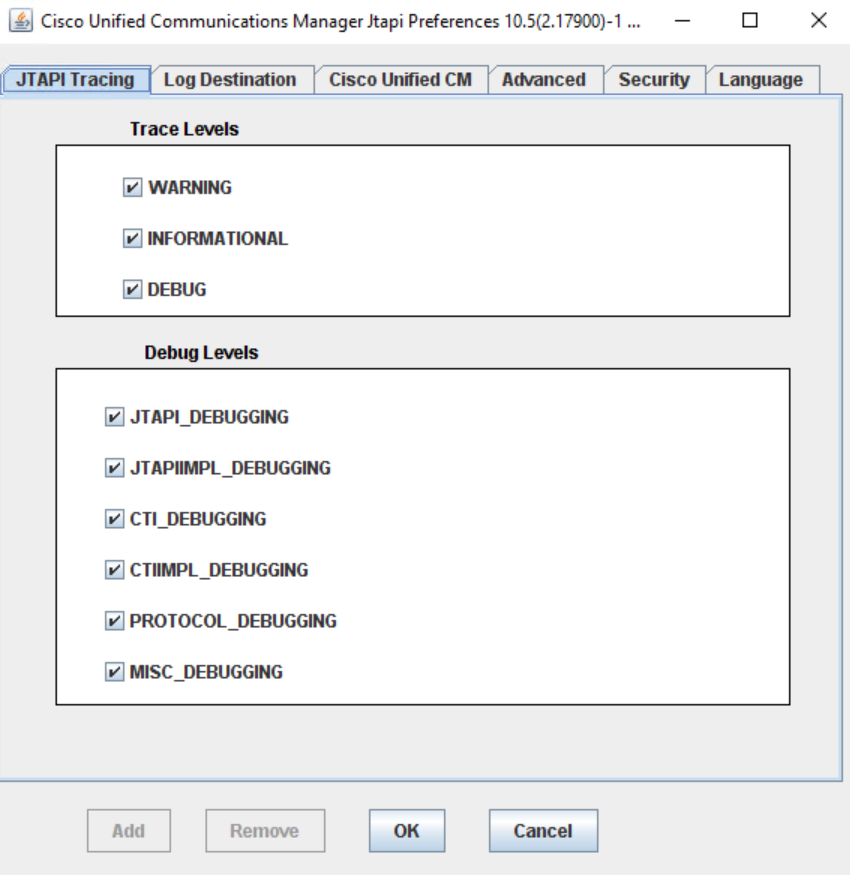
JTAPI InstallationInstallationInstall the Cisco JTAPI Libraries on an appropriate server. This example assumes that the PRES role has been installed on a windows server. Installing simply requires clicking through the defaults, it is not necessary to change the paths. ConfigurationFrom the directory in which Cisco JTAPI is installed (on a windows server, usually C:\Program Files\Cisco\JTAPI64Tools), run jtprefs.bat. The following screens show the settings which can be made: DebuggingIf debugging and logging is desired, settings can be made on this page to specify the debug level:
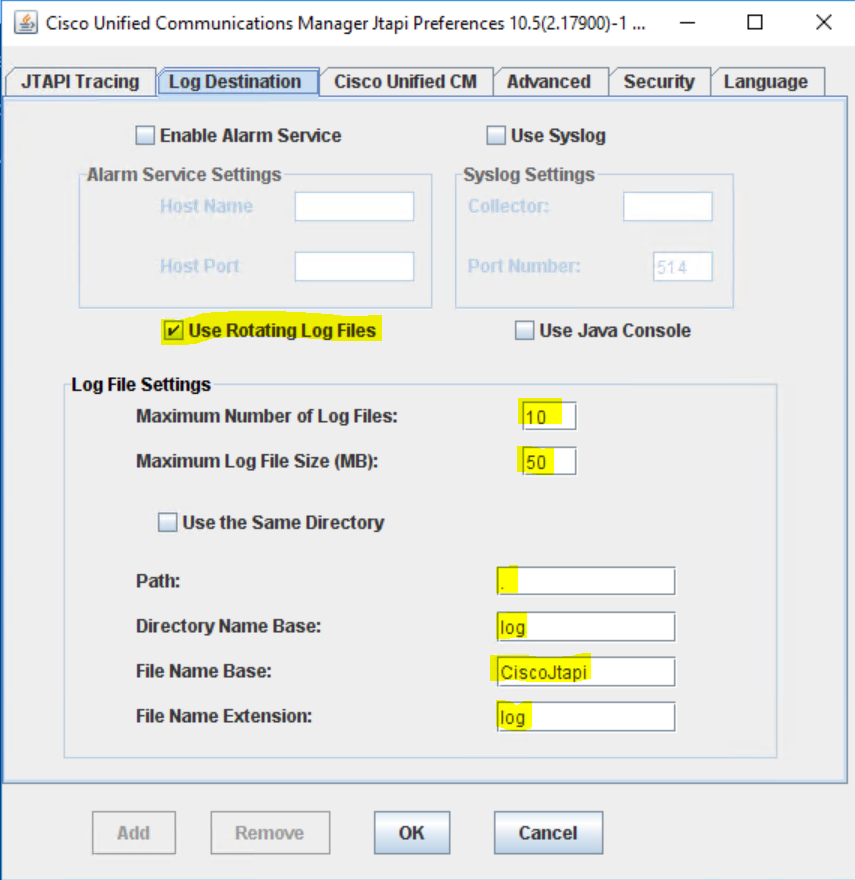
LoggingThese are the recommended logging settings:
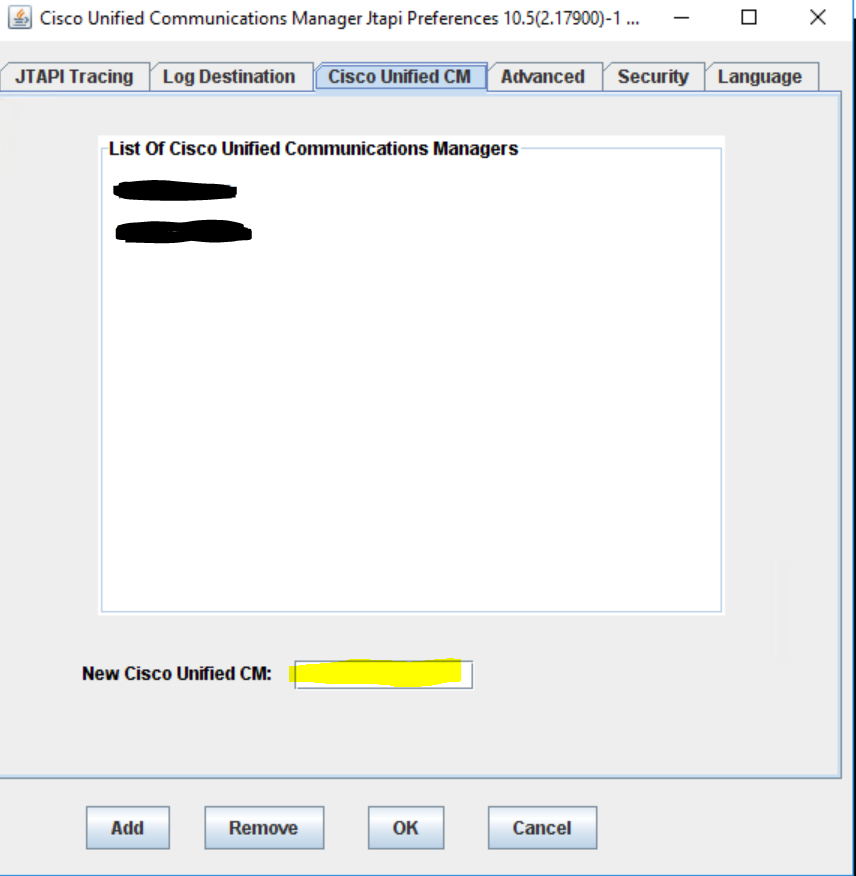
Cisco Unified CMAdd all available call manager servers on the next page:
Further SettingsThe settings on the remaining pages can be left "as is", and do not need to be changed. Copy JTAPI.INIClick on OK, to create a JTAPI.INI file. This file will be stored in: C:\Program Files\Cisco\JTAPI64Tools Copy this file to the bin directory of the presence aggregator, for example: C:\presence-aggregator\bin Portal ConfigurationTo use the connector, and new presence connector is created as sysadmin in the jtel Web Portal. Give the connector a good name, and select CiscoCUCM Jtapi (Version) as the connector type. The Configuration of the connector uses XML. The following example XML is used in the table below, to explain the settings. Translations Ignore |
Cisco Connector Portal Configuration Settings | |||||
| Setting | Value | Comments | implementation jar base | jtel-system-presence-connectors-cisco.v10OR jtel-system-presence-connectors-cisco.v12 | ||
| implementation jar version | 1.0 | This version pertains to the jtel version of the connector implementation. Currently version 1.0 is required (for all Cisco versions). | ||||
| parameters providerName | IP_ADDRESS | Use the IP Address or DNS Name of the CUCM Server. | ||||
| parameters user | JTAPI_USER | Use the name of the configured user with JTAPI access in the CUCM Server. | ||||
| parameters password | JTAPI_USER_PASSWORD | Use the password of the configured user with JTAPI access in the CUCM Server. Note: if special characters (not allowed in XML) are included in the password, these must be escaped inside a CDATA section as shown in the example configuration above. | addressTranslators | XML Translator Definition | addressExcluders | XML Excluder Definition |
| behaviour syncAcdUsers | 0 | Causes all reported extensions to be created as an ACD user. Setting this to 1 is not recommended. Note: even if this is set to 0, the ACD users presence status will still be set according to the current Tel1 field in the user record, and TelActive (the active telephone number). | ||||
| behavious syncPbxUsers | 1 | Causes all reported extensions to be created as PBX Users. Setting this to 1 is recommended. |
| Setting | Example Value | Comments |
|---|---|---|
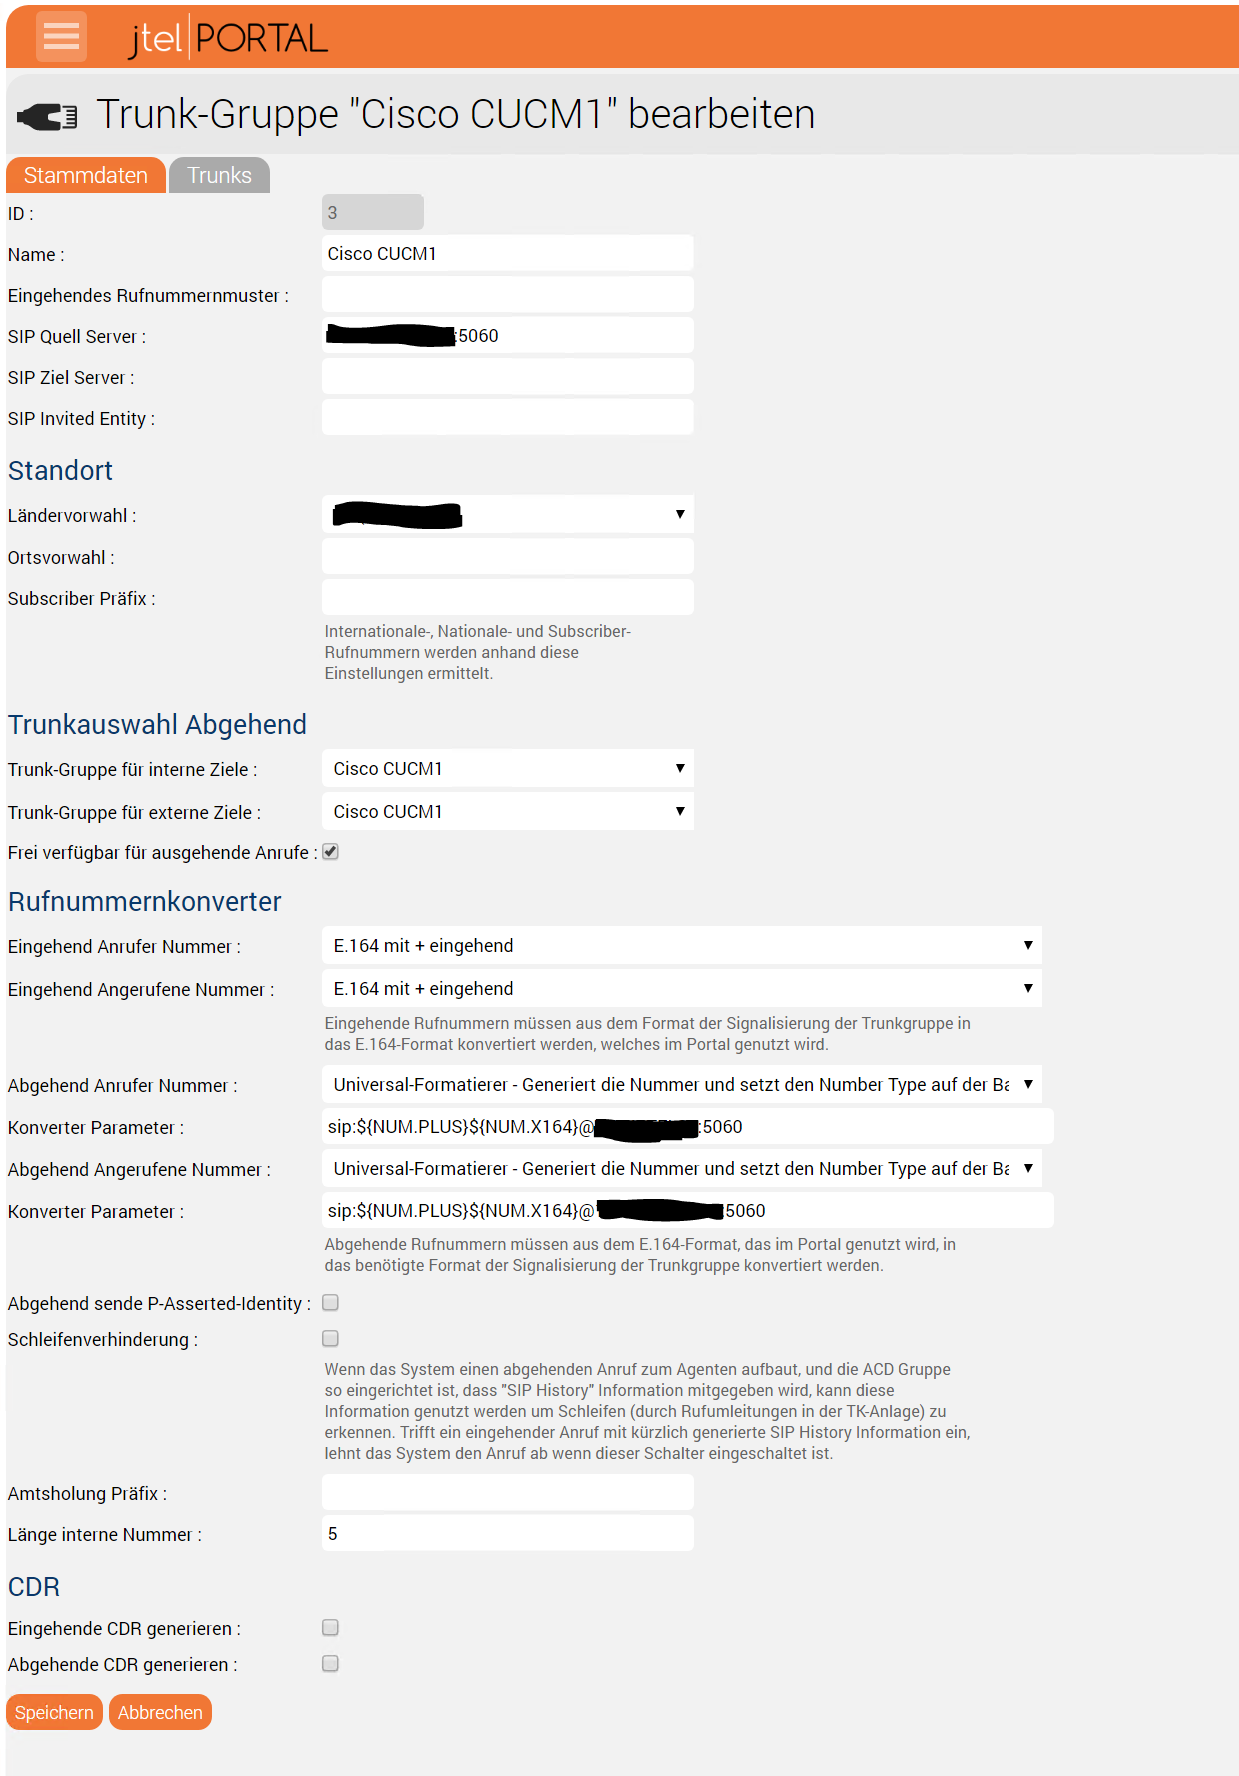
| SIP Source Server | 10.10.10.1:5060 | This is used to match the trunk to the relevant CUCM in incoming INVITE messages. Important for multi-CUCM installations. |
| Incoming Caller | Set to E.164 with + | |
| Incoming Called | Set to E.164 with + | |
| Outgoing Caller | sip:{NUM.PLUS}${NUM.X164}@10.10.10.10:5060 | Use the universal formatter, so that internal numbers can be presented if necessary in non E.164 format. The IP Adress of one of the the jtel servers is used here. |
| Outgoing Called | sip:{NUM.PLUS}${NUM.X164}@10.10.10.1:5060 | Use the universal formatter, so that internal numbers can be dialled if necessary in non E.164 format. The IP Adress of one of the CUCM is used here. |
| Internal Number Length | 5 | Set the maximum length of an internal number here. |
User Configuration
Users can be configured either:
- Fully E.164 qualified (recommended)
- Only the extension number
The second method may be the best method to use on multi-site CUCM installations, if the numbering plan in the CUCM was never E.164 and has become "untidy" over time.
Example
| Sv translation | ||||||
|---|---|---|---|---|---|---|
| ||||||
|
| Sv translation | |||||||
|---|---|---|---|---|---|---|---|
| |||||||
Prérequis
Installation JTAPIInstallationInstallez les bibliothèques JTAPI de Cisco sur un serveur approprié. Cet exemple suppose que le rôle PRES a été installé sur un serveur Windows. L'installation nécessite simplement de cliquer sur les valeurs par défaut, il n'est pas nécessaire de changer les chemins d'accès. ConfigurationDepuis le répertoire dans lequel Cisco JTAPI est installé (sur un serveur Windows, généralement Pre-Requisites
JTAPI InstallationInstallationInstall the Cisco JTAPI Libraries on an appropriate server. This example assumes that the PRES role has been installed on a windows server. Installing simply requires clicking through the defaults, it is not necessary to change the paths. ConfigurationFrom the directory in which Cisco JTAPI is installed (on a windows server, usually C:\Program Files\Cisco\JTAPI64Tools), run lancer jtprefs.bat. The following screens show the settings which can be made: DebuggingLes écrans suivants montrent les réglages qui peuvent être effectués : DébogageSi le débogage et la journalisation sont souhaités, des réglages peuvent être effectués sur cette page pour spécifier le niveau de débogage If debugging and logging is desired, settings can be made on this page to specify the debug level :
LoggingEnregistrementVoici les paramètres d'enregistrement recommandés These are the recommended logging settings :
Cisco Unified CMAdd all available call manager servers on the next pageAjoutez tous les serveurs de gestion d'appels disponibles sur la page suivante :
Further SettingsThe settings on the remaining pages can be left "as is", and do not need to be changed. Autres paramètresLes paramètres des pages restantes peuvent être laissés "tels quels", et n'ont pas besoin d'être modifiés. CopierCopyJTAPI.INIClick on Cliquez sur OK, to create a pour créer un fichier JTAPI.INI file. This file will be stored inCe fichier sera stocké dans : C:\Program Files\Cisco\JTAPI64Tools Copy this file to the bin directory of the presence aggregator, for exampleCopiez ce fichier dans le répertoire bin de l'agrégateur de présence, par exemple : C:\presence-aggregator\bin Portal ConfigurationTo use the connector, and new presence connector is created as sysadmin in the jtel Web Portal. Give the connector a good name, and select CiscoCUCM Jtapi (Version) as the connector type. The Configuration of the connector uses XML. The following example XML is used in the table below, to explain the settings.
Settings | |||||||
| Setting | Value | Comments | implementation jar base | jtel-system-presence-connectors-cisco.v10OR jtel-system-presence-connectors-cisco.v12 | |||
| implementation jar version | 1.0 | This version pertains to the jtel version of the connector implementation. Currently version 1.0 is required (for all Cisco versions). | |||||
| parameters providerName | IP_ADDRESS | Use the IP Address or DNS Name of the CUCM Server. | |||||
| parameters user | JTAPI_USER | Use the name of the configured user with JTAPI access in the CUCM Server. | |||||
| parameters password | JTAPI_USER_PASSWORD | Use the password of the configured user with JTAPI access in the CUCM Server. Note: if special characters (not allowed in XML) are included in the password, these must be escaped inside a CDATA section as shown in the example configuration above. | addressTranslators | XML Translator Definition | addressExcluders | XML Excluder Definition |
| Paramètre | Exemple de Value | Commentaires |
|---|---|---|
| Serveur SIP source |
Causes all reported extensions to be created as an ACD user. Setting this to 1 is not recommended.
Note: even if this is set to 0, the ACD users presence status will still be set according to the current Tel1 field in the user record, and TelActive (the active telephone number).
Starting / Stopping Connectors
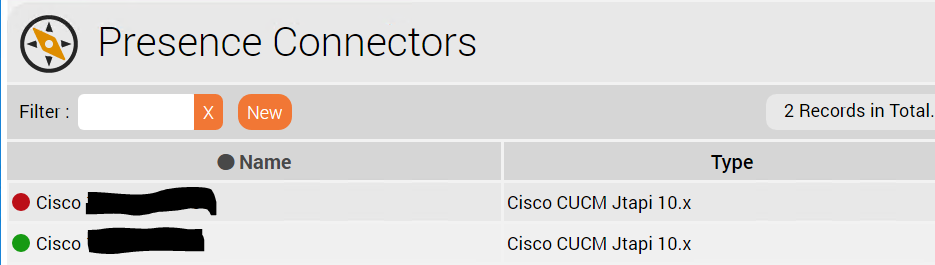
Connectors can be started or stopped in the web interface, by clicking on the red / green dot next to the name:
Trunk Groups
The following settings are recommended for the creation / use of Trunks and Trunk Groups in the jtel System:
| Setting | Example Value | Comments | |||||
|---|---|---|---|---|---|---|---|
10.10.10.1:5060 | This is used to match the trunk to the relevant CUCM in incoming INVITE messages. Important for multi-CUCM installations. | Incoming Caller | Set to E.164 with + | Incoming Called | Set to E.164 with + | Outgoing CallerIl est utilisé pour faire correspondre le tronc au CUCM pertinent dans les messages INVITE entrants. Important pour les installations multi-CUCM. | |
| Appelant entrant | Régler sur E.164 avec +. | ||||||
| Appelé entrant | Régler sur E.164 avec +. | ||||||
| Appelant sortant | sip:{NUM.PLUS}${NUM.X164}@10.10.10.10:5060 | Use the universal formatter, so that internal numbers can be presented if necessary in non Utilisez le formatteur universel, afin que les numéros internes puissent être présentés si nécessaire dans un format autre que E.164 | format. | L'adresse IP de l'un des serveurs jtel est utilisée ici. | |||
| Appelé sortant | Outgoing Calledsip:{NUM.PLUS}${NUM.X164}@10.10.10.1:5060 | Use the universal formatter, so that internal numbers can be dialled if necessary in non Utilisez le formatteur universel, afin que les numéros internes puissent être composés si nécessaire dans un format autre que E.164 | format. | ||||
| Internal Number Length | 5 | Set the maximum length of an internal number here. |
User Configuration
Users can be configured either:
- Fully E.164 qualified (recommended)
- Only the extension number
The second method may be the best method to use on multi-site CUCM installations, if the numbering plan in the CUCM was never E.164 and has become "untidy" over time.
L'adresse IP de l'un des CUCM est utilisée ici. | ||
| Longueur du numéro interne | 5 | Fixez ici la longueur maximale d'un numéro interne. |
Configuration de l'utilisateur
Les utilisateurs peuvent être configurés soit :
- Entièrement qualifié E.164 (recommandé)
- Seul le numéro d'extension
La deuxième méthode peut être la meilleure à utiliser sur les installations CUCM multi-sites, si le plan de numérotation dans le CUCM n'a jamais été E.164 et est devenu "désordonné" au fil du temps.
Exemple
Example