| Sv translation | ||||||||||||||||||||||||||||||||||||||||||||||||||||||||||
|---|---|---|---|---|---|---|---|---|---|---|---|---|---|---|---|---|---|---|---|---|---|---|---|---|---|---|---|---|---|---|---|---|---|---|---|---|---|---|---|---|---|---|---|---|---|---|---|---|---|---|---|---|---|---|---|---|---|---|
| ||||||||||||||||||||||||||||||||||||||||||||||||||||||||||
IntroductionThe TEL server runs the call flows for telephone calls in the jtel system. It also runs background processes, such as jobs to create statistics subscription e-mails and convert audio files or create audio with a TTS engine. Also, usually PBX connectors are run on the TEL server. InstallationFile DownloadsThe following script downloads all the files needed in this section.
Configure Data SourcesImport the downloaded file odbc_ini_v52.reg to the registry to configure the data sources in windows. You may need to change the password entries for each datasource, depending on the password configured for the mysql database. Prepare 8-Server RegistryImport the downloaded file 8server_config_v8.reg to the registry to prepare the registry for 8-Server. You will need to change the Machine ID setting - set this to the last byte of the IPv4 address in the local network. You need to change this value to HEX. Install 8-ServerClone Repository
Run the following commands from a non elevated command prompt:
Checkout ReleaseRun the following commands from a non elevated command prompt (in the same one as above):
Install 8-ServerTelephony and DeamonsRun the following commands from a non elevated command prompt:
Deamons OnlyRun the following commands from a non elevated command prompt:
Windows FirewallThe following commands configure the windows firewall. Run these in an elevated cmd window:
Install Aculab SIP and RTP StackInstall AIT
Windows Defender
The following commands configure windows defender, to exclude some telephony server processes and directories. Run the following commands from a non elevated command prompt, and install for all users:
Install Aculab v67
Configure Aculab
Symmetric RTPTo configure symmetric RTP, a file is created in Translations Ignore |
Port RangeIf it is required, that a port range is used for RTP, then the file C:\aculab\v67\cfg\aculab.config must be edited, set the port range as is required by the remote end (PBX / SIP Trunk): Translations Ignore |
Services
Setup the following Aculab services to start only manually:
Setup the following Aculab services to be disabled:
Startup ScriptsNet UseCheck the file c:\8Server\bin\startup.cmd - to see whether the net use command needs to be changed or not. Warning | | |||||||||||||||||||||||||||||||||||||||||||||||||||||||
|
| Warning |
|---|
Note - make sure the aculab services are started at this point. |
Sometimes windows does not update the path immediately after installation of the components above. The following must be present in the path, and as an environment variable, for the rest of the installation to work:
PATH=...;c:\8Server\gi2\bin
R5_CONFIG_DIR=c:\8Server\Config\
|
Install Aculab SIP and RTP Stack
Install AIT
Run the following commands from a non elevated command prompt, and install for all users:
| Translations Ignore | ||
|---|---|---|
|
Install Aculab v67
- Start the AIT application
- Choose "Connection" -> "Work offline".
- "File" -> ""Import" -> Load Aculab Package File...".
c:\8Server\deploy\oem\jtel\aculab\v67.apf
Target Directory:C:\aculab\v67
"Install"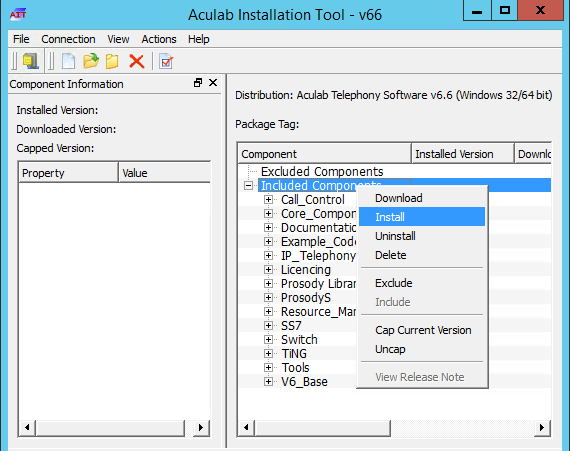
| Warning |
|---|
Note - if secure boot is not switched off in the virtual environment, the installation of the drivers might fail. |
Configure Aculab
- Start ACT
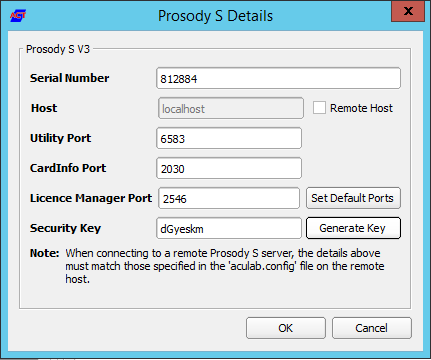
- Add a Prosody-S instance
- Choose "Prosody S" ... "Add...":
- The serial number can be freely chosen, as can the security key. We recommend 100000 and jtel respectively.
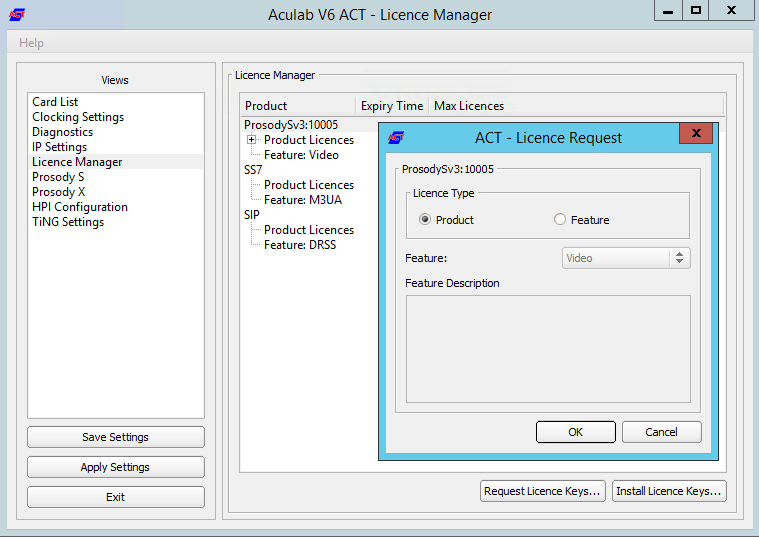
- Install the licenses
- Choose "License Manager", Install Licence Keys...
- Save and apply
- Choose "Save Settings" then "Apply Settings".
| Info | ||
|---|---|---|
| ||
All following config files can be opened via cmd with a simple start notepad++ command to speed up the process |
Symmetric RTP
To configure symmetric RTP, as well as setting a static value for the telephone-event payload codec at 101, a file is created in C:\Aculab\v67\cfg\mhp.cfg with the following content:
| Code Block |
|---|
start notepad++ C:\Aculab\v67\cfg\mhp.cfg |
| Translations Ignore | ||
|---|---|---|
|
| Translations Ignore | |||||
|---|---|---|---|---|---|
|
Port Range
If it is required, that a port range is used for RTP, then the file C:\aculab\v67\cfg\aculab.config must be edited, set the port range as is required by the remote end (PBX / SIP Trunk):
| Code Block |
|---|
start notepad++ C:\aculab\v67\cfg\aculab.config |
| Translations Ignore | ||
|---|---|---|
|
Services
| Status | ||||
|---|---|---|---|---|
|
Setup the following Aculab services to start only manually:
- Aculab Prosody S
- Aculab Resource Manager
- Aculab Startup Service
Setup the following Aculab services to be disabled:
- Aculab SS7 TS Manager
Startup Scripts
Net Use
Check the file c:\8Server\bin\startup.cmd - to see whether the net use command needs to be changed or not.
| Code Block |
|---|
start notepad++ c:\8Server\bin\startup.cmd |
| Warning | ||
|---|---|---|
| ||
Comment out the following lines in the startup.cmd file: aculabservicemanager -stop sip |
Shortcut
Create a shortcut for:
c:\8Server\bin\startup_launcher.cmd
and place this in shell:startup.
Configuration Files
Create Default Configuration giAculab.cfg
Start a cmd up, and start gihal. This will create a default giAculab.cfg file.
| Warning |
|---|
Note - make sure the aculab services are started at this point. |
Do this in an elevated command prompt:
| Note | ||
|---|---|---|
Sometimes windows does not update the path immediately after installation of the components above. The following must be present in the path, and as an environment variable, for the rest of the installation to work: PATH=...;c:\8Server\gi2\bin
|
| Translations Ignore | ||
|---|---|---|
|
Edit giAculab.cfg
The file is in:
c:\8Server\gi2\config\giAculab.cfg| Code Block |
|---|
start notepad++ c:\8Server\gi2\config\giAculab.cfg |
giAculab.cfg is now configured for SIP with 8-Server. Replace the SIP section in the newly created file with the section below, changing the following:
- channel_count to the number of licensed SIP channels
- default_rtp_ip should be changed to the IP address of the NIC in the telephony network in multi-homed systems. Leave as is, if the system is not multi-homed.
| Translations Ignore | ||
|---|---|---|
|
Edit gi2.ini
Edit the file C:\8Server\gi2\bin\gi2.ini
At the very bottom, change the following setting to 2 (standard is 1):
| Code Block |
|---|
start notepad++ C:\8Server\gi2\bin\gi2.ini |
| Translations Ignore | ||
|---|---|---|
|
Edit StdCall_MCP.cfg
| Status | ||||
|---|---|---|---|---|
|
The following settings are changed in the file:
c:\8Server\config\StdCall_MCP.cfg| Code Block |
|---|
start notepad++ c:\8Server\config\StdCall_MCP.cfg |
- Enable_SIP_Registrar - for installations which require a registrar for the SIP trunk (e.g. Panasonic PBX installations)
- Default_SIP_Contact - change to the IP address of the server (for multi-homed systems use the IP address of the NIC in the telephony network
- Startup_Command4 und Startup_Sleep4 - delete these lines if the machine does not require registration to a SIP trunk (for example NFON requires registration - in this case leave in!)
- Total_Channel_Count - Set to the total licensed SIP channel count
- Inbound_Use_Channels - Set to the number of agents + supervisors + queue + IVR channels
- Outbound_Use_Channels - Set to the number of agents + supervisors + call transfer channels
- Note: Total_Channel_Count = Inbound_Use_Channels + Outbound_Use_Channels
| Translations Ignore | ||
|---|---|---|
|
| Code Block |
|---|
gihal

# If it starts, press CTRL+C then cancel |
Edit giAculab.cfg
The file is in:
c:\8Server\gi2\config\giAculab.cfggiAculab.cfg is now configured for SIP with 8-Server. Replace the SIP section in the newly created file with the section below, changing the following:
| Code Block |
|---|
    [SIP]
    {
      netport			                = 0
      channel_count		                = 30
      default_vmp_set		            = "VMP_SET1"
      default_rtp_ip		            = "0.0.0.0"
      default_rtp_dscp		            = 46
      defaultSignallingGateway	        = ""
      numberOnly		                = FALSE
      rfc2833RxToneEvent	            = TRUE
      rfc2833RxInbandToneRegeneration	= TRUE
      rfc2833TxToneConversion	        = TRUE
} |
Edit gi2.ini
Edit the file C:\8Server\gi2\bin\gi2.ini
At the very bottom, change the following setting to 2 (standard is 1):
| Code Block |
|---|
DISABLE_ERROR_DIALOG = 2 |
Edit StdCall_MCP.cfg
| Status | ||||
|---|---|---|---|---|
|
The following settings are changed in the file:
c:\8Server\config\StdCall_MCP.cfg- Enable_SIP_Registrar - for installations which require a registrar for the SIP trunk (e.g. Panasonic PBX installations)
- Default_SIP_Contact - change to the IP address of the server (for multi-homed systems use the IP address of the NIC in the telephony network
- Startup_Command4 und Startup_Sleep4 - delete these lines if the machine does not require registration to a SIP trunk (for example NFON requires registration - in this case leave in!)
- Total_Channel_Count - Set to the total licensed SIP channel count
- Inbound_Use_Channels - Set to the number of agents + supervisors + queue + IVR channels
- Outbound_Use_Channels - Set to the number of agents + supervisors + call transfer channels
- Note: Total_Channel_Count = Inbound_Use_Channels + Outbound_Use_Channels
| Translations Ignore | ||
|---|---|---|
|
8-Server Configuration
Startup 8-Server:
| Translations Ignore | ||
|---|---|---|
|
Configuration
Machine ID (Settings ... General)
Set to the last byte of the IPv4 address of the machine.
Internet Components
Increase the number of UDP components, but only on machines which have a lot of lines.
Recommend: up to 200 lines use 40. Above 200 lines, increase by 20 for every additional 100 lines.
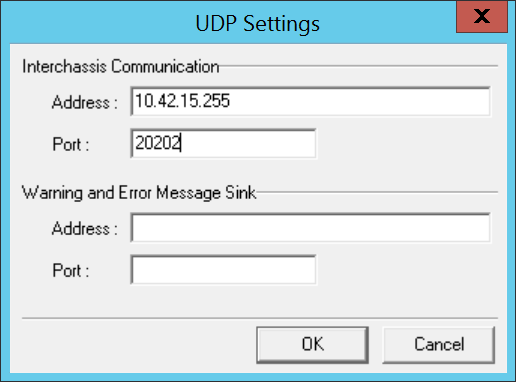
UDP Settings
If building a cluster with more than one 8-Server, enter the broadcast address for interchassis communication, using port 20202:
Daemon Processes
| Translations Ignore | ||
|---|---|---|
|
The following list is for a pure telephony server (daemon applications are running on a separate server):
| Translations Ignore | |||||
|---|---|---|---|---|---|
|
The following list is for a pure daemon application server:
| Translations Ignore | |||||
|---|---|---|---|---|---|
|
Stop 8-Server
Now shutdown 8-Server using File ... Exit.
8-Server License
Use C:\8Server\bin\KeyOrder6.exe to request a license for 8-Server:
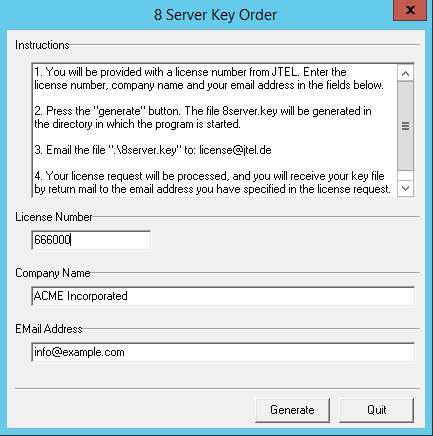
Send the file C:\8Server\bin\8server.key to support@jtel.de
Once the license file is received, delete the file:
C:\8Server\bin\8server.key
and place the license file in:
C:\8Server\Config
Install the Platform UDP Listener
Installation
Install the platform UDP listener with the following commands:
| Translations Ignore | |||||
|---|---|---|---|---|---|
|
Shortcut
Create a shortcut from:
c:\PlatformUDPListener\startListener.bat
and place this in shell:startup
Test
Start the platform UDP listener. It should find other cluster members, for example the webserver or database master, if other machines are already active.
Windows Autostart
To enable all applications to startup automatically (unless they are installed as services), an automatic login should be configured on windows.
Unpack AutoLogin.zip, and run the executable.
Setup the required account details, and save.
Reboot the machine to test! Note - give the machine a couple of minutes since if you attach via RDP to the account running the jtel applications, you will cause a login to occur and the applications to be started.
| Sv translation | ||||||
|---|---|---|---|---|---|---|
| ||||||
|
| Sv translation | |||||||||||||||||||||||||||||||||||||||||||||||||||||||||||||||||||||||||||||||||||||||||||||||||||||||||||||||||||||||||||||||||||
|---|---|---|---|---|---|---|---|---|---|---|---|---|---|---|---|---|---|---|---|---|---|---|---|---|---|---|---|---|---|---|---|---|---|---|---|---|---|---|---|---|---|---|---|---|---|---|---|---|---|---|---|---|---|---|---|---|---|---|---|---|---|---|---|---|---|---|---|---|---|---|---|---|---|---|---|---|---|---|---|---|---|---|---|---|---|---|---|---|---|---|---|---|---|---|---|---|---|---|---|---|---|---|---|---|---|---|---|---|---|---|---|---|---|---|---|---|---|---|---|---|---|---|---|---|---|---|---|---|---|---|---|
| |||||||||||||||||||||||||||||||||||||||||||||||||||||||||||||||||||||||||||||||||||||||||||||||||||||||||||||||||||||||||||||||||||
IntroductionLe serveur TEL gère les flux d'appels pour les appels téléphoniques dans le système jtel. Il exécute également des processus en arrière-plan, tels que des emplois pour créer des e-mails d'abonnement aux statistiques et convertir des fichiers audio ou créer des fichiers audio avec un moteur TTS. En outre, les connecteurs PBX sont généralement exécutés sur le serveur TEL. InstallationTéléchargement de fichiersLe script suivant permet de télécharger tous les fichiers nécessaires dans cette section.
Configurer les ressources donnéesImporter le fichier téléchargé odbc_ini_v52.reg au registre pour configurer les sources de données dans windows. Vous devrez peut-être modifier les entrées du mot de passe pour chaque source de données, en fonction du mot de passe configuré pour la base de données mysql. Préparer un registre de 8-ServerImporter le fichier téléchargé 8server_config_v8.reg au registre pour préparer le registre pour 8-Server. Vous devrez modifier le paramètre ID de la machine - définissez-le sur le dernier octet de l'adresse IPv4 du réseau local. Vous devez changer cette valeur en HEX. Installer 8-Servercloner le dépôt
Exécutez les commandes suivantes à partir d'un invite de commande non élevé:
Vérifier lq ReleaseExécutez les commandes suivantes à partir d'une invite de commande non surélevé (dans le même que ci-dessus):
Installer 8-ServerTéléphonie et DémonsExécutez les commandes suivantes à partir d'un invite de commande non élevé:
Uniquement DémonsExécutez les commandes suivantes à partir d'un invite de commande non élevé:
Pare-feu WindowsLes commandes suivantes permettent de configurer le pare-feu de Windows. Exécutez-les dans une fenêtre cmd élevé :
Windows Defender
Les commandes suivantes configurent le défenseur de Windows pour exclure certains processus et répertoires du serveur de téléphonie.
Installer Aculab SIP et RTP StackInstaller AITExécutez les commandes suivantes à partir d'un invite de commande non élevé et l'installer pour tous les utilisateurs :
Installer Aculab v67
Configurer Aculab
RTP SymétriquePour configurer le RTP symétrique, ainsi que pour définir une valeur statique pour le codec de charge utile téléphone-événement à 101, un fichier est créé dans
Plage PortS'il est nécessaire qu'une plage de ports soit utilisée pour le RTP, alors le fichier C:\aculab\v67\cfg\aculab.config doit être édité, définissez la plage de ports requise par l'extrémité distante (PBX / SIP Trunk) :
Services
Configurez les services Aculab suivants pour qu'ils ne démarrent que manuellement :
Configurez les services Aculab suivants pour qu'ils soient handicapés :
Scripts de démarrageUtilisation du netVérifiez the fichier c:\8Server\bin\startup.cmd - pour voir si la commande d'utilisation du net doit être modifiée ou non.
RaccourciCréer un raccourci pour : c:\8Server\bin\startup_launcher.cmd et le placer dans shell:startup. Fichiers de configurationCréer une configuration par défaut giAculab.cfgDémarrez un cmd, et commencez gihal. Cela créera un fichier par défaut giAculab.cfg.
Faites-le dans une invite de commande élevée :
Modifier giAculab.cfgLe dossier est en cours : c:\8Server\gi2\config\giAculab.cfggiAculab.cfg est maintenant configuré pour SIP avec 8-Server. Remplacez la section SIP dans le fichier nouvellement créé par la section ci-dessous, en modifiant ce qui suit :
Modifier gi2.iniModifier le fichier Tout en bas, changez le paramètre suivant pour 2 (la norme est 1) :
Modifier StdCall_MCP.cfg
Les paramètres suivants sont modifiés dans le fichier : c:\8Server\config\StdCall_MCP.cfg
Configuration 8-ServerConfigurationStartup Démarrage 8-Server:
ConfigurationMachineID de la machine (SettingsParamètres ...General)Général)Réglé sur le dernier octet de l'adresse IPv4 de la machine. Composantes de l'InternetAugmenter le nombre de composants UDP, mais seulement sur les machines qui ont beaucoup de lignes. Recommandation : jusqu'à 200 lignes utiliser 40. Recommendation Set to the last byte of the IPv4 address of the machine. Internet ComponentsIncrease the number of UDP components, but only on machines which have a lot of lines. Recommend: up to 200 lines use 40. Above 200 lines, increase by 20 for every additional 100 lines. Paramètres UDPSettingsSi vous construisez un cluster avec plus d'un 8-serveur, entrez l'adresse de diffusion pour la communication interchâssis, en utilisant le If building a cluster with more than one 8-Server, enter the broadcast address for interchassis communication, using port 20202 :
|
| Translations Ignore | ||
|---|---|---|
|
La liste suivante concerne un serveur de téléphonie pure (les applications des démons fonctionnent sur un serveur séparéThe following list is for a pure telephony server (daemon applications are running on a separate server) :
| Translations Ignore | |||||
|---|---|---|---|---|---|
|
The following list is for a pure daemon application serverLa liste suivante concerne un serveur d'application purement démoniaque :
| Translations Ignore | |||||
|---|---|---|---|---|---|
|
Stop 8-Server
Now shutdown Maintenant, arrêtez 8-Server using en utilisant File ... ExitSortie.
Licence 8-Server
LicenseUseUtilisez C:\8Server\bin\KeyOrder6.exe to request a license for pour demander une licence pour le 8-Server :
Send the file Envoyer le fichier C:\8Server\bin\8server.key to ausupport@jtel.de Once the license file is received, delete the file
Envoyer le fichier Une fois le fichier de licence reçu, supprimez le fichier :
C:\8Server\bin\8server.key
and place the license file inet placer le fichier de licence dans:
C:\8Server\Config
Installation de la plate-forme UDP Listener
Installation
Install the platform UDP listener with the following commandsInstallez la plate-forme UDP listener avec les commandes suivantes :
| Translations Ignore | |||||
|---|---|---|---|---|---|
|
Shortcut
Raccourci
Créer un raccourci deCreate a shortcut from:
c:\PlatformUDPListener\startListener.bat
and place this in et le placer dans shell:startup.
Test
Start the platform UDP listener. It should find other cluster members, for example the webserver or database master, if other machines are already active.
Windows Autostart
To enable all applications to startup automatically (unless they are installed as services), an automatic login should be configured on windows.
Unpack AutoLogin.zip, and run the executable.
Setup the required account details, and save.
Reboot the machine to test! Note - give the machine a couple of minutes since if you attach via RDP to the account running the jtel applications, you will cause a login to occur and the applications to be started.
| language | de |
|---|
Démarrer l'écouteur UDP de la plate-forme. Il devrait trouver d'autres membres du cluster, par exemple le serveur web ou le maître de la base de données, si d'autres machines sont déjà actives.
Démarrage automatique de Windows
Pour permettre à toutes les applications de démarrer automatiquement (sauf si elles sont installées en tant que services), une connexion automatique doit être configurée sur Windows.
Décompressez AutoLogin.zip, et lancez l'exécutable.
Définissez les détails du compte requis et enregistrez.
Redémarrez la machine pour tester ! Note - laissez à la machine quelques minutes car si vous vous connectez via RDP au compte qui exécute les applications jtel, vous provoquerez une connexion et le démarrage des applications.Status