| Sv translation | ||
|---|---|---|
| ||
The system can be fully operated by means of an internet browser. After logging in, you can see the menu on the left hand side of the browser window, which gives access to all available functions. MenuAfter logging in, you will be shown the home screen. Using the menu on the left side of the screen you can access important system functions. You can see the functions and applications to which your accound has been granted access. Note, that depending on your login, i.e. the currently logged in user, different software functions may be visible and usable. Extract from the menu:
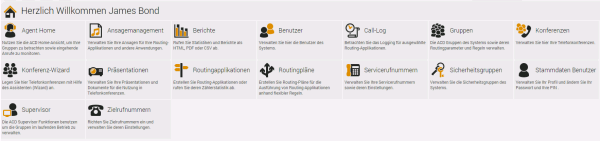
The menu entries are arranged in alphabetical order. In this document, most functions are described in the Administration chapter. The administration functions comprise user management, prompt management, contacts, document and settings management. You will need these functions to administer all applications. Functions which mainly refer to ACD, Network IVR and the Conference Server, can be found in the respective chapter. When you choose a function in the menu, a window is shown which shows you data and settings relevant to the actual function. Please do not use the forwards and backwards buttons in the browser to navigate between screens and functions. Home Screen ButtonsAfter logging in, you can see on the right next to the menu a selection of functions which you can access by clicking (as an alternative to the menu selection). Example:
Data TablesWhen you select a function, the home screen (or previous screen) is replaced by a screen showing data pertaining to the selected function. Example: In a lot of cases, you will see a table of data associated with the function, as it is displayed in the example Conference PINs. If words in the table are shown in a different colour, then they are usually clickable links which represent commands operating on the row of data, for example Edit or Delete. You can sort the table data by clicking on one of the column headers. In the header of some columns you can see the symbols The plus and minus symbols In many cases the data for a function is split up into many tables, which you can view by selecting the relevant tabs at the top of the data area. Example: ToolbarAt the top of the work area to the right of the icon depicting the current function, you can see the toolbar. Depending on the selected system function, instructions on buttons and tools are selectable here, for example New to create a new record. Using the arrow buttons, you can navigate through multi page tables. The filter function allows you to enter characters, to selectively display items in a table. The filter always applies to the column by which the data table is currently sorted. Example Icon and Toolbar:
When searching, you can also use % as a wildcard. Work Break IndicatorOn the right of the toolbar respectively on the left, you can see the Work Break Indicator of the currently logged in user. On the right side the client work break indicator is displayed. The group work break indicator is displayed on the left hand side in agent home, when you select the details of a particular group. The work break indicators show, referring to the client (client status) respectively referring to the current ACD Group (group status) if it is possible and sensible to set the pause mode. The number of available pause slots N is calculated in proportion to the number of logged in agents. A setting in the ACD Group (Agent Group) is programmed for this purpose. The status information will indicate:
To receive further information in the form of a tool tip move the mouse over the status information. Status InformationTo the right of the toolbar, you can see the status of the currently logged in user. Example: Note: The displayed status categories and their colours can be different from those displayed in this example. Depicted from left to right are: Coloured squares, which enable you to define the ACD status of the user (if this user is for example an agent in the call center). The colours equate to the defined Agent Status. The squares are only visible for users who are associated with an ACD group. One click is enough to change the status. When changing from a not logged in status, to a logged in status, the first available telephone number from the user account is used. Via the grey squares with a preconfigured number you can switch between the configured telephone numbers in the user account. These fields are only visible for user accounts who are associated with an ACD group. Note: The status manual post call does not end automatically, and is ended only when the user chooses another status category. The current ACD status of the user, and the telephone number of the agent (possibly shortened). Clicking on either displays a popup dialog in which both the status and the telephone number can be changed simultaneously. Alternatively, use the previously described coloured dots. Below the current phone number and the phone status are displayed. Through a button (x) at the phone status, the agent can set oneself to Free, if the ACD has not been able to detect the status. This can, for example, be a good idea if agents transfer a call within their PBX systems rather than using the ACD functions. In so doing, agents can activate themselves, and receive further calls. Note, that using this function can not be equated with “rejecting” a call. The call itself is not disconnected and remains in the ringing or connected state. Only the status of the agent in the ACD is changed. The user, whose identity is being impersonated by the currently logged in user. Use Logout to leave the impersonated identity and return to the original user account. The logged in user. Use Change to display a table of identities which you can change to, assuming the rights to use that function are granted to your account. Connection StatusThe symbol on the right shows the status of the connection to the web server.
The colours mean:
If yellow or red is being shown, try to refresh the browser using F5 to return to the main screen. If this does not work, then the connection is broken and you will need to login to the system again. IconsIn the left and right corner of the screen, you can see further icons. On the right side: The question mark is used to access the online help. The home symbol is used to return to the home page of the system. Use Logout to log off the system completely. Depending on the configuration of the system, a button also might be displayed for this option. Use the flag symbols to change the language in which the system is displayed. Simply click on the desired flag to select the language you require. The initially displayed language depends on the settings in your internet browser. If you have, for example, setup English as a higher priority language than German, then you will initially see the portal in English. Currently loaded data will not be translated when the language is changed. To translate the data, you need to access the function from the menu again. The captions and menu options are, however, immediately changed. Status BarThe status bar at the bottom of the screen shows the following: Version: The product name and exact version (build) of the software. Current User Support address (this can be modified by the reseller) Example: |


| Sv translation | ||
|---|---|---|
| ||
Das System ist vollständig über einen Internet-Browser bedienbar. Nach dem Login sehen Sie im Browserfenster auf der linken Seite ein Menü, über das sämtliche Funktionen erreichbar sind. Menü
Die Menüeinträge sind alphabetisch geordnet. In diesem Dokument sind die meisten von ihnen im Kapitel Verwaltung zusammengefasst. Die Verwaltungsfunktionen umfassen Daten zu Benutzern, Ansagen, Kontakten, Dokumenten usw. sowie Grundeinstellungen, die Sie bei der Arbeit benötigen. Funktionen die sich überwiegend auf ACD, Network IVR und Konferenz-Server beziehen, sind in den gleichnamigen Abschnitten beschrieben.
|


| Sv translation | ||
|---|---|---|
| ||
Le système peut être entièrement exploité au moyen d'un navigateur internet. Après vous être connecté, vous pouvez voir le menu à gauche de la fenêtre du navigateur, qui donne accès à toutes les fonctions disponibles. MenuAprès vous être connecté, l'écran d'accueil s'affiche. Le menu situé à gauche de l'écran vous permet d'accéder à des fonctions importantes du système. Vous pouvez voir les fonctions et les applications auxquelles votre ordinateur a été autorisé à accéder. Notez que selon votre identifiant, c'est-à-dire l'utilisateur actuellement connecté, différentes fonctions logicielles peuvent être visibles et utilisables. Extrait du menu :
Les entrées du menu sont classées par ordre alphabétique. Dans ce document, la plupart des fonctions sont décrites dans le chapitre Administration . Les fonctions d'administration comprennent la gestion des utilisateurs, la gestion des invites, des contacts, des documents et des paramètres. Vous aurez besoin de ces fonctions pour gérer toutes les demandes. Les fonctions qui concernent principalement l'ACD, le réseau IVR et le serveur de conférence, se trouvent dans le chapitre correspondant. Lorsque vous choisissez une fonction dans le menu, une fenêtre s'affiche qui vous montre les données et les paramètres pertinents pour la fonction en question. Veuillez Ne pas utiliser les boutons "Avancer" et "Reculer" du navigateur pour naviguer entre les écrans et les fonctions. Boutons de l'écran d'accueilUne fois connecté, vous pouvez voir sur la droite, à côté du menu, une sélection de fonctions auxquelles vous pouvez accéder en cliquant (en alternative à la sélection du menu). Exemple:
tableaux de donnéesLorsque vous sélectionnez une fonction, l'écran d'accueil (ou l'écran précédent) est remplacé par un écran affichant les données relatives à la fonction sélectionnée. Exemple: Dans de nombreux cas, vous verrez un tableau de données associé à la fonction, tel qu'il est affiché dans les exemples de codes PIN de conférence. Si les mots du tableau sont affichés dans une couleur différente, il s'agit généralement de liens cliquables qui représentent des commandes opérant sur la ligne de données, par exemple Modifier ou Supprimer. If the words in the table are displayed in a different color, they are usually clickable links that represent commands operating on the data line, such as Edit or Delete. Dans l'en-tête de certaines colonnes, vous pouvez voir les symboles Les symboles plus et moins Dans de nombreux cas, les données d'une fonction sont divisées en plusieurs tableaux, que vous pouvez consulter en sélectionnant les onglets correspondants en haut de la zone de données. Exemple: Barre d'outilsEn haut de la zone de travail, à droite de l'icône représentant la fonction en cours, vous pouvez voir la barre d'outils. Selon la fonction du système sélectionnée, les instructions sur les boutons et les outils sont sélectionnables ici, par exemple Nouveau pour créer un nouvel enregistrement. En utilisant les boutons fléchés, vous pouvez naviguer dans des tableaux de plusieurs pages. La fonction de filtrage vous permet d'entrer des caractères, d'afficher sélectivement des éléments dans un tableau. Le filtre s'applique toujours à la colonne par laquelle le tableau de données est actuellement trié. Exemple d'icône et de barre d'outils :
Lors d'une recherche, vous pouvez également utiliser % comme joker. Indicateur d'interruption de travailSur la droite de la barre d'outils, respectivement sur la gauche, vous pouvez voir l'indicateur de pause de travail de l'utilisateur actuellement connecté. Sur le côté droit, l'indicateur d'interruption de travail du client est affiché. L'indicateur de pause dans le travail de groupe est affiché sur le côté gauche dans l'acceuil agent, lorsque vous sélectionnez les détails d'un groupe particulier. Les indicateurs de pause de travail indiquent, en se référant au client (statut du client) respectivement en se référant au groupe ACD actuel (statut du groupe) s'il est possible et judicieux de régler le mode pause. Le nombre de slots de pause disponibles N est calculé proportionnellement au nombre d'agents connectés. Un réglage dans le groupe ACD (groupe d'agents) est programmé à cet effet. Les informations sur le statut indiqueront :
Pour recevoir des informations complémentaires sous la forme d'une info-bulle, passez la souris sur les informations de statut. Statut InformationÀ droite de la barre d'outils, vous pouvez voir le statut de l'utilisateur actuellement connecté. Exemple: Note: Les catégories de statut affichées et leurs couleurs peuvent être différentes de celles affichées dans cet exemple. De gauche à droite sont représentés : Des carrés de couleur, qui vous permettent de définir le statut ACD de l'utilisateur (si cet utilisateur est par exemple un agent du centre d'appel). Les couleurs correspondent au statut d'agent défini. Les carrés ne sont visibles que pour les utilisateurs qui sont associés à un groupe ACD. Un clic suffit pour changer le statut. Lors du passage d'un statut non connecté à un statut connecté, le premier numéro de téléphone disponible du compte d'utilisateur est utilisé. Les carrés gris avec un numéro préconfiguré vous permettent de passer d'un numéro de téléphone configuré à l'autre dans le compte utilisateur. Ces champs ne sont visibles que pour les comptes d'utilisateurs qui sont associés à un groupe ACD. Note: Le post-appel manuel de statut ne se termine pas automatiquement, et n'est terminé que lorsque l'utilisateur choisit une autre catégorie de statut. Le statut actuel du ACD de l'utilisateur, et le numéro de téléphone de l'agent (éventuellement abrégé). En cliquant sur l'un ou l'autre, une fenêtre de dialogue s'affiche, dans laquelle le statut et le numéro de téléphone peuvent être modifiés simultanément. Sinon, utilisez les points de couleur décrits précédemment. Sous le numéro de téléphone actuel et le statut du téléphone sont affichés. Grâce à un bouton (x) au niveau de l'état du téléphone, l'agent peut se mettre en position Libre, si le ACD n'a pas pu détecter l'état. Cela peut, par exemple, être une bonne idée si les agents transfèrent un appel au sein de leurs systèmes PBX plutôt que d'utiliser les fonctions ACD. Ce faisant, les agents peuvent s'activer et recevoir d'autres appels. Notez que l'utilisation de cette fonction ne peut pas être assimilée au "rejet" d'un appel. L'appel lui-même n'est pas déconnecté et reste en état de sonnerie ou de connexion. Seul le statut de l'agent au sein de l'ACD est modifié. L'utilisateur, dont l'identité est usurpée par l'utilisateur actuellement connecté. Utilisez la fonction Déconnexion pour quitter l'identité usurpée et revenir au compte utilisateur d'origine. L'utilisateur connecté. Utilisez la fonction Modifier pour afficher un tableau des identités que vous pouvez modifier, en supposant que les droits d'utilisation de cette fonction sont accordés à votre compte. Statut de connexionLe symbole à droite indique l'état de la connexion au serveur web.
Les couleurs signifient :
Si le jaune ou le rouge s'affiche, essayez de rafraîchir le navigateur en utilisant la touche F5 pour revenir à l'écran principal. Si cela ne fonctionne pas, la connexion est interrompue et vous devrez vous reconnecter au système. IcônesDans les coins gauche et droit de l'écran, vous pouvez voir d'autres icônes. Sur le côté droit : Le point d'interrogation est utilisé pour accéder à l'aide en ligne. Le symbole de la maison est utilisé pour revenir à la page d'accueil du système. Utilisez la fonction " Déconnexion " pour vous déconnecter complètement du système. En fonction de la configuration du système, un bouton peut également être affiché pour cette option. Utilisez les symboles du drapeau pour changer la langue dans laquelle le système est affiché. Il suffit de cliquer sur le drapeau souhaité pour sélectionner la langue souhaitée. La langue initialement affichée dépend des paramètres de votre navigateur Internet. Si vous avez, par exemple, choisi l'anglais comme langue prioritaire par rapport à l'allemand, vous verrez d'abord le portail en anglais. Les données actuellement chargées ne seront pas traduites lorsque la langue est changée. Pour traduire les données, vous devez accéder à nouveau à la fonction à partir du menu. Les légendes et les options de menu sont toutefois immédiatement modifiées. Barre d'étatLa barre d'état en bas de l'écran indique ce qui suit : Version : Le nom du produit et la version exacte (build) du logiciel. Utilisateur actuel Adresse du support (elle peut être modifiée par le revendeur) Exemple: |