The CHAT role is used for conducting chat sessions with agents from external websites.
The chat server is a Java application, which can be installed in parallel on the web servers - with a corresponding RAM extension of about 4 GB per server - or installed on a separate server.
Java 8 Installation
In this step Java 8 is installed on the server.
yum -y install https://cdn.jtel.de/downloads/java/jdk-8u202-linux-x64.rpm
Installing and Configuring ClientMessenger
ClientMessenger Installation
The ClientMessenger directory is copied to /home/jtel.
cp -R /home/jtel/shared/JTELCarrierPortal/Utils/Install/ClientMessenger/ /home/jtel/ClientMessenger
chown -R jtel:jtel /home/jtel/ClientMessenger
Hazelcast Cluster Configuration
The configuration of the Hazelcast cluster must be checked. For new installations of Release 3.11 as of April 1, 2018, the entries in hazelcast.xml are available, but not before.
- On the one hand, the chat server is accepted as a member of the cluster.
On the other hand the CHAT buffers and counters are added to the configuration - if not available.
The necessary configuration sections in hazelcast.xml are listed here
	...

	<tcp-ip enabled="true">
 		...
		<member>CHATSERVER</member>
	</tcp-ip>

	...

	<ringbuffer name="CHAT">
		<in-memory-format>BINARY</in-memory-format>
		<backup-count>1</backup-count>
		<async-backup-count>0</async-backup-count>
		<time-to-live-seconds>60</time-to-live-seconds>
		<capacity>500</capacity>
	</ringbuffer>

	<map name="CHATCOUNTERS">
        <backup-count>0</backup-count>
        <async-backup-count>1</async-backup-count>
        <time-to-live-seconds>600</time-to-live-seconds>
        <eviction-policy>LRU</eviction-policy>
        <max-size policy="PER_NODE">5000</max-size>
	</map>
View all computers in the Hazelcast cluster:
- Role DATA, DB master
- update hazelcast.xml
- execute updatepl.sh
- Role TEL
- update hazelcast.xml
- restart PlatformUDPListener
- Role WEB
- update hazelcast.xml
execute updatejb.sh
- Role CHAT (the system that is being installed!)
- its best to copy hazelcast.xml
Install ClientMessenger as a daemon process
If the repositories are located on a Windows machine (this can only affect old installations), the start script /etc/init.d/jtel-clientmessenger must be repaired before, so that CR+LF becomes only LF.
sed -i -e 's/\r//g' /home/jtel/ClientMessenger/init.d/jtel-clientmessenger
The configuration or the start file jtel-clientmessenger may have to be adapted so that the database connection can be established. Here <password> must be replaced with the password for the root user of the database:
...
                        -Dde.jtel.platform.clientmessenger.connection=jdbc:mysql://acd-dbm/JTELWeb?user=root\&password=<password>\&characterEncoding=utf8 \
...

# For jtel portal version >= 3.25
-Dde.jtel.platform.clientmessenger.connection=jdbc:mysql://acd-dbm/JTELWeb?user=root\&password=<password>\&characterEncoding=utf8\&serverTimezone=Europe/Berlin \
Then, the process is installed as a Linux daemon:
cd /home/jtel/
cp /home/jtel/ClientMessenger/init.d/jtel-clientmessenger /etc/init.d/
chmod 755 /etc/init.d/jtel-clientmessenger
chkconfig jtel-clientmessenger on
service jtel-clientmessenger start
Create update script
An update script is created for updating the chat server:
cat <<EOFF>/usr/local/bin/updatesc.sh
#!/bin/bash
service jtel-clientmessenger stop
cp /home/jtel/shared/JTELCarrierPortal/Utils/Install/ClientMessenger/bin/* /home/jtel/ClientMessenger/bin
cp /home/jtel/shared/JTELCarrierPortal/Utils/Install/ClientMessenger/public /home/jtel/ClientMessenger/ -r
 chown -R jtel:jtel /home/jtel/ClientMessenger
service jtel-clientmessenger start
EOFF
chmod +x /usr/local/bin/updatesc.sh
Firewall configuration
Next, the open ports for the chat service must be entered in the firewall and saved persistently. Here you can distinguish whether http (speak unsecure websocket) or https (secure websocket) is used.
Since the load balancer usually decrypts the https, for https only port 3003 needs to be opened to the load balancer.
Firewall configuration http
Execute the following commands, on the following machines:
- On CHAT server (here the chat port and the Hazelcast Cluster ports)
firewall-cmd --zone=public --add-port=5701-5801/tcp --permanent
firewall-cmd --zone=public --add-port=3000/tcp --permanent
firewall-cmd --reload
- On all LB - with http connection to the outside
firewall-cmd --zone=public --add-port=3000/tcp --permanent
firewall-cmd --reload
Firewall configuration https
- On all LB - with https connection to the outside
firewall-cmd --zone=public --add-port=3003/tcp --permanent
firewall-cmd --reload
Firewall Centos 6
service iptables status
iptables -I INPUT 4 -p tcp -m tcp --dport 5701:5801 -j ACCEPT
iptables -I INPUT 4 -p tcp -m tcp --dport 3000:3003 -j ACCEPT
service iptables save
service iptables restart
Load Balancer Configuration
haproxy.cfg Adjustments
For http
The following adjustments are made on the haproxy, in case of a http connection for the chat to the outside:
frontend acdportal_chat_ws
        mode            http
        bind            :3000
        timeout         client 1d
        default_backend backend_chat_ws

backend backend_chat_ws
        mode            http
        balance         leastconn # roundrobin
        server          chatserver1 <ip_addresse_oder_name>:3000 weight 1 check inter 1m
        server          chatserver2 <ip_addresse_oder_name>:3000 weight 1 check inter 1m
For https
frontend acdportal_chat_wss
        mode            http
        bind            :3003 ssl crt /etc/haproxy/haproxy.pem
        timeout         client 1d
        default_backend backend_chat_ws

backend backend_chat_ws
        mode            http
        balance         leastconn # roundrobin
        server          chatserver1 <ip_addresse_oder_name>:3000 weight 1 check inter 1m
        server          chatserver2 <ip_addresse_oder_name>:3000 weight 1 check inter 1m
Reload Haproxy
Then, reload the haproxy with the following command:
service haproxy reload
Chat Configuration
Parameters (as sysadmin)
For https / wss
ACD.Chat.Script.Library.URL | https://<load-balancer>:3003/gui/ |
| ACD.Chat.Server.Base.URL | wss://<load-balancer>:3003 |
For http / ws
ACD.Chat.Script.Library.URL | https://<load-balancer>:3000/gui/ |
| ACD.Chat.Server.Base.URL | ws://<load-balancer>:3000 |
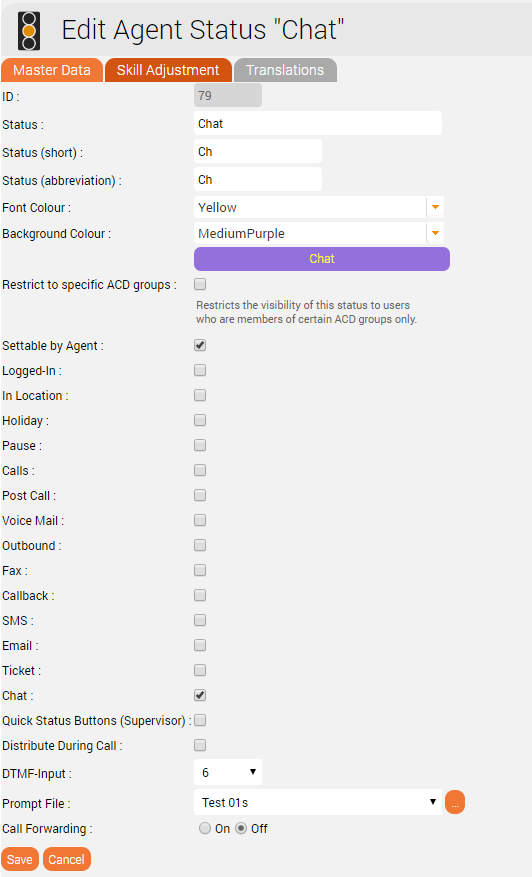
Status
An appropriate agent status for "Chat" - or an existing status - must be configured so that chat is distributed to the agent:
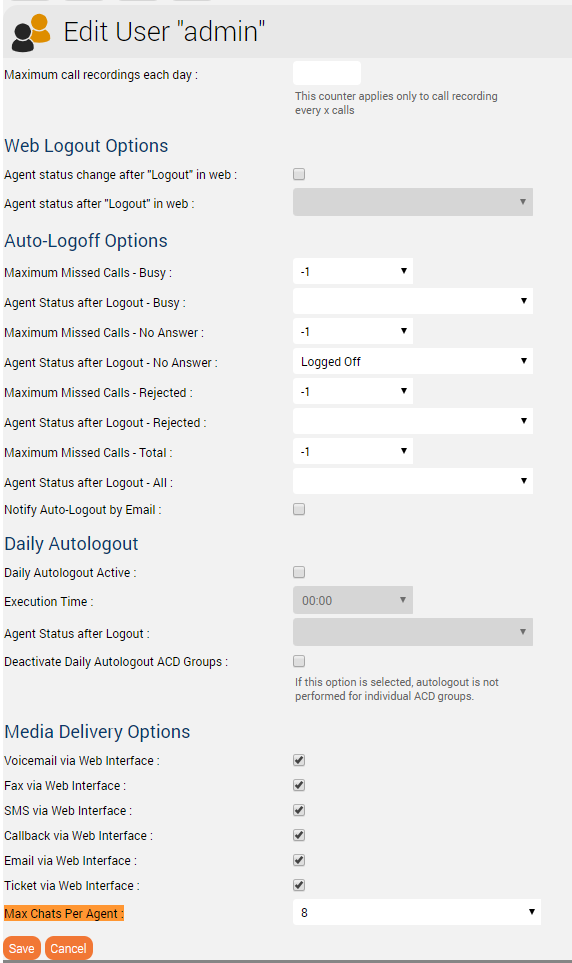
Max chats per agent
The maximum number of parallel chats per agent must be configured. This value is set to 0 by default for all agents.
Additional configurations for WhatsApp
In order for What's App to work, further configurations still need to be made.
Note: setting up the WhatsApp business account or connecting to the provider (currently TynTec) is done directly with the provider.
https
The load balancer must be operated with https and a valid certificate.
Additional configuration in jtel-clientmessenger
The parameter DATADIR must be checked. This must point to either the /srv/jtel/shared/Data/Clients/ directory if it is hosted directly on the chat server, or /home/jtel/shared/Data/clients/ if the server has mooted the directory.
DATADIR="/home/jtel/shared/Data/clients/"
Additional configurations on the load balancer
Additional entries are required in the frontend area for the portal:
frontend acdportal_https
...
        acl whatsapp_req    path /incoming
        acl whatsapp_req    path /delivery
...
        use_backend     backend_chat_ws if whatsapp_req
Additional parameters
The following system parameters must be checked in the portal:
| Parameter | Value | Comment |
|---|---|---|
| ACD.Whatsapp.Server.Base.URL | The URL used by the agent client to allow the agent to reply to messages. This must be resolved from all agent workstations to a valid URL via DNS, and is directed to the chat server via the haproxy. | |
| ACD.Whatsapp.Whatsapp.Url | https://jtel-portal:3003 | The URL used by the outside world (WhatsApp users) to download the attachments of the messages. This must be resolved from the Internet to a valid URL via DNS, and is directed to the chat server via the haproxy. |
| ACD.Whatsapp.Tyntec.Url | https://api.tyntec.com/chat-api/v2/messages | The URL of the TynTec API for WhatsApp. |
Customize TynTec API endpoints
It may be necessary to adjust the API endpoints to which the messages are sent. Currently TynTec does not offer the possibility to do this via a web configuration, this must be done via a REST call. The easiest way to do this is to use Postman.
The following parameters are required, both callback URLs are adjusted according to the end point of the system.
| Setting | Value |
|---|---|
| URL | https://api.tyntec.com/chat-api/v2/applications/default |
| Request Type | PATCH |
| Authorization | apikey Value = the generated API Key from Tyntec |
| Additional Headers | Accept application/problem+json |
| Additional Headers | Content-Type application/json |
| Body | { |
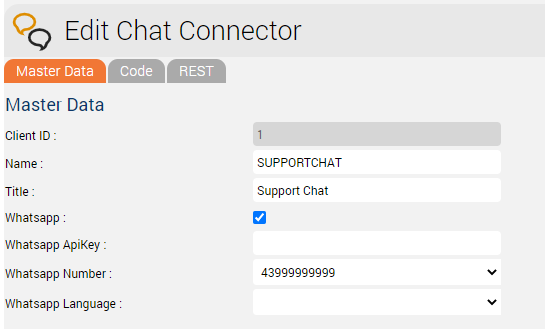
Chat Connector Configuration
The following additional parameters are configured in the Chat Connector:
- The check mark Whatsapp is set.
- The TynTec API Key is entered.
- The phone number is entered in E.164 format.
- The language used for automatic Whatsapp responses