Contacts are callers to the system, for example customers, support benificiaries or participants of a conference. Contacts are used to identify callers to the system. If the system is setup correspondingly, contacts are created for every call to the system.
Choose System Settings - Contacts in the main menu, to view the table of existing contacts.
Using the option Export CSV you can export the table to a CSV file which you can then download.
You can use Import to import contacts from a file. The file must be in CSV format.
When exporting and importing user data via CSV files, the following conventions apply:
- Records in a file are separated by CR + LF (Windows line ending).
- CR + LF within a record is not allowed.
- Fields within records are separated by semicolons.
- The field descriptions (see table) are not provided.
- A record contains all fields in the defined order (see following table).
- Missing fields are not allowed.
- Field contents can be supplied enclosed by inverted commas. In this case the inverted commas are not considered part of the data.
- The detection of duplicates is performed using the value provided in the CheckDuplicateFields field. Duplicates are overwritten if you specify the option Overwrite Duplicates.
The following fields are specified per record:
| Field | Contents |
“Contact” | Fixed text: “Contact” This identifies the type of the record. |
ContactClassName | The name of the contact class for this record. Leave empty, |
| What fields are to be used to identify a duplicate. The fields |
Title | The title of the contact |
Name | Name |
FirstName | First Name |
Company | Company |
Position | The contact’s position in the company |
Street1 | Street |
Street2 | Additional Street |
PostCode | Post Code |
City | City |
Country | Country |
Tel1 | The telephone number in E.164 format |
Fax | The fax number in E.164 format |
EMail1 | The email address. |
ListsName | If the name of a list is provided here, then the contact is |
Use New in the toolbar to create a new contact. Entries can be changed by selecting Edit in the Action column. Provide the following information:
Master Data
| ID | Internal ID of the record in the database. |
| Contact Class | The optional selection of a Contact Class |
Title | The title of the contact |
First Name | First Name |
Name | Name |
Company | Company |
Position | The contact’s position in the company |
Street | Street |
Street 2 | Additional Street |
Post Code | Post Code |
City | City |
Country | The state or county |
| Customer Number | Customer Number or ID |
Communications
Telephone 1 | The first number of the contact |
| Telephone 2 | The second number of the contact |
| Telephone 3 | The thirdnumber of the contact |
| Telephone 4 | The fourth number of the contact |
| Telephone 5 | The fifth number of the contact |
Fax | The contact’s fax number |
Email 1 | The contact’s email address. |
Image
In Edit mode, you can upload an image for the contact. This image is, for example, shown when the contact participates in a telephone conference.
Automatic Contact Import
It is possible to configure an automatic file import for contacts.
Configuration
The following parameter must be set, as sysadmin.

The Parameter Portal.Contacts.Import.Directory.Active must be set to 1.
Note: the webservers must be restarted when this parameter is set.
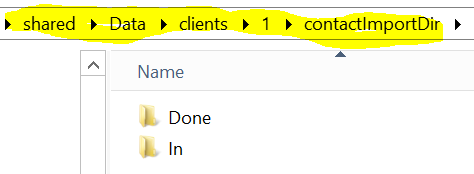
A directory is created in the Share Directory - Data/Clients/Client-ID/ (as JTEL User) - contactImportDir. The following subdirectories are then created:
- In
- Done
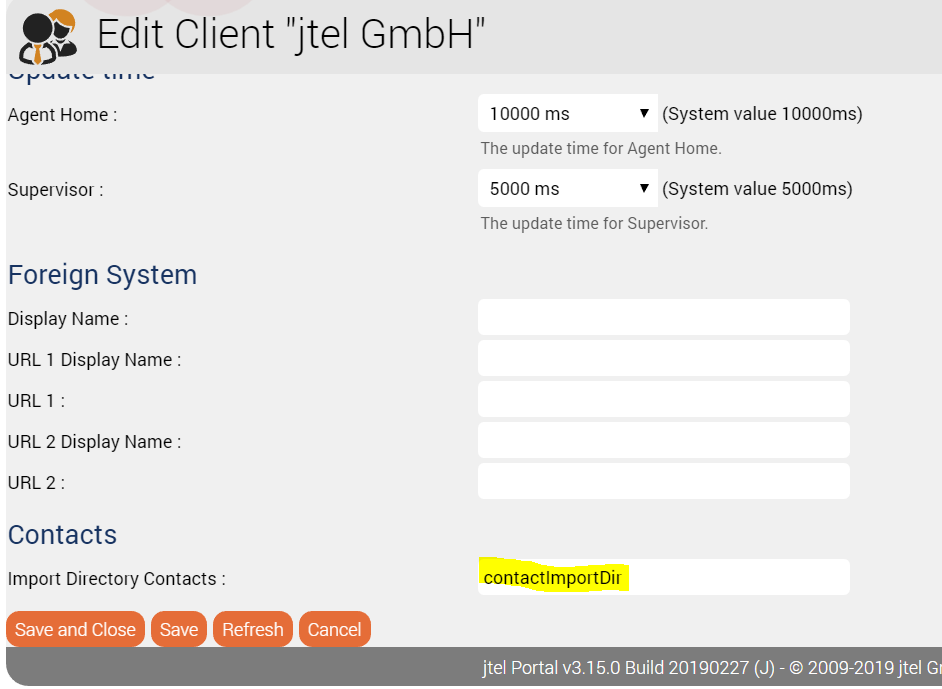
In Client Master Data, the Import Directory is specified.
Note: the name must correspond to the directory created above.
Import
A file, in the correct format (UTF-8), is placed in the In directory.
If the import is successful, the file is moved to Done, and the contacts are visible in the system.