| Sv translation | ||||||||||||||||||
|---|---|---|---|---|---|---|---|---|---|---|---|---|---|---|---|---|---|---|
| ||||||||||||||||||
IntroductionThis page provides a guide to the required configuration to activate the jtel Teams Presence API in your jtel system. The API functions are described in detail at this page. Azure ConfigurationCreate an Access Token for the Application- PrerequisitesThe configuration should be done by a Azure AD Tenant Administrator. The configuring user must have access to the following:
Azure Configuration - Step by Step Guide
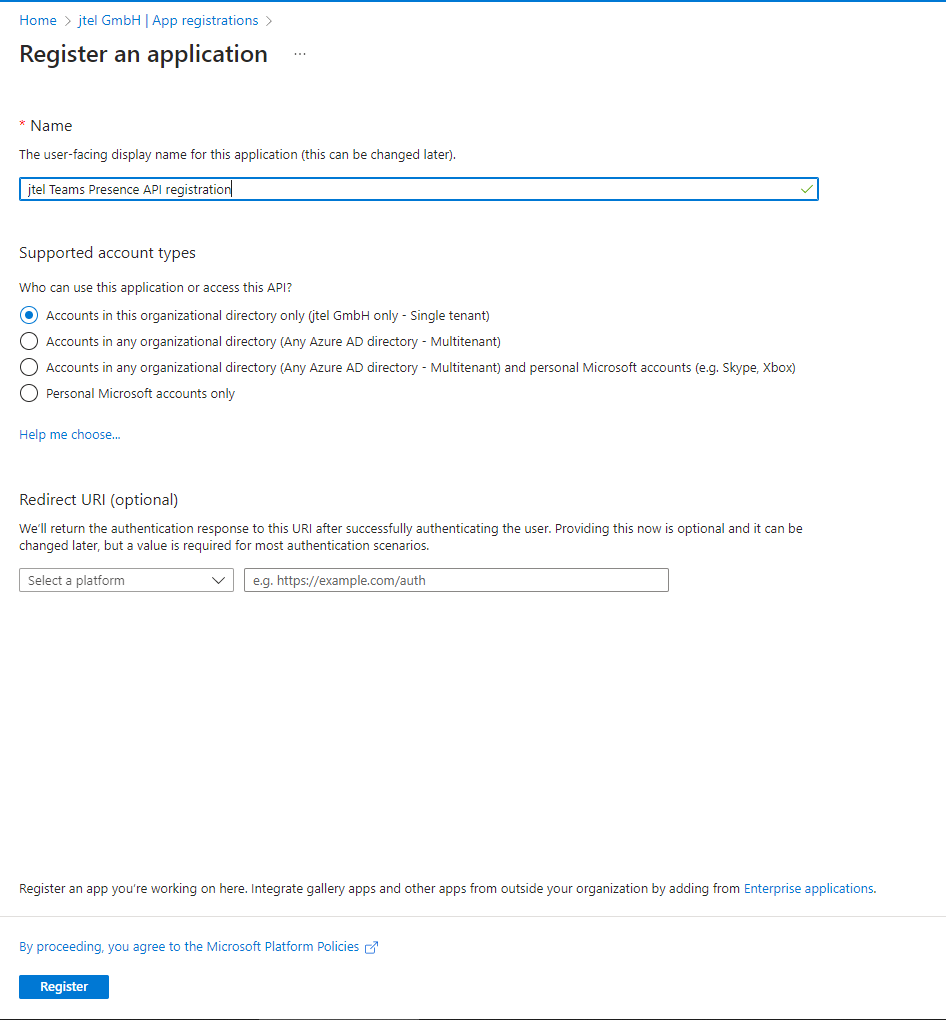
Create App RegistrationIn the Azure Active Directory of your Tenant, navigate to App registrations and create a New registration. Choose a name and select "Register".
Create a User with permissions to use the ApplicationNavigate to Azure Active Directory → Users and create a new User Additional User ConfigurationThe users default password must be changed during first login. Log into the account on for example a different browser to complete a first-login and set a new password.
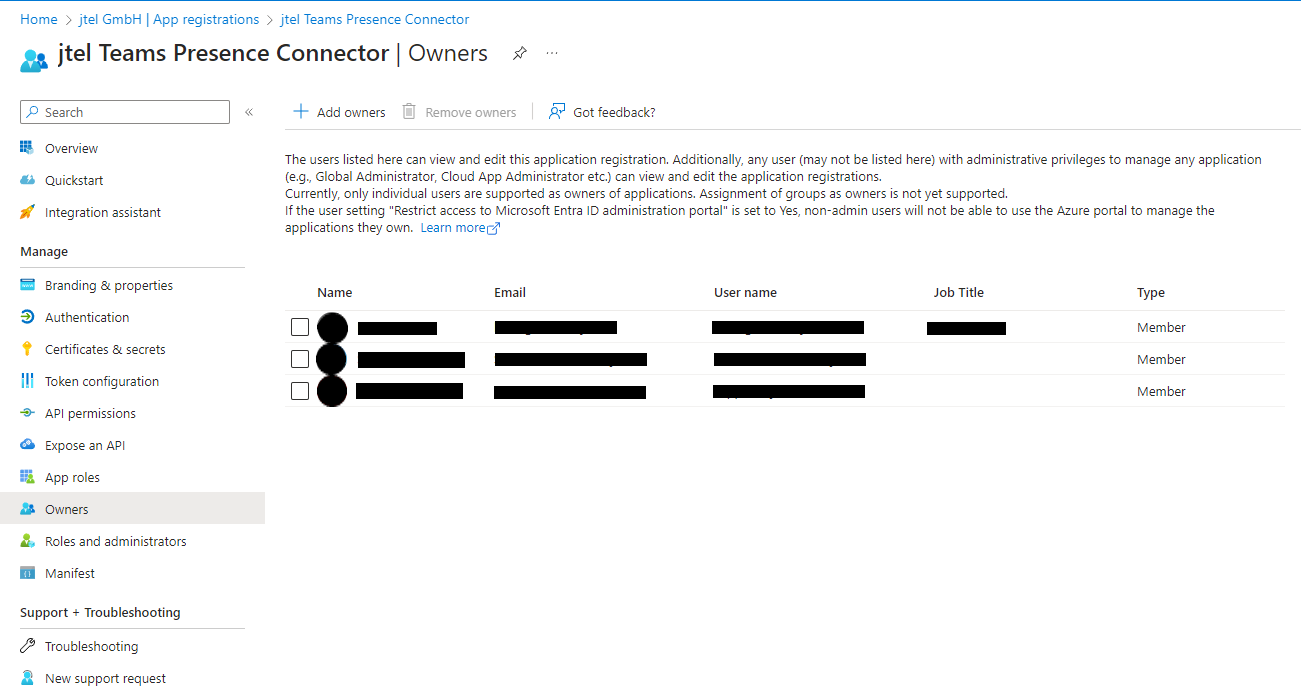
Depending on your Azure AD configuration and security, the users password might reset by default after a defined amount of time has passed. If you do not wish to disable this for this User, make sure to keep track of the date, as the configuration in the jtel Teams Presence Aggregator contains the password of the user and must be changed accordingly. Assign the User to the ApplicationNavigate to the registered App configuration and into the tab "Owners" and add the User.
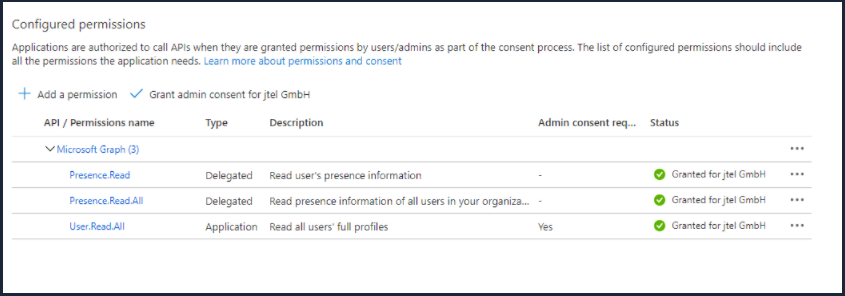
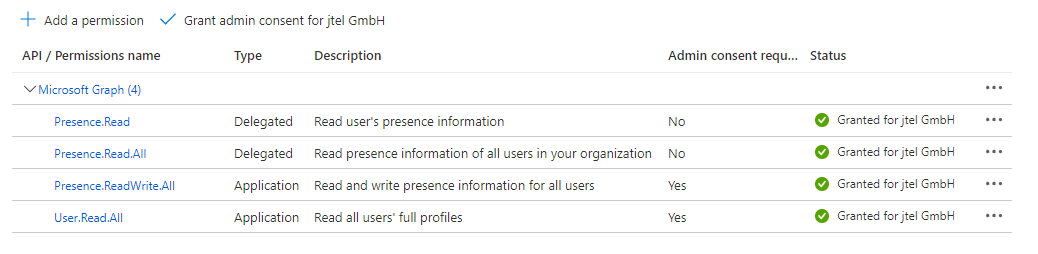
Grant PermissionsThe Presence Connector will need at least this. Also, click on requires permissions to read the users presence status. Configure the following permissions with "Add a permission" and grant the permssions by clicking on "Grant admin consent for Jtel GmbH<Tenant Name>".
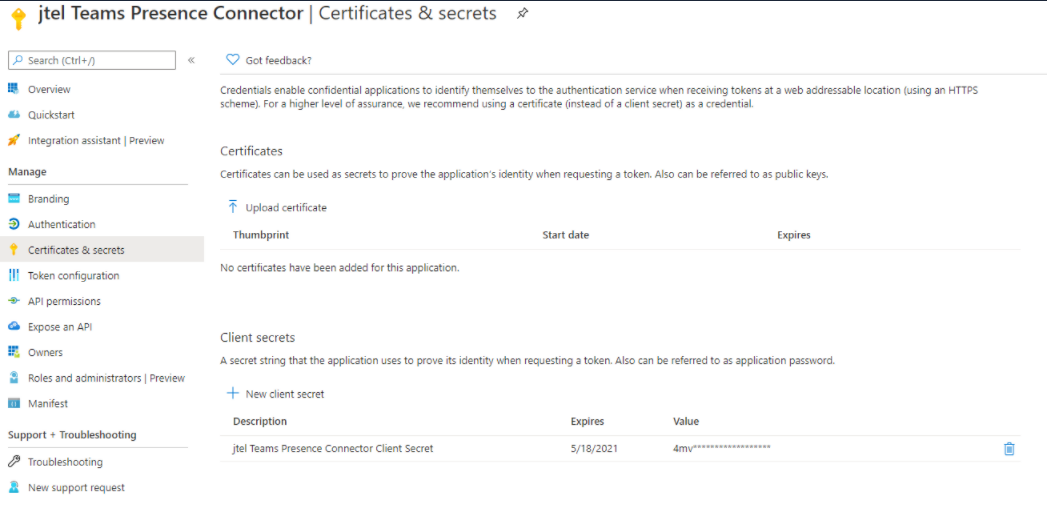
Create a Client SecretNavigate to Certificates and Secrets and click on "New client secret" to add a new secret.
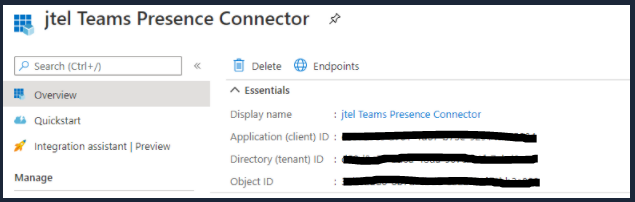
Gather all InformationYou will need: Please provide all information on the following table to the contact who will be configuring the jtel Teams Presence Connector in your jtel ACD: Note: The Secret Value is required, not the Secret ID. The
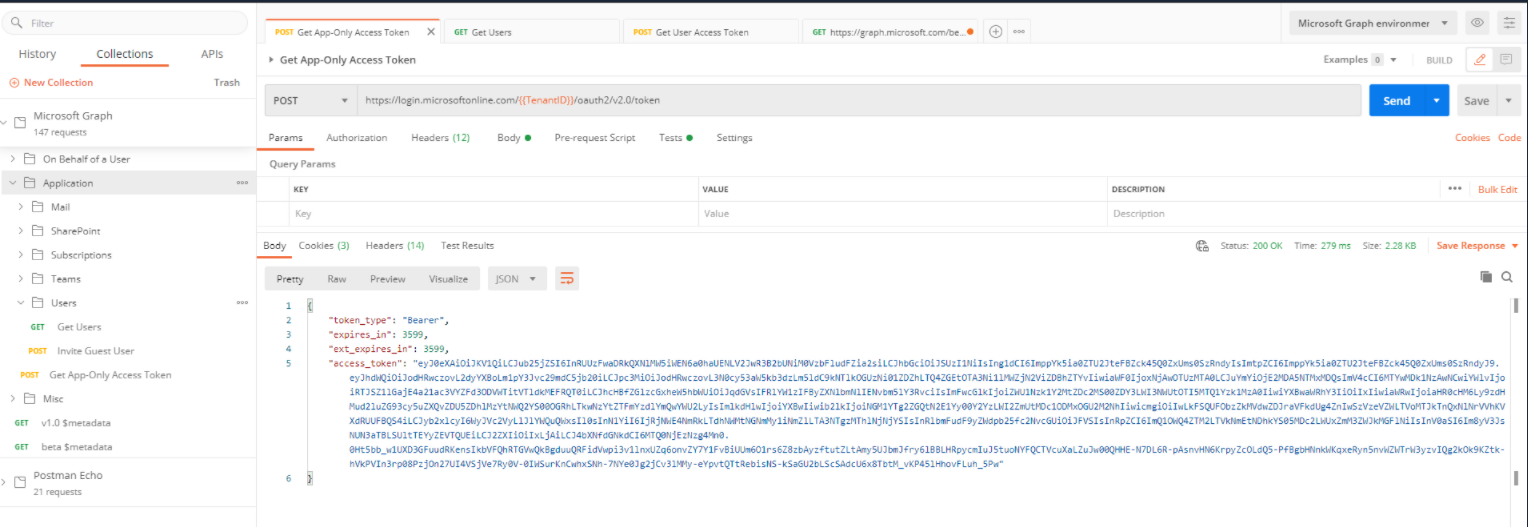
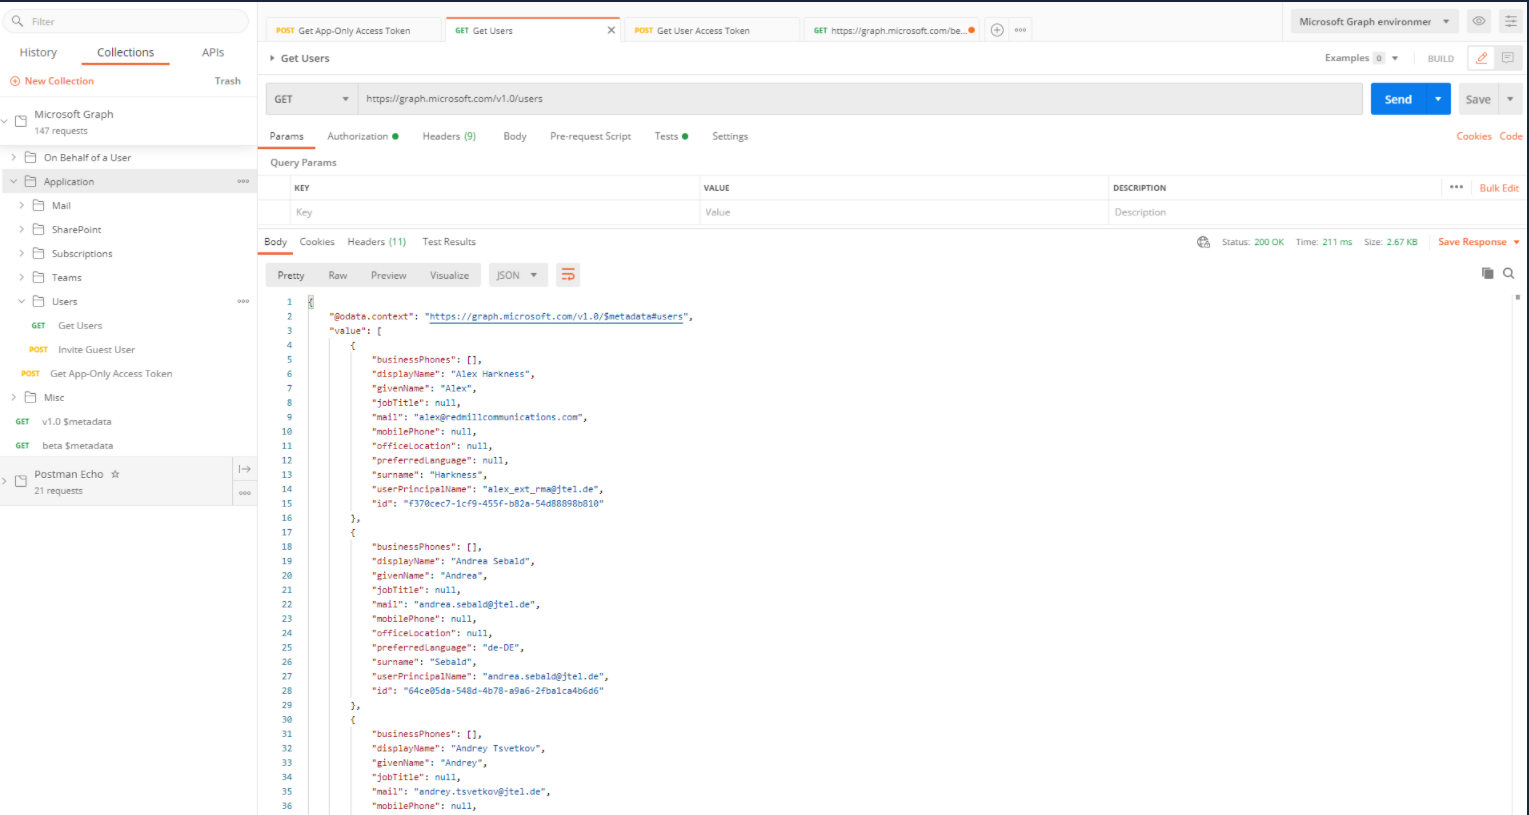
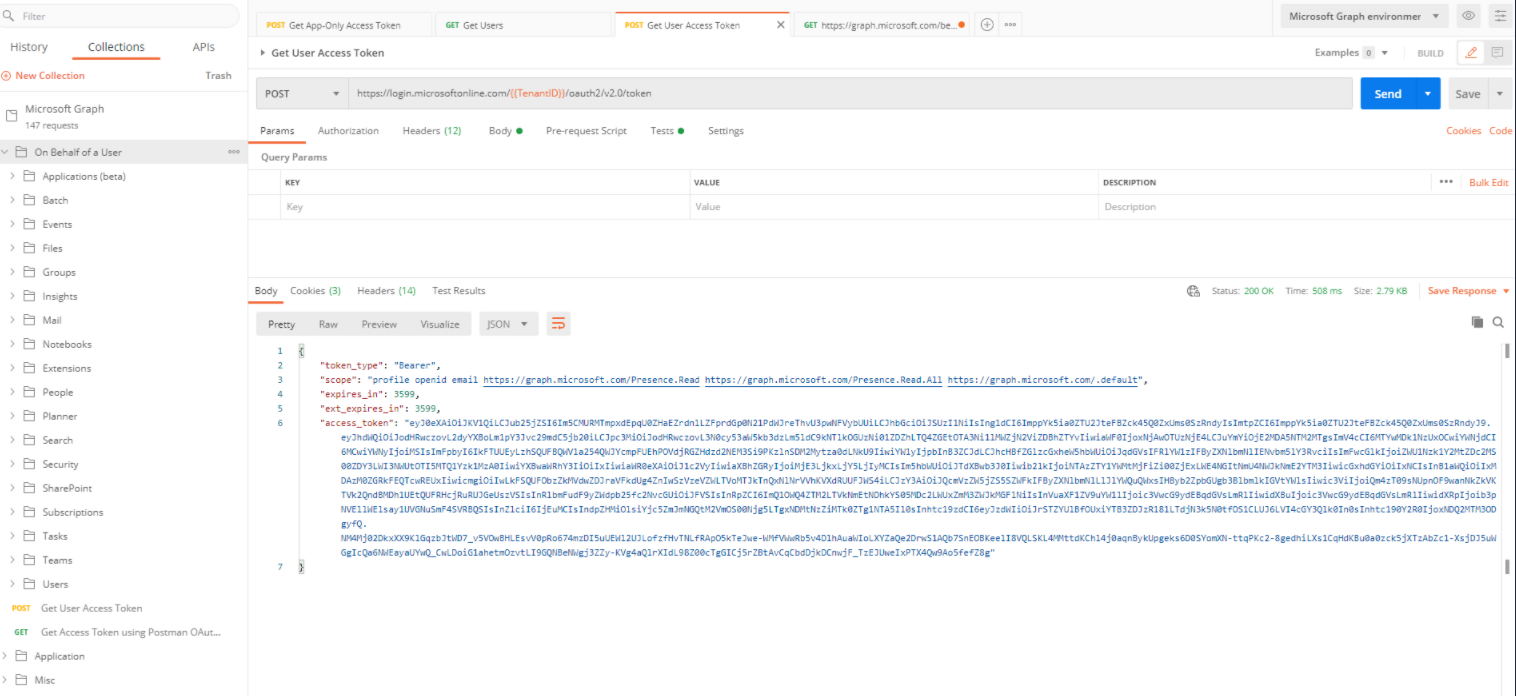
The user and password are the email and password for the Teams Administrator. Postman CollectionsTo see what is going on, import the postman collections as described here: https://github.com/microsoftgraph/microsoftgraph-postman-collections Demo:Application: Get App Only Access Token
Application: Get Users
On Behalf of a User: Get User Access Token
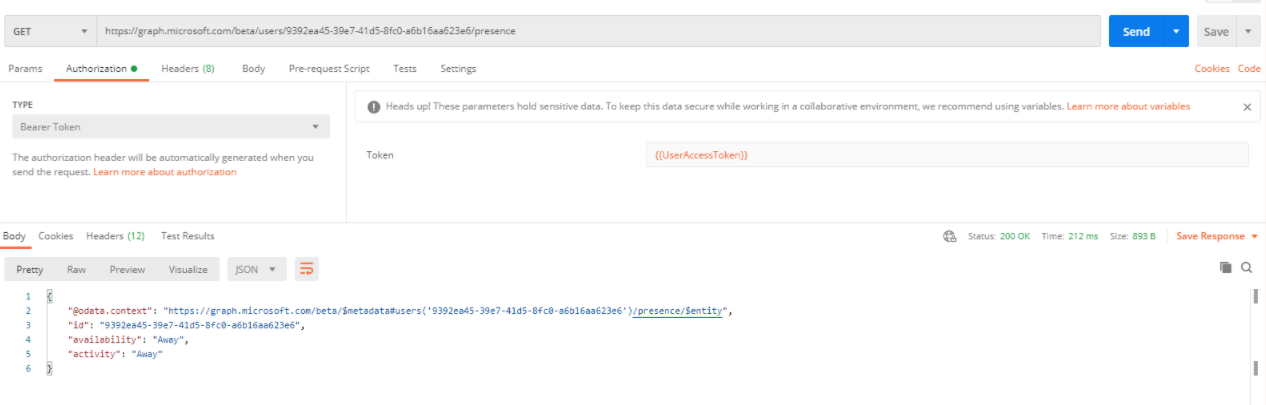
Get Presence status of a specific user This request does not exist in the postman collection, you have to create a new GET request as below: URL: https://graph.microsoft.com/beta/users/{{users_id}}/presence Authorization: Bearer token using the variable: {{UserAccessToken}}.
For more details about the MS Graph Get preseence for multiple users, please see https://docs.microsoft.com/en-us/graph/api/cloudcommunications-getpresencesbyuserid?view=graph-rest-1.0&tabs=http | ||||||||||||||||||
| Sv translation | ||||||||||||||||||
| ||||||||||||||||||
|
| Sv translation | |||||||||||||||||||||||||
|---|---|---|---|---|---|---|---|---|---|---|---|---|---|---|---|---|---|---|---|---|---|---|---|---|---|
| |||||||||||||||||||||||||
EinführungAuf dieser Seite finden Sie eine Anleitung für die erforderliche Konfiguration zur Aktivierung der jtel Teams Presence API in Ihrem jtel System. Die API-Funktionen sind hier im Detail beschrieben. Azure Konfiguration - VoraussetzungenDie Konfiguration sollte von einem Azure AD Mandant-Administrator durchgeführt werden. Der konfigurierende Benutzer muss Zugriff auf Folgendes haben:
Azure Konfiguration - Schritt für Schritt Anleitung
Azure-KonfigurationErstellen eines Zugriffstokens für die AnwendungErstellen Sie die Anwendung und registrieren Sie sie wie hier beschrieben: https://docs
Berechtigungen erteilenDer Presence Connector benötigt mindestens diese Angaben. Klicken Sie außerdem auf Grand admin consent für die Jtel GmbH.
Ein Kundengeheimnis erstellen
Sammeln Sie alle InformationenSie benötigen:
Der Benutzer und das Passwort sind die E-Mail und das Passwort für den Team-Administrator. Postman-SammlungenUm zu sehen, was vor sich geht, importieren Sie die postman-Sammlungen wie hier beschrieben: https://github.com/microsoftgraph/microsoftgraph-postman-collections Demo:Application: Get App Only Access Token
Application: Get Users
On Behalf of a User: Get User Access Token
Anwesenheitsstatus eines bestimmten Benutzers abrufen Diese Anfrage existiert nicht in der Postman-Sammlung. Sie müssen eine neue GET-Anfrage wie unten beschrieben erstellen: URL: https://graph.microsoft.com/beta/users/{{users_id}}/presence Authorization: Bearer token unter Verwendung der Variablen: {{UserAccessToken}}.
Weitere Einzelheiten über die MS Graph Get-Priorität für mehrere Benutzer finden Sie unter App-Registrierung erstellenNavigieren Sie im Azure Active Directory Ihres Tenants zu App-Registrierungen und erstellen Sie eine neue Registrierung. Nach Angabe eines Namen auf "Registrieren" klicken.
Erstellen Sie einen Benutzer mit Berechtigungen zur Nutzung der AnwendungNavigieren Sie zu Azure Active Directory → Benutzer und erstellen Sie einen neuen Benutzer. Zusätzliche BenutzerkonfigurationDas Standardpasswort des Benutzers muss bei der ersten Anmeldung geändert werden. Loggen Sie sich z. B. mit einem anderen Browser in das Konto ein, um die Erstanmeldung abzuschließen und ein neues Passwort festzulegen.
Abhängig von Ihrer Azure AD-Konfiguration und Sicherheitsrichtlinien kann das Passwort des Benutzers nach einer bestimmten Zeitspanne standardmäßig zurückgesetzt werden. Wenn Sie dies für diesen Benutzer nicht deaktivieren möchten, stellen Sie sicher, dass Sie das Datum im Auge behalten, da die Konfiguration im jtel Teams Presence Aggregator das Passwort des Benutzers enthält und entsprechend geändert werden muss. Weisen Sie den Benutzer der Anwendung zuNavigieren Sie zur registrierten App-Konfiguration und fügen Sie auf der Registerkarte "Besitzer" den Benutzer hinzu.
Berechtigungen erteilenDer Presence Connector benötigt Berechtigungen, um den Präsenzstatus der Benutzer zu lesen. Konfigurieren Sie im Reiter "API-Berechtigungen" die folgenden Berechtigungen mit "Berechtigung hinzufügen" und gewähren Sie die Berechtigungen durch Klicken auf "Admin-Zustimmung für <Mandantenname> gewähren".
Ein Kundengeheimnis erstellenNavigieren Sie zu Zertifikate & Geheimnisse und klicken Sie auf "Neuer geheimer Clientschlüssel", um ein neues Geheimnis hinzuzufügen.
Information ZusammentragenBitte geben Sie alle Informationen in der folgenden Tabelle an die Kontaktperson weiter, die den jtel Teams Presence Connector in Ihrer jtel ACD konfigurieren wird: Hinweis: Der Wert des geheimen Clientschlüssel ist erforderlich, nicht die geheime ID.
|


| Sv translation | |||||||||||||||||||||
|---|---|---|---|---|---|---|---|---|---|---|---|---|---|---|---|---|---|---|---|---|---|
| |||||||||||||||||||||
IntroductionCette page fournit un guide de la configuration requise pour activer l'API jtel Teams Presence dans votre système jtel. Les fonctions de l'API sont décrites en détail sur cette page. Configuration d'Azure - Conditions préalablesLa configuration doit être effectuée par un administrateur de locataires Azure AD. L'utilisateur chargé de la configuration doit avoir accès aux éléments suivants :
Configuration d'Azure - Guide étape par étape
| |||||||||||||||||||||
| Sv translation | |||||||||||||||||||||
| |||||||||||||||||||||
Configuration d'AzureCréer un token d'accès pour l'applicationCréez l'application et enregistrez-la comme décrit ici: https://docs
Accorder des autorisationsLe Connecteur de Présence aura besoin d'au moins cela. Cliquez également sur Accorder le consentement de l'administrateur pour Jtel GmbH.
Créer un secret client
Rassembler toutes les informationsVous aurez besoin :
L'utilisateur et le mot de passe sont l'email et le mot de passe de l'administrateur de Teams. Collections du PostmanPour voir ce qui se passe, importez les collections postman comme décrit ici: https://github.com/microsoftgraph/microsoftgraph-postman-collections Demo:Application: Get App Only Access Token
Application: Get Users
On Behalf of a User: Get User Access Token
Get Presence status of a specific user Cette requête n'existe pas dans la collection Postman, vous devez créer une nouvelle requête GET comme ci-dessous : URL: https://graph.microsoft.com/beta/users/{{users_id}}/presence Authorization: Bearer token en utilisant la variable: {{UserAccessToken}}.
Pour plus de détails sur la préséance de MS Graph Get pour les utilisateurs multiples, voir Créer un enregistrement d'applicationDans l'Azure Active Directory de votre locataire, naviguez vers App registrations et créez un nouvel enregistrement. Choisissez un nom et sélectionnez "Register".
Créer un utilisateur ayant les droits d'utiliser l'applicationNaviguez vers Azure Active Directory → Utilisateurs et créez un nouvel utilisateur. Configuration supplémentaire de l'utilisateurLe mot de passe par défaut de l'utilisateur doit être modifié lors de la première connexion. Connectez-vous au compte avec un autre navigateur, par exemple, pour terminer la première connexion et définir un nouveau mot de passe.
En fonction de votre configuration Azure AD et de vos politiques de sécurité, le mot de passe de l'utilisateur peut être réinitialisé par défaut après une certaine période. Si vous ne souhaitez pas désactiver cela pour cet utilisateur, assurez-vous de garder un œil sur la date, car la configuration dans jtel Teams Presence Aggregator contient le mot de passe de l'utilisateur et doit être modifiée en conséquence. Affecter l'utilisateur à l'applicationNaviguez vers la configuration de l'application enregistrée et dans l'onglet "Propriétaires" et ajoutez l'utilisateur.
Accorder des permissionsLe Connecteur de Présence nécessite des permissions pour lire le statut de présence des utilisateurs. Configurez les autorisations suivantes en cliquant sur "Add a permission" et accordez les autorisations en cliquant sur "Grant admin consent for <Tenant Name>".
Créer un secret clientNaviguez vers Certificats et Secrets et cliquez sur "Nouveau secret client" pour ajouter un nouveau secret.
Rassembler toutes les informationsVeuillez fournir toutes les informations du tableau suivant au contact qui configurera le connecteur de présence jtel Teams dans votre ACD jtel : Note : La valeur secrète est requise, pas l'ID secret.
|


