| Sv translation | ||||||||||||||||||||||||||||||||||||||||||||||||||||||||||||||||||
|---|---|---|---|---|---|---|---|---|---|---|---|---|---|---|---|---|---|---|---|---|---|---|---|---|---|---|---|---|---|---|---|---|---|---|---|---|---|---|---|---|---|---|---|---|---|---|---|---|---|---|---|---|---|---|---|---|---|---|---|---|---|---|---|---|---|---|
| ||||||||||||||||||||||||||||||||||||||||||||||||||||||||||||||||||
Necessary adjustments of the configurationNote: in case of redundancy, this is done on BOTH NODES. The configuration file Adjustment of the users for the haproxy administrationVia the URL
This command generates a new SHA256 hash for the password "F1r3ball2016" using the salt value "jhaProxy". This hash can then be used for the corresponding user. The user area in the configuration file looks like this:
Adjustment of the URL redirectionsThe configuration template provides three URL redirections to allow convenient access to the login masks for the system administrator login, the normal user login and the normal user login for the Mini Client. However, this requires an adjustment to the
Here the character strings RESELLER or CLIENT must be replaced with the "Reseller UID" and the "Client UID" of the standard client. If these are not specifically adapted when the customer system is set up, both are "default". Adjustment of the backend listsThe list of Web application servers to which the request is to be distributed is maintained in the configuration file in two separate areas. The following area is responsible for distributing all calls to the portal:
In accordance with the system architecture, all web application servers that the web portal should provide (including Mini Client) are to be entered here. A "server" line must be created for each server. Make sure to use unique internal name identifiers and cookie values (in the above case "jbossX" where X is numbered consecutively). The following area is responsible for the distribution of all SOAP requests:
Here, too, all web application servers that are to provide the SOAP interface must be entered in accordance with the system architecture. A "server" line must be created for each server.Make sure to use unique internal name identifiers and cookie values (in the above case "jbossX" where X is numbered consecutively). These servers are usually the same as those used for portal access. In large installations, however, dedicated Web application servers can also be specified for this purpose.
Starting the haproxy serviceAfter all configuration adjustments have been made, the haproxy service can be started:
Subsequently, it should be checked whether the service is actually running. If this is not the case, the log file can provide information about possible configuration errors. In case of configuration changes the haproxy service can update its configuration during operation with the following command:
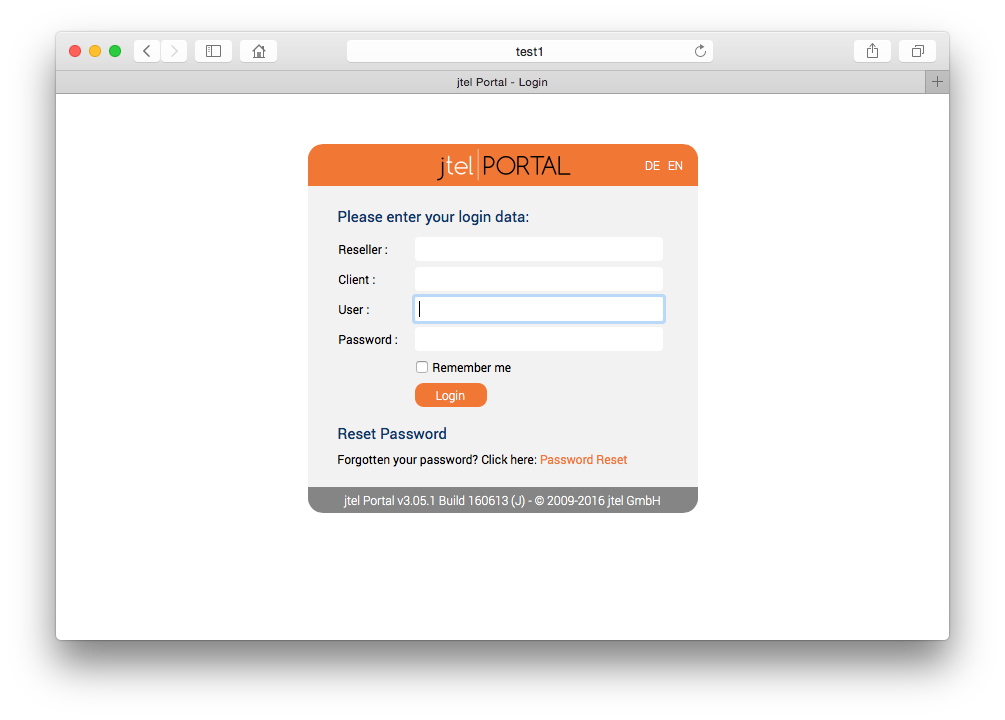
A final test provides information about the success of the installation. Since the UID values of the Reseller and Client have not yet been renamed at this time, it is recommended to call the URL for the admin login: http://acd-lb.example.com/admin which, if successful, leads to the login mask of the portal.
Further links |
| Sv translation | ||||||||||||||||||||||||||||||||||||||||||||||||||||||||||||||||||
|---|---|---|---|---|---|---|---|---|---|---|---|---|---|---|---|---|---|---|---|---|---|---|---|---|---|---|---|---|---|---|---|---|---|---|---|---|---|---|---|---|---|---|---|---|---|---|---|---|---|---|---|---|---|---|---|---|---|---|---|---|---|---|---|---|---|---|
| ||||||||||||||||||||||||||||||||||||||||||||||||||||||||||||||||||
Erforderliche Anpassungen der KonfigurationHinweis: bei Redundanz, wird dies auf BEIDE NODES ausgeführt. Die Konfigurationsdatei Anpassung der Benutzer für die haproxy-AdministrationÜber die URL
Dieser Befehl generiert ein neues SHA256 Hash für das Passwort "F1r3ball2016" unter Benutzung des Salt-Wertes "jhaProxy". Dieser Hash kann dann für den entsprechenden Benutzer eingesetzt werden. Der Benutzerbereich in der Konfigurationsdatei sieht folgendermaßen aus:
Anpassung der URL UmleitungenDie Konfigurationsvorlage stellt drei URL-Umleitungen zu Verfügung um den komfortablen Zugriff auf die Login Masken für den System-Administrator Login, den normalen Benutzer-Login und den normalen Benutzer-Login für den Mini Client zu ermöglichen. Dies erfordert allerdings eine Anpassung an dem Bereich
Hier sind die Zeichenketten Anpassung der Backend-ListenDie Liste der Web-Applikationsserver auf die die Anfrage verteilt werden sollen, wird in der Konfigurationsdatei in zwei getrennten Bereichen gepflegt. Der folgende Bereich ist zuständig für die Verteilung aller Aufrufe auf das Portal:
Hier sind entsprechend der Systemarchitektur alle Web-Applikationsserver einzutragen, die das Web-portal (auch Mini Client) zur Verfügung stellen sollen. Für jeden Server ist eine "server"-Zeile zu erstellen. Dabei ist darauf zu achten, eindeutige interne Namenskennzeichnungen und cookie-Werte zu verwenden (im obigen Fall "jbossX" wobei X durchnummeriert wird). Der folgende Bereich ist hingegen zuständig für die Verteilung aller SOAP Anfragen:
Auch hier sind entsprechend der Systemarchitektur alle Web-Applikationsserver einzutragen, die das SOAP Interface zur Verfügung stellen sollen. Für jeden Server ist eine "server"-Zeile zu erstellen. Dabei ist darauf zu achten, eindeutige interne Namenskennzeichnungen und cookie-Werte zu verwenden (im obigen Fall "jbossX" wobei X durchnummeriert wird). Diese Server sind in der Regel die gleichen, die auch für den Portal-Zugriff verwendet werden. In großen Installationen können hierfür aber auch dedizierte Web-Applikationsserver angegeben werden.
Starten des haproxy-DienstesNach dem alle Konfigurationsanpassungen getätigt wurden, kann der haproxy-Dienst gestartet werden:
Im Anschluss sollte geprüft werden, ob der Dienst auch tatsächlich läuft. Ist dies nicht der Fall, kann die Log-Datei Aufschluß über eventuelle Konfigurationsfehler geben. Bei Konfigurationsänderungen kann der haproxy DIenst im laufenden Betrieb mittels folgendem Befehl seine Konfiguration aktualisieren:
Ein finaler Test gibt Aufschluss über den Erfolg der Installation. Da zu diesem Zeitpunkt die UID Werte des Reseller und Mandanten noch nicht umbenannt wurden, empfiehlt sich der Aufruf der URL für den Admin-Login: http://acd-lb.example.com/admin welcher im Erfolgsfall zur Login-Maske des Portals führt.
Weiterführende Links |
| Sv translation | ||||||||||||||||||||||||||||||||||||||||||||||||||||||||||||||||||
|---|---|---|---|---|---|---|---|---|---|---|---|---|---|---|---|---|---|---|---|---|---|---|---|---|---|---|---|---|---|---|---|---|---|---|---|---|---|---|---|---|---|---|---|---|---|---|---|---|---|---|---|---|---|---|---|---|---|---|---|---|---|---|---|---|---|---|
| ||||||||||||||||||||||||||||||||||||||||||||||||||||||||||||||||||
Les ajustements nécessaires de la configurationNote : en cas de licenciement, cela se fait sur LES DEUX NODES. Le fichier de configuration Adaptation des utilisateurs pour l'administration du haproxyVia l'URL
Cette commande génère un nouveau hachage SHA256 pour le mot de passe "F1r3ball2016" en utilisant la valeur de sel "jhaProxy". Ce hachage peut ensuite être utilisé pour l'utilisateur correspondant. La zone utilisateur dans le fichier de configuration ressemble à ceci :
Ajustement des redirections URLLe modèle de configuration fournit trois redirections URL pour permettre un accès pratique aux masques de connexion pour la connexion de l'administrateur système, la connexion de l'utilisateur normal et la connexion de l'utilisateur normal pour le mini-client. Toutefois, cela nécessite un ajustement de la zone
Ici, les chaînes de caractères RESELLER ou CLIENT doivent être remplacées par le "Reseller UID" et le "Client UID" du client standard. Si ceux-ci ne sont pas spécifiquement adaptés lors de la configuration du système client, les deux sont "par défaut". Ajustement des listes de backendLa liste des serveurs d'application Web auxquels la demande doit être distribuée est maintenue dans le fichier de configuration dans deux zones distinctes. Le domaine suivant est responsable de la distribution de tous les appels au portail :
Conformément à l'architecture du système, tous les serveurs d'application web que le portail web doit fournir (y compris le mini-client) doivent être saisis ici. Une ligne "serveur" doit être créée pour chaque serveur. Veillez à utiliser des identificateurs de nom internes uniques et des valeurs de cookie (dans le cas ci-dessus "jbossX" où X est numéroté consécutivement). Le secteur suivant est responsable de la distribution de toutes les demandes SOAP :
Ici aussi, tous les serveurs d'applications web qui doivent fournir l'interface SOAP doivent être saisis conformément à l'architecture du système. Une ligne "serveur" doit être créée pour chaque serveur. Assurez-vous d'utiliser des identificateurs de noms internes uniques et des valeurs de cookies (dans le cas ci-dessus "jbossX" où X est numéroté consécutivement). Ces serveurs sont généralement les mêmes que ceux utilisés pour l'accès au portail. Dans les grandes installations, cependant, des serveurs d'applications Web dédiés peuvent également être spécifiés à cette fin.
Démarrer le service haproxyUne fois que tous les ajustements de configuration ont été effectués, le service haproxy peut être lancé :
Ensuite, il faut vérifier si le service fonctionne effectivement. Si ce n'est pas le cas, le fichier journal peut fournir des informations sur d'éventuelles erreurs de configuration. En cas de changement de configuration, le service haproxy peut mettre à jour sa configuration en cours de fonctionnement avec la commande suivante :
Un test final fournit des informations sur la réussite de l'installation. Étant donné que les valeurs d'UID du revendeur et du client n'ont pas encore été renommées pour le moment, il est recommandé d'appeler l'URL pour le login de l'administrateur : http://acd-lb.example.com/admin qui, en cas de succès, conduit au masque de connexion du portail.
Autres liens |