| Sv translation | |||||||||||||||||||||
|---|---|---|---|---|---|---|---|---|---|---|---|---|---|---|---|---|---|---|---|---|---|
| |||||||||||||||||||||
The jtel Portal System is moving to use MySQL 8.x instead of the older MySQL 5.6. Currently, the latest release of the portal 3.15 supports both versions of MySQL, however this is only an interim measure, and this will change in a coming release soon such that MySQL 8.x is required. This procedure describes how to update the system to MySQL 8.x.
Pre-Requisites
IntroductionThis is a multi-stage operation, since the MySQL system does not support missing out updates to versions - to move from 5.6 to 8.0 it is required to first update to 5.7.
Phase 1 - Ensure existing configuration is goodThere are several configuration items which need to be set in the slave configuration before proceeding. Unfortunately, mysql 5.7 will use a different default binary log and relay log file name during the upgrade process (this is probably a bug), unless these steps are completed. Complete this procedure for all slaves (also both masters in master-master replication).
Phase 2 - Update MySQL to 5.7Remember - for replicated installations, start with the slaves first. Then update the masters |
...
| Warning | |||||||||||||||||||||||||||||||||||||||||||||||||||||||||||||||||||||||||||||||||||||||||||||||||||||
|---|---|---|---|---|---|---|---|---|---|---|---|---|---|---|---|---|---|---|---|---|---|---|---|---|---|---|---|---|---|---|---|---|---|---|---|---|---|---|---|---|---|---|---|---|---|---|---|---|---|---|---|---|---|---|---|---|---|---|---|---|---|---|---|---|---|---|---|---|---|---|---|---|---|---|---|---|---|---|---|---|---|---|---|---|---|---|---|---|---|---|---|---|---|---|---|---|---|---|---|---|---|
| |||||||||||||||||||||||||||||||||||||||||||||||||||||||||||||||||||||||||||||||||||||||||||||||||||||
For Master-Master Replication, perform this simulataneously on both masters, one after the other. Perform clean shutdown of MySQL with innodb_fast_shutdown set to 0
Remove Old yum repository, and install new yum repositoryRemove the old MySQL yum repository.
Next, install the new MySQL yum repository, using the command relevant to the OS version being used. You can determine the OS being used, with the following command:
For CentOS 7:
For CentOS 6:
Update MySQL Server to 5.7This involves clearing the version-lock table, and enabling the 5.7 update path. Note, the yum command is issued without the -y option. You should check what the system is about to do before confirming this step.
Start the MySQL Server (WITHOUT REPLICATION FOR SLAVES AND MASTER-MASTER)Start the mysql Server without replication.
Run mysql_upgradeEither change the password in the following command, or simply use the -p option without specifying a password, and entering it at the prompt.
Check the output from this phase before proceeding - if this procedure is showing non-recoverable error messages, then the procedure has gone wrong, and you must rollback here. Next restart the MySQL server.
Check Database and Replication and Version are OK
Only proceed if no errors are found.
Phase 3 - Update MySQL to 8.0
Perform clean shutdown of MySQL with innodb_fast_shutdown set to 0
Enable 8.0 repoitories and update the serverNote, the yum command is issued without the -y option. You should check what the system is about to do before confirming this step.
Start the MySQL ServerStart the mysql Server.
Note, that starting the mysql server may take some time. It may even appear to be hung, but wait for a few minutes and let it complete.
Check Database and Replication and Version are OK
Phase 4 - Configure Other Components |
...
PortalRun the Portal update script again. This will optimise the scripts for |
Update the JBOSS Server
...
MySQL 8.x. |
...
|
...
| Code Block | ||||
|---|---|---|---|---|
.
|
Reconfigure 8-Server ODBC Connections
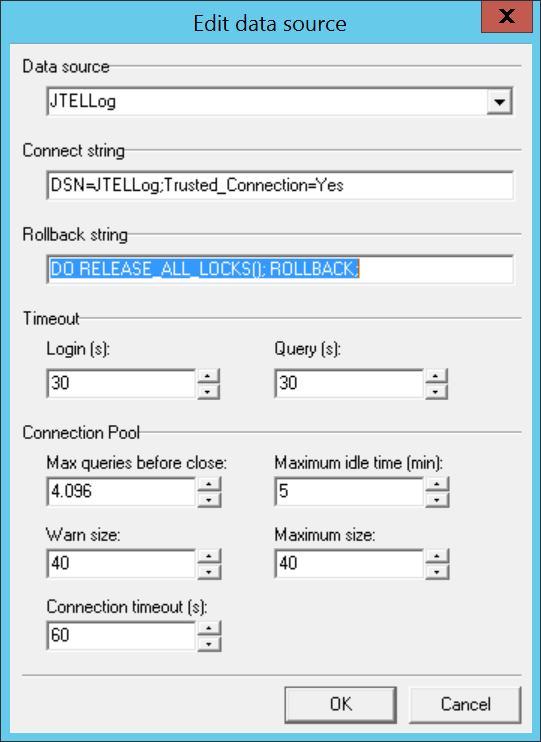
The Rollback string for MySQL Versions 8.x (in fact MySQL 5.7) and higher has changed, and will need to be reconfigured in 8-Server.
The new rollback string is:
| Code Block |
|---|
DO RELEASE_ALL_LOCKS(); ROLLBACK; |
8-Server should be restarted after making this change:
...
JBOSS ServerEITHER: Install new Version of JBOSS ServerYou can simply install the new version of the JBOSS Server, at least jboss-as-7.1.1.FINAL.14.tar.gz from cdn.jtel.de. This contains the required components, but will require that the hazelcast.xml and standalone-full.xml files are updated as described in the installation of the webserver, see here: Role WEB OR: Update the JBOSS ServerThe JBOSS server requires a new connector to attach to MySQL 8.x. This can be copied to the JBOSS server instance, using the following command (run for example from /home/jtel/shared/JTELCarrierPortal/Update), as the jtel user:
Change stanalone-full.xmlThe standalone-full.xml configuration file requires some modifications. A new connection property must be added to the datasource configurations for MySQL. This must be added to the datasource configurations for JTELWeb, JTELWebSlave, JTELStats, JTELLog and JTELReports. See the following example:
In the drivers section, make sure that the driver class line is included for the mysql driver. This will only be missing on very old jboss installations, if this is the case, it might be better to update the jboss server to a new release completely.
Reconfigure 8-Server ODBC ConnectionsThe Rollback string for MySQL Versions 8.x (in fact MySQL 5.7) and higher has changed, and will need to be reconfigured in 8-Server. The new rollback string is:
8-Server should be restarted after making this change:
Troubleshootingjtel Portal DB Script fails with "Failed to load caching_sha2_password authentication plugin"The DB scripts are being run from a different server than the updated MySQL server(s). This is good! You should run them from the role STORE. However, you will need to update the mysql client on these machines too. Do this (change the second line for CentOS 6.x - see above for the RPM required):
Now run the scripts again. jtel Portal DB Script fails with "Duplicate Entry"Try running the DB script again. Authentication Failed with some DB ToolsFor example, earlier versions of DB Forge will fail when connecting to MySQL 8.x. Update the tool. Slave Fails to Start with Error ERROR 1872 (HY000): Slave failed to initialize relay log info structure from the repositoryThe following series of commands issed in mysql might sometimes help to restart the slave, without rebuilding replication from scratch:
Upgrade to MySQL 8.x FailsIf the upgrade to 8.x fails, try rolling back to 5.7 as follows, and resolve the problem in 5.7 before proceeding.
|
| Sv translation | |||||||||||||||||||||||||||||||||||||||||||||||||||||||||||||||||||||||||||||||||||||||||||||||||||||||||||||||||||||||||||||||||||||||||||||||||||
|---|---|---|---|---|---|---|---|---|---|---|---|---|---|---|---|---|---|---|---|---|---|---|---|---|---|---|---|---|---|---|---|---|---|---|---|---|---|---|---|---|---|---|---|---|---|---|---|---|---|---|---|---|---|---|---|---|---|---|---|---|---|---|---|---|---|---|---|---|---|---|---|---|---|---|---|---|---|---|---|---|---|---|---|---|---|---|---|---|---|---|---|---|---|---|---|---|---|---|---|---|---|---|---|---|---|---|---|---|---|---|---|---|---|---|---|---|---|---|---|---|---|---|---|---|---|---|---|---|---|---|---|---|---|---|---|---|---|---|---|---|---|---|---|---|---|---|---|
| |||||||||||||||||||||||||||||||||||||||||||||||||||||||||||||||||||||||||||||||||||||||||||||||||||||||||||||||||||||||||||||||||||||||||||||||||||
Das jtel-Portalsystem geht dazu über, MySQL 8.x anstelle des älteren MySQL 5.6 zu verwenden. Derzeit unterstützt die neueste Version des Portals 3.15 beide Versionen von MySQL, dies ist jedoch nur eine Übergangsmaßnahme, und dies wird sich in einer kommenden Version bald ändern, so dass MySQL 8.x erforderlich ist. Diese Prozedur beschreibt, wie Sie das System auf MySQL 8.x aktualisieren.
Voraussetzungen
EinführungDies ist eine mehrstufige Operation, da das MySQL-System nicht unterstützt, dass Aktualisierungen von Versionen ausgelassen werden - um von 5.6 auf 8.0 zu wechseln, ist es erforderlich, zuerst auf 5.7 zu aktualisieren.
Phase 1 - Sicherstellen, dass die bestehende Konfiguration gut istEs gibt mehrere Konfigurationselemente, die in der Slave-Konfiguration eingestellt werden müssen, bevor Sie fortfahren können Leider wird mysql 5.7 während des Upgrade-Prozesses einen anderen Standard-Binär-Log- und Relay-Log-Dateinamen verwenden (dies ist wahrscheinlich ein Bug), es sei denn, diese Schritte werden befolgt. Führen Sie dieses Verfahren für alle Slaves durch (auch für beide Master bei der Master-Master-Replikation).
Phase 2 - Update MySQL auf 5.7Denken Sie daran - beginnen Sie bei replizierten Installationen zuerst mit den Slaves. Aktualisieren Sie dann die Master, einen nach dem anderen. Durchführen eines sauberen Shutdowns von MySQL mit innodb_fast_shutdown auf 0
Altes yum-Repository entfernen und neues yum-Repository installierenEntfernen Sie das alte MySQL yum-Repository.
Als nächstes installieren Sie das neue MySQL yum-Repository mit dem Befehl, der für die verwendete Betriebssystemversion relevant ist. Mit dem folgenden Befehl können Sie das verwendete Betriebssystem bestimmen:
Für CentOS 7:
Für CentOS 6:
Update MySQL Server auf 5.7Dazu gehört das Bereinigen der Versionlock-Tabelle und das Aktivieren des 5.7 Update-Pfades. Beachten Sie, dass der Befehl yum ohne die Option -y ausgeführt wird. Sie sollten prüfen, was das System vorhat, bevor Sie diesen Schritt bestätigen.
Starten Sie den MySQL-Server (OHNE REPLIKATION FÜR SLAVES und MASTER-MASTER)Starten Sie den mysql Server ohne Replikation.
mysql_upgrade ausführenEntweder ändern Sie das Passwort im folgenden Befehl, oder Sie verwenden einfach die Option -p, ohne ein Passwort anzugeben, und geben es an der Eingabeaufforderung ein.
Überprüfen Sie die Ausgabe aus dieser Phase, bevor Sie fortfahren - wenn dieses Verfahren nicht behebbare Fehlermeldungen anzeigt, dann ist das Verfahren schief gelaufen, und Sie müssen hier ein Rollback durchführen. Starten Sie als nächstes den MySQL-Server neu.
Prüfen, ob Datenbank und Replikation und Version in Ordnung sind
Fahren Sie nur fort, wenn keine Fehler gefunden werden.
Phase 3 - Update MySQL auf 8.0
Durchführen eines sauberen Shutdowns von MySQL mit innodb_fast_shutdown auf 0
8.0-Repositorys aktivieren und den Server aktualisierenBeachten Sie, dass der Befehl yum ohne die Option -y ausgführt wird. Sie sollten prüfen, was das System vorhat, bevor Sie diesen Schritt bestätigen.
Starten Sie den MySQL-ServerStarten Sie den mysql Server.
Beachten Sie, dass das Starten des mysql-Servers einige Zeit dauern kann. Es mag sogar so aussehen, als sei es aufgehangen, aber warten Sie ein paar Minuten und lassen Sie es fertigstellen.
Prüfen, ob Datenbank und Replikation und Version in Ordnung sind
Phase 4 - Andere Komponenten konfigurierenPortalFühren Sie das Portal-Aktualisierungsskript erneut aus. Dadurch werden die Skripte für MySQL 8.x optimiert.
JBOSS ServerEntweder: Neue Version von JBOSS Server installierenSie können einfach die neue Version des JBOSS-Servers installieren, mindestens jboss-as-7.1.1.FINAL.14.tar.gz von cdn.jtel.de. Diese enthält die erforderlichen Komponenten, erfordert jedoch, dass die Dateien hazelcast.xml und standalone-full.xml aktualisiert werden, wie bei der Installation des Webservers beschrieben, siehe hier: Role WEB Oder: Updaten des JBOSS-ServersDer JBOSS-Server benötigt einen neuen Konnektor, um sich mit MySQL 8.x zu verbinden. Diese kann mit dem folgenden Befehl (z.B. von /home/jtel/shared/JTELCarrierPortal/Update aus ausführen) als jtel-Benutzer auf die JBOSS-Serverinstanz kopiert werden:
Standalone-full.xml ändernDie Konfigurationsdatei standalone-full.xml erfordert einige Änderungen. Eine neue Verbindungseigenschaft muss zu den Datasource-Konfigurationen für MySQL hinzugefügt werden. Dies muss zu den Datasource-Konfigurationen für JTELWeb, JTELWebSlave, JTELStats, JTELLog und JTELReports hinzugefügt werden. Siehe das folgende Beispiel:
Stellen Sie im Abschnitt drivers sicher, dass die Zeile driver class für den mysql-Treiber enthalten ist. Dies wird nur bei sehr alten jboss-Installationen fehlen. Wenn dies der Fall ist, ist es vielleicht besser, den jboss-Server komplett auf eine neue Version zu aktualisieren..
8-Server-ODBC-Verbindungen rekonfigurierenDer Rollback-String für MySQL-Versionen 8.x (eigentlich MySQL 5.7) und höher hat sich geändert und muss in 8-Server neu konfiguriert werden. Die neue Rollback-String ist:
8-Server sollte nach dieser Änderung neu gestartet werden:
Fehlerbehebungjtel Portal DB-Skript schlägt fehl mit "Failed to load caching_sha2_password authentication plugin"Die DB-Skripte werden von einem anderen Server als dem/den aktualisierten MySQL-Server(n) ausgeführt. Das ist gut! Sie sollten sie von der Rolle STORE aus ausführen. Allerdings müssen Sie auch auf diesen Maschinen den mysql-Client aktualisieren. Tun Sie dies (ändern Sie die zweite Zeile für CentOS 6.x - siehe oben für die erforderliche RPM):
Führen Sie nun die Skripte erneut aus. jtel Portal DB-Skript schlägt fehl mit "Duplicate Entry"Versuchen Sie, das DB-Skript erneut auszuführen. Authentifizierung bei einigen DB-Tools fehlgeschlagenBeispielsweise schlagen frühere Versionen von DB Forge beim Verbinden mit MySQL 8.x fehl. Aktualisieren Sie das Tool. Sklave startet nicht mit Fehler "ERROR 1872 (HY000): Slave failed to initialize relay log info structure from the repository"Die folgende Reihe von Befehlen, die in mysql ausgeführt werden, kann manchmal helfen, den Slave neu zu starten, ohne die Replikation von Grund auf neu aufzubauen:
Upgrade auf MySQL 8.x schlägt fehlWenn das Upgrade auf 8.x fehlschlägt, versuchen Sie, wie folgt auf 5.7 zurückzusetzen und das Problem in 5.7 zu lösen, bevor Sie fortfahren.
|
| Sv translation | |||||||||||||||||||||||||||||||||||||||||||||||||||||||||||||||||||||||||||||||||||||||||||||||||||||||||||||||||||||||||||||||||||||||||||||||||||
|---|---|---|---|---|---|---|---|---|---|---|---|---|---|---|---|---|---|---|---|---|---|---|---|---|---|---|---|---|---|---|---|---|---|---|---|---|---|---|---|---|---|---|---|---|---|---|---|---|---|---|---|---|---|---|---|---|---|---|---|---|---|---|---|---|---|---|---|---|---|---|---|---|---|---|---|---|---|---|---|---|---|---|---|---|---|---|---|---|---|---|---|---|---|---|---|---|---|---|---|---|---|---|---|---|---|---|---|---|---|---|---|---|---|---|---|---|---|---|---|---|---|---|---|---|---|---|---|---|---|---|---|---|---|---|---|---|---|---|---|---|---|---|---|---|---|---|---|
| |||||||||||||||||||||||||||||||||||||||||||||||||||||||||||||||||||||||||||||||||||||||||||||||||||||||||||||||||||||||||||||||||||||||||||||||||||
Le système de portail de jtel utilise désormais MySQL 8.x au lieu de l'ancienne version MySQL 5.6. Actuellement, la dernière version du portail 3.15 supporte les deux versions de MySQL, mais ce n'est qu'une mesure provisoire, et cela changera dans une prochaine version de sorte que MySQL 8.x sera nécessaire. Cette procédure décrit comment mettre à jour le système vers MySQL 8.x.
Prérequis
IntroductionIl s'agit d'une opération en plusieurs étapes, puisque le système MySQL ne prend pas en charge les mises à jour manquantes des versions - pour passer de la version 5.6 à la version 8.0, il faut d'abord mettre à jour la version 5.7.
Phase 1 - S'assurer que la configuration existante est bonneIl y a plusieurs éléments de configuration qui doivent être réglés dans la configuration de l'esclave avant de procéder. Malheureusement, mysql 5.7 utilisera un nom de fichier journal binaire et de relais par défaut différent pendant le processus de mise à niveau (c'est probablement un bogue), à moins que ces étapes ne soient terminées. Complétez cette procédure pour tous les esclaves (également les deux maîtres dans la réplication maître-maître).
Phase 2 - Mise à jour de MySQL à 5.7N'oubliez pas - pour les installations reproduites, commencez par les esclaves. Ensuite, mettez à jour les maîtres, l'un après l'autre. Effectuer un arrêt propre de MySQL avec innodb_fast_shutdown réglé sur 0
Supprimer l'ancien dépôt Yum et installer le nouveau dépôt YumSupprimer l'ancien dépôt MySQL yum.
Ensuite, installez le nouveau dépôt MySQL yum, en utilisant la commande correspondant à la version du système d'exploitation utilisée. Vous pouvez déterminer le système d'exploitation utilisé, avec la commande suivante :
Pour CentOS 7:
Pour CentOS 6:
Mettre à jour le serveur MySQL à 5.7Cela implique d'effacer la table de verrouillage des versions et d'activer le chemin de mise à jour 5.7. Notez que la commande yum est émise sans l'option -y. Vous devez vérifier ce que le système est sur le point de faire avant de confirmer cette étape.
Démarrer le serveur MySQL (SANS REPRISE D'ESCLAVES ET DE MASTER-MASTER)Démarrez le serveur mysql sans réplication.
Lancer mysql_upgradeVous pouvez soit changer le mot de passe dans la commande suivante, soit utiliser simplement l'option -p sans spécifier de mot de passe, et le saisir à l'invite.
Vérifiez le résultat de cette phase avant de poursuivre - si cette procédure affiche des messages d'erreur non récupérables, c'est que la procédure s'est mal déroulée, et vous devez revenir en arrière ici. Ensuite, redémarrez le serveur MySQL.
Vérifier que la base de données, la réplication et la version sont correctes
Ne procédez que si aucune erreur n'est trouvée.
Phase 3 - Mise à jour de MySQL à 8.0
Effectuer un arrêt propre de MySQL avec innodb_fast_shutdown réglé sur 0
Activer les référentiels 8.0 et mettre à jour le serveurNotez que la commande yum est émise sans l'option -y. Vous devez vérifier ce que le système est sur le point de faire avant de confirmer cette étape.
Démarrer le serveur MySQLDémarrer le serveur mysql
Notez que le démarrage du serveur mysql peut prendre un certain temps. Il peut même sembler être suspendu, mais attendez quelques minutes et laissez le tout se dérouler.
Vérifier que la base de données, la réplication et la version sont correctes
Phase 4 - Configuration des autres composantesPortailExécutez à nouveau le script de mise à jour du portail. Cela permettra d'optimiser les scripts pour MySQL 8.x.
Serveur JBOSSSOIT: Installateur de la nouvelle version de Serveur JBOSSVous pouvez simplement installer la nouvelle version du serveur JBOSS, au moins jboss-as-7.1.1.FINAL.14.tar.gz de cdn.jtel.de. Il contient les éléments requis, mais exigera que le hazelcast.xml et standalone-full.xml sont mis à jour comme décrit dans l'installation du serveur web, voir ici : Role WEB OU. Mettre à jour le serveur JBOSSLe serveur JBOSS nécessite un nouveau connecteur pour se connecter à MySQL 8.x. Celui-ci peut être copié sur l'instance du serveur JBOSS, en utilisant la commande suivante (exécuter par exemple à partir de /home/jtel/shared/JTELCarrierPortal/Update), comme l'utilisateur de jtel :
Changer stanalone-full.xmlLa fichier de standalone-full.xml configuration nécessite quelques modifications. Une nouvelle propriété de connexion doit être ajoutée aux configurations des sources de données pour MySQL. Elle doit être ajoutée aux configurations des sources de données pour JTELWeb, JTELWebSlave, JTELStats, JTELLog et JTELReports. Voir l'exemple suivant :
Dans la section des conducteurs, assurez-vous que la ligne de la classe du conducteur est incluse pour le conducteur mysql. Cela ne manquera que sur les très anciennes installations de jboss, si c'est le cas, il pourrait être préférable de mettre à jour le serveur jboss avec une nouvelle version complète.
Reconfigurer les connexions ODBC à 8-ServerLa chaîne de Rollback pour les versions MySQL 8.x (en fait MySQL 5.7) et supérieures a changé, et devra être reconfigurée en 8-Server. La nouvelle ficelle du rollback est :
8-Server doit être redémarré après avoir effectué ce changement :
Dépannagejtel Portal DB Script échoue avec le "Failed to load caching_sha2_password authentication plugin".Les scripts de la base de données sont exécutés à partir d'un serveur différent du ou des serveurs MySQL mis à jour. C'est bien ! Vous devriez les diriger depuis le rôle STORE. Cependant, vous devrez également mettre à jour le client mysql sur ces machines. Faites-le (changez la deuxième ligne pour CentOS 6.x - voir ci-dessus pour le RPM requis) :
Maintenant, refaites les scripts. jtel Portal DB Script échoue avec "Duplicate Entry".Essayez d'exécuter à nouveau le script DB. Échec de l'authentification avec certains outils de la base de donnéesPar exemple, les versions antérieures de DB Forge échoueront lors de la connexion à MySQL 8.x. Mettre à jour l'outil. L'esclave ne démarre pas avec l'erreur ERROR 1872 (HY000) : L'esclave n'a pas réussi à initialiser la structure d'information du journal de relais à partir du dépôtLes séries de commandes suivantes émises dans mysql peuvent parfois aider à redémarrer l'esclave, sans avoir à reconstruire la réplication à partir de zéro :
La mise à niveau vers MySQL 8.x échoueSi la mise à niveau vers la version 8.x échoue, essayez de revenir à la version 5.7 comme suit, et résolvez le problème dans la version 5.7 avant de continuer.
|