| Sv translation | ||||||||||||||||||||||||||||||||||||||||||||||||||||||||||||||||||||||||||||||||||||||||||||||||||||||||||||||||||||||||||||||||
|---|---|---|---|---|---|---|---|---|---|---|---|---|---|---|---|---|---|---|---|---|---|---|---|---|---|---|---|---|---|---|---|---|---|---|---|---|---|---|---|---|---|---|---|---|---|---|---|---|---|---|---|---|---|---|---|---|---|---|---|---|---|---|---|---|---|---|---|---|---|---|---|---|---|---|---|---|---|---|---|---|---|---|---|---|---|---|---|---|---|---|---|---|---|---|---|---|---|---|---|---|---|---|---|---|---|---|---|---|---|---|---|---|---|---|---|---|---|---|---|---|---|---|---|---|---|---|---|---|
| ||||||||||||||||||||||||||||||||||||||||||||||||||||||||||||||||||||||||||||||||||||||||||||||||||||||||||||||||||||||||||||||||
IntroductionThe TEL server runs the call flows for telephone calls in the jtel system. It also runs background processes, such as jobs to create statistics subscription e-mails and convert audio files or create audio with a TTS engine. Also, usually PBX connectors are run on the TEL server. InstallationFile DownloadsThe following script downloads all the files needed in this section.
Configure Data SourcesImport the downloaded file odbc_ini_v52.reg to the registry to configure the data sources in windows. Prepare 8-Server RegistryImport the downloaded file 8server_config_v8.reg to the registry to prepare the registry for 8-Server. Install 8-ServerClone RepositoryRun the following commands from a non elevated command prompt:
Install 8-ServerTelephony and DeamonsRun the following commands from a non elevated command prompt:
Deamons OnlyRun the following commands from a non elevated command prompt:
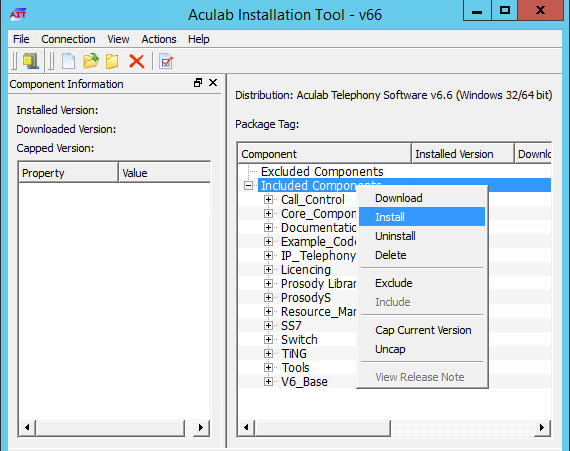
Install Aculab SIP and RTP StackInstall AITRun the following commands from a non elevated command prompt, and install for all users:
Install Aculab v67
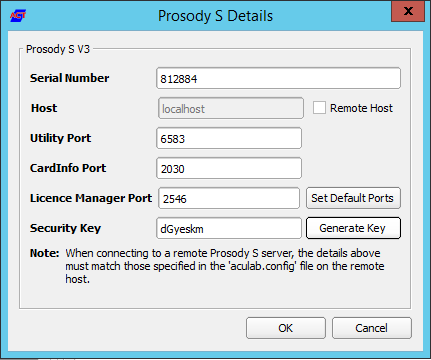
Configure Aculab
Symmetric RTPTo configure symmetric RTP, a file is created in
Startup ScriptsGgf inNet UseCheck the file c:\8Server\bin\startup.cmd - to see whether the net use command needs to be changed or not. ShortcutCreate a shortcut for: das "net use" anpassen.VerknüpfungenVerknüpfung von c:\8Server\bin\startup_launcher.cmd Auf den Desktop sowie nach and place this in shell:startup legen. Aculab Konfiguration für 8-ServergiAculab config erzeugen (cmd als ADMIN): Achtung: manchmal schluckt Windows das Verändern des Pfads nicht 100% sofort. Wenn nicht (falls gihal.exe nicht gefunden wird), dann neu booten. Translations Ignore |
giAculab.cfg muss nun angepasst werden. Den Einstellungsbereich unten kopieren und in der Zieldatei ersetzen. Configuration FilesCreate Default Configuration giAculab.cfgStart a cmd up, and start gihal. This will create a default giAculab.cfg file.
Edit giAculab.cfgThe file is in: c:\8Server\gi2\config\giAculab.cfggiAculab.cfg is now configured for SIP with 8-Server. Replace the SIP section in the newly created file with the section below, changing the following:
Eine weitere Änderung betrifft die Datei Translations Ignore |
Zusätzlich wird eine Datei C:\8Server\bin\gi2.ini angelegt, mit folgenden Inhalt: Translations Ignore |
Edit gi2.iniEdit the file At the very bottom, change the following setting to 2 (standard is 1):
Edit StdCall_MCP.cfgThe following settings are changed in the file cC:\8Server\config\StdCall_MCP.cfg Folgende Einstellungen insbesonders beleuchten:
Symmetrisches RTPWir installieren alle Systeme mit symmetrisches RTP. Dies erfordert, dass eine neue Konfigurationsdatei Namens Translations Ignore |
8-Server KonfigurationVon diese URL, die Registry Datei importieren: MySQL 8.xhttp://cdn.jtel.de/downloads/configs/8server_config_v8.reg MySQL 5.xhttp://cdn.jtel.de/downloads/configs/8server_config.reg 8-Server als ADMIN starten (rechter Mausklick auf robot5.exe im Verzeichnis c:\8Server\Config). WICHTIG: Nicht über startup.cmd oder startup_launcher.cmd! General Settings, General
8-Server KonfigurationStartup 8-Server:
Bereich Internet ComponentsNur bei Maschinen mit viele Leitungen: ggf. der Wert von "UDP" erhöhen. Bereich UDP SettingsNur bei den Betrieb von mehreren 8-Server:
Bereich Daemon ProcessesGgf. bei ein reiner Daemonen-Server oder reine Telefonie-Server einige der Daemonen entfernen.
Bei einem reinen Telefonie-Server müssen mindestens folgende Daemonen eingetragen werden (Die Pfade orientieren sich an der Beispielskonfiguration):
Bei einem Daemonen-Server müssen mindestens folgende Daemonen eingetragen werden (Die Pfade orientieren sich an der Beispielskonfiguration):
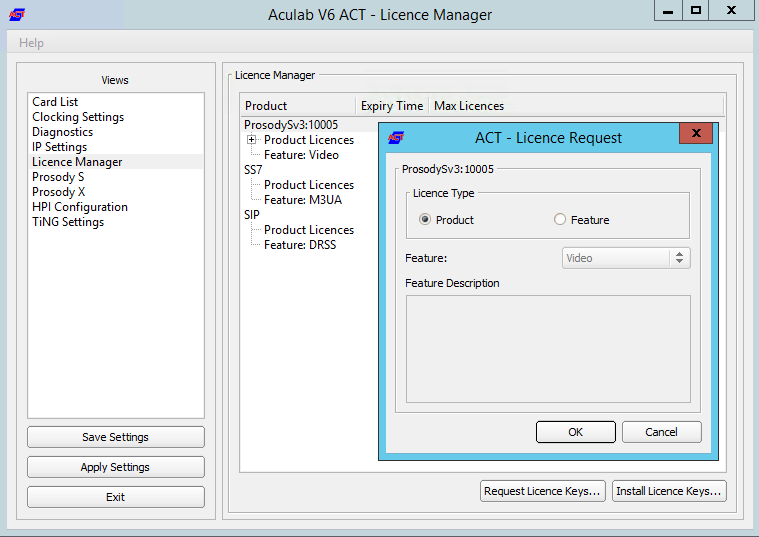
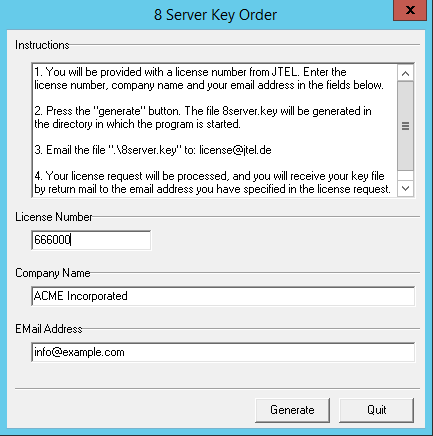
Hiermit ist die Interaktive Grund-Konfiguration des 8Servers abgeschlossen. Der 8Server kann nun beendet werden, so dass eine gültige Lizenz generiert und eingespielt werden kann. 8Server Lizenz anfordernDie Anforderung der Lizenz erfolgt mittels des Programms
Die Datei Sobald eine gültige Lizenzdatei verfügbar ist, muss diese ins Verzeichnis Installation des Hazelcast Platform UDP ListenersPlatform UDP Listener InstallierenIm Anschluss wird der Platform UDP Listener mit folgenden Befehlen installiert:
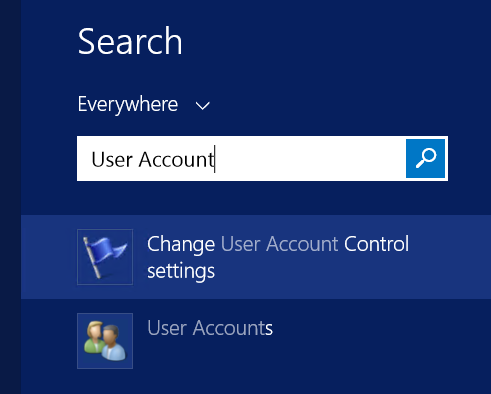
VerknüpfungenVerknüpfung von c:\PlatformUDPListener\startListener.bat Auf den Desktop sowie nach shell:startup legen. TestPlatform UDP Listener starten. Es sollten nun im Cluster alle TEL Nodes gefunden werden. Wenn zuvor, die Webserver und DBM installiert wurden, sollten diese Nodes nun auch im Cluster aktiv sein. Windows AutostartBedingung für die Installation durch uns, ist ein lokaler Administrator Account. Ferner ist es zu empfehlen, dass die Maschine nicht in der Domäne des Kunden eingebunden ist. Hier gibt es einfach die Möglichkeit, dass zu viele Policies uns in die Suppe spucken. Maschine ohne "Administrator" LoginDies betrifft meistens Maschinen die in der Kunden-Domäne sind. Damit der 8-Server korrekt läuft, muss es mit "Als Administrator ausführen" gestartet werden. Es gibt jedoch einen Weg, dies automatisch zu machen. Voraussetzung ist, dass wir die Einstellungen der Benutzerkontensteuerung verändern können, sollte dies nicht möglich sein, MUSS der Kunde das anpassen. Sonst an dieser Stelle: HALT. Einstellungen der Benutzerkontensteuerung ändernAuf den Startmenü clicken oder Windows Taste drücken. Dann eingeben: Benutzerkontensteuerung (Deutsches Windows) oder User Account Control. Siehe Screenshot:
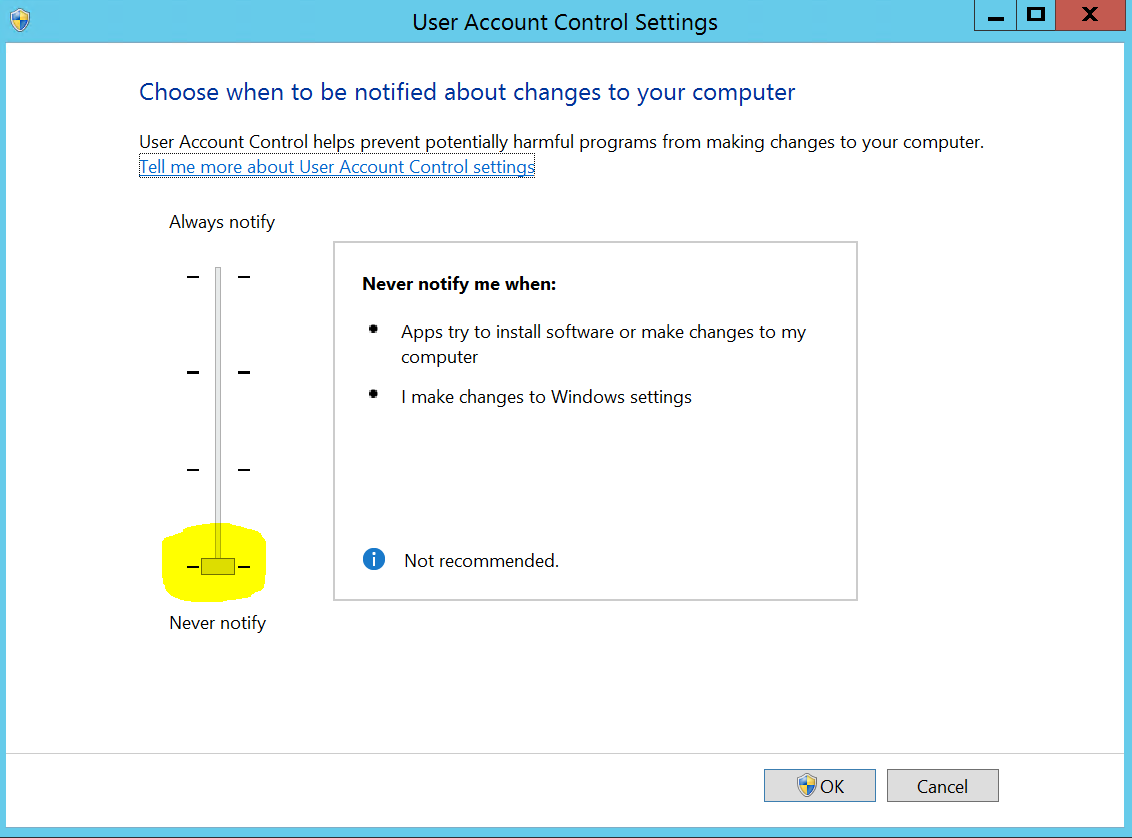
Den entsprechenden Menüpunkt auswählen, und dann die Benutzerkontensteuerung auf die Niedrigste Stufe stellen - siehe Screenshot.
Autostart Installierenhttp://cdn.jtel.de/downloads/tools/AutoLogon.zip Entpacken, und für den Benutzer (Administrator oder den jtel Benutzer) ein Autologin einrichten. Anschließend testen:
Windows FirewallFalls die Windows Firewall aktiviert bleiben soll, müssen ein paar Anpassungen getätigt werden. Folgende Befehle als Administrator im cmd Fenster ausführen:
Aculab Port EingrenzungDamit das UDP von Remote auch an bestimmte Ports in Aculab ankommt, muss zusätzlich die Aculab Konfiguration angepasst werden. Mit notepad++ folgende Datei bearbeiten: C:\aculab\v67\cfg\aculab.config und die Port Range auf 30000 bis 34999 setzen:
|

| Sv translation | ||||||||||||||||||||||||||||||||||||||||||||||||||||||||||||||||||||||||||||||||||||||||||||||||||||||||||||||||||||
|---|---|---|---|---|---|---|---|---|---|---|---|---|---|---|---|---|---|---|---|---|---|---|---|---|---|---|---|---|---|---|---|---|---|---|---|---|---|---|---|---|---|---|---|---|---|---|---|---|---|---|---|---|---|---|---|---|---|---|---|---|---|---|---|---|---|---|---|---|---|---|---|---|---|---|---|---|---|---|---|---|---|---|---|---|---|---|---|---|---|---|---|---|---|---|---|---|---|---|---|---|---|---|---|---|---|---|---|---|---|---|---|---|---|---|---|---|
| ||||||||||||||||||||||||||||||||||||||||||||||||||||||||||||||||||||||||||||||||||||||||||||||||||||||||||||||||||||
Beschreibung der RolleDie TEL Server sind dafür zuständig Call-Flow-Applikationen und zentrale Verwaltungs- und Steuerfunktionen in Form von R5-Skripten auszuführen. Des weiteren werden auf diesen Servern in der Regel auch die Connectoren für Synchronisation verschiedner Bentzer und Telefonie-Stati der Telefonanlagen installiert. Einrichtung der Zeitsynchronisation (Alternativer Zeitdienst)portal.Daemon.TimeServiceMonitor.r5 stoppen im 8-Server falls installiert. Zeitdienst herunterladen und installieren: http://cdn.jtel.de/downloads/NTP/ntp-4.2.8p10-win32-setup.exe Immer auf next, bis zur Auswahl der Zeitserver. Zuerst den Kundenserver angeben (falls vorhanden), dann die ptb Zeitserver: ptbtime1.ptb.de,ptbtime2.ptb.de,ptbtime3.ptb.de
Dann installation abschließen. Monitor installieren: http://cdn.jtel.de/downloads/NTP/ntp-time-server-monitor-104.exe Sicherstellen dass dienst läuft. Monitor prüfen, dass mindestens einer der Zeitserver "grün" ist.
Achtung:
Konfigurieren der DatenquellenAls nächstes müssen die Datenquellen im ODBC Administrator konfiguriert werden. Folgende Registry-File downloaden und importieren: https://cdn.jtel.de/downloads/configs/odbc_ini_v52.reg Hinweis: Konfigurationsdateien für neuere ODBC Treiber sind ebenfalls vorhanden. Es wird jedoch empfohlen, wegen Speicherprobleme im MySQL ODBC Treiber, mit dieser Version zu arbeiten. Auch mit den neuesten 8.x Treiber treten Speicherprobleme auf, wenn Datenbankverbindungen abbrechen. Installieren des 8ServersRepository Clonen
Software InstallierenTelefonie und Daemonen:
Nur Daemonen:
C++ Runtimes installierenFolgende Runtimes installieren:
Installieren des Aculab Media ServersAIT Installierenv67 Paket installieren
Aculab Konfiguration
Startup ScriptsGgf in c:\8Server\bin\startup.cmd das "net use" anpassen. VerknüpfungenVerknüpfung von c:\8Server\bin\startup_launcher.cmd Auf den Desktop sowie nach shell:startup legen. Aculab Konfiguration für 8-ServergiAculab config erzeugen (cmd als ADMIN): Achtung: manchmal schluckt Windows das Verändern des Pfads nicht 100% sofort. Wenn nicht (falls gihal.exe nicht gefunden wird), dann neu booten.
giAculab.cfg muss nun angepasst werden. Den Einstellungsbereich unten kopieren und in der Zieldatei ersetzen.
Eine weitere Änderung betrifft die Datei
Zusätzlich wird eine Datei C:\8Server\bin\gi2.ini angelegt, mit folgenden Inhalt:
Folgende Einstellungen insbesonders beleuchten:
Symmetrisches RTPWir installieren alle Systeme mit symmetrisches RTP. Dies erfordert, dass eine neue Konfigurationsdatei Namens
8-Server KonfigurationVon diese URL, die Registry Datei importieren: MySQL 8.xhttp://cdn.jtel.de/downloads/configs/8server_config_v8.reg MySQL 5.xhttp://cdn.jtel.de/downloads/configs/8server_config.reg 8-Server als ADMIN starten (rechter Mausklick auf robot5.exe im Verzeichnis c:\8Server\Config). WICHTIG: Nicht über startup.cmd oder startup_launcher.cmd! General Settings, General
Bereich Internet ComponentsNur bei Maschinen mit viele Leitungen: ggf. der Wert von "UDP" erhöhen. Bereich UDP SettingsNur bei den Betrieb von mehreren 8-Server:
Bereich Daemon Processes
Bei einem reinen Telefonie-Server müssen mindestens folgende Daemonen eingetragen werden (Die Pfade orientieren sich an der Beispielskonfiguration):
Bei einem Daemonen-Server müssen mindestens folgende Daemonen eingetragen werden (Die Pfade orientieren sich an der Beispielskonfiguration):
Hiermit ist die Interaktive Grund-Konfiguration des 8Servers abgeschlossen. Der 8Server kann nun beendet werden, so dass eine gültige Lizenz generiert und eingespielt werden kann. 8Server Lizenz anfordernDie Anforderung der Lizenz erfolgt mittels des Programms
Die Datei Sobald eine gültige Lizenzdatei verfügbar ist, muss diese ins Verzeichnis Installation des Hazelcast Platform UDP ListenersPlatform UDP Listener InstallierenIm Anschluss wird der Platform UDP Listener mit folgenden Befehlen installiert:
VerknüpfungenVerknüpfung von c:\PlatformUDPListener\startListener.bat Auf den Desktop sowie nach shell:startup legen. TestPlatform UDP Listener starten. Es sollten nun im Cluster alle TEL Nodes gefunden werden. Wenn zuvor, die Webserver und DBM installiert wurden, sollten diese Nodes nun auch im Cluster aktiv sein. Windows AutostartBedingung für die Installation durch uns, ist ein lokaler Administrator Account. Ferner ist es zu empfehlen, dass die Maschine nicht in der Domäne des Kunden eingebunden ist. Hier gibt es einfach die Möglichkeit, dass zu viele Policies uns in die Suppe spucken. Maschine ohne "Administrator" LoginDies betrifft meistens Maschinen die in der Kunden-Domäne sind. Damit der 8-Server korrekt läuft, muss es mit "Als Administrator ausführen" gestartet werden. Es gibt jedoch einen Weg, dies automatisch zu machen. Voraussetzung ist, dass wir die Einstellungen der Benutzerkontensteuerung verändern können, sollte dies nicht möglich sein, MUSS der Kunde das anpassen. Sonst an dieser Stelle: HALT. Einstellungen der Benutzerkontensteuerung ändernAuf den Startmenü clicken oder Windows Taste drücken. Dann eingeben: Benutzerkontensteuerung (Deutsches Windows) oder User Account Control. Siehe Screenshot:
Den entsprechenden Menüpunkt auswählen, und dann die Benutzerkontensteuerung auf die Niedrigste Stufe stellen - siehe Screenshot.
Autostart Installierenhttp://cdn.jtel.de/downloads/tools/AutoLogon.zip Entpacken, und für den Benutzer (Administrator oder den jtel Benutzer) ein Autologin einrichten. Anschließend testen:
Windows FirewallFalls die Windows Firewall aktiviert bleiben soll, müssen ein paar Anpassungen getätigt werden. Folgende Befehle als Administrator im cmd Fenster ausführen:
Aculab Port EingrenzungDamit das UDP von Remote auch an bestimmte Ports in Aculab ankommt, muss zusätzlich die Aculab Konfiguration angepasst werden. Mit notepad++ folgende Datei bearbeiten: C:\aculab\v67\cfg\aculab.config und die Port Range auf 30000 bis 34999 setzen:
|


