Versions Compared

Key

  • This line was added.
  • This line was removed.
  • Formatting was changed.
Comment: Content imported from a Scroll Translations translation file.
Sv translation
languageen

Introduction

The TEL server runs the call flows for telephone calls in the jtel system.

It also runs background processes, such as jobs to create statistics subscription e-mails and convert audio files or create audio with a TTS engine.

Also, usually PBX connectors are run on the TEL server. 

Installation

File Downloads

The following script downloads all the files needed in this section.

Translations Ignore


Code Block
powershell -command "& { Start-BitsTransfer -Source https://cdn.jtel.de/downloads/configs/8server_config_v8.reg -Destination $Env:UserProfile\Downloads }"
powershell -command "& { Start-BitsTransfer -Source https://cdn.jtel.de/downloads/configs/odbc_ini_v52.reg -Destination $Env:UserProfile\Downloads }"
powershell -command "& { Start-BitsTransfer -Source http://cdn.jtel.de/downloads/aculab/AculabInstaller.msi -Destination $Env:UserProfile\Downloads }"
powershell -command "& { Start-BitsTransfer -Source https://cdn.jtel.de/downloads/tools/AutoLogon.zip -Destination $Env:UserProfile\Downloads }"


Configure Data Sources

Import the downloaded file odbc_ini_v52.reg to the registry to configure the data sources in windows.

You may need to change the password entries for each datasource, depending on the password configured for the mysql database.

Prepare 8-Server Registry

Import the downloaded file 8server_config_v8.reg to the registry to prepare the registry for 8-Server.

Install 8-Server

Clone Repository

You will need to change the Machine ID setting - set this to the last byte of the IPv4 address in the local network. You need to change this value to HEX.

Install 8-Server

Clone Repository

Status
colourYellow
titleImportant - THE STARTUP PROCEDURE IN STDCALL_MCP.CFG REQUIRES RC-5.23.13 AS MORE THAN 10 COMMANDS ARE REQUIRED

Run the following commands from a non elevated command promptRun the following commands from a non elevated command prompt:

Translations Ignore


Code Block
c:
cd \
mkdir \8Server
cd \8Server
git clone https://bitbucket.org/jtelgmbh/8-server-deploy.git deploy
cd deploy
git checkout release/rc-5.23.1214


Install 8-Server

Telephony and Deamons

Run the following commands from a non elevated command prompt:

Translations Ignore


Code Block
c:
cd \8Server\deploy\OEM\JTEL\
first_install.cmd
copy_keyfile_en_mcp_v67.cmd


Deamons Only

Run the following commands from a non elevated command prompt:

Translations Ignore


Code Block
c:
cd \8Server\deploy\OEM\JTEL\
first_install.cmd
copy_keyfile_en_daemon.cmd

Install Aculab SIP and RTP Stack

Install AIT


Windows Firewall

The following commands configure the windows firewall. Run these in an elevated cmd window:Run the following commands from a non elevated command prompt, and install for all users:

Translations Ignore


Code Block
start %USERPROFILE%\Downloads\AculabInstaller.msi

Install Aculab v67

  • Start the AIT application
  • Choose "Connection" -> "Work offline".
  • "File" -> ""Import"  -> Load Aculab Package File...".
    • c:\8Server\deploy\oem\jtel\aculab\v67.apf
  • Target Directory:
    • C:\aculab\v67
  • "Install"

    Image Removed

Warning

Note - if secure boot is not switched off in the virtual environment, the installation of the drivers might fail.

Configure Aculab

  • Start ACT 
  • Add a Prosody-S instance
  • Choose "Prosody S" ... "Add...":
  • The serial number can be freely chosen, as can the security key. We recommend 100000 and jtel respectively.

Image Removed

  • Install the licenses
  • Choose "License Manager", Install Licence Keys...
Image Removed
  • Save and apply
  • Choose "Save Settings" then "Apply Settings".

Startup Scripts

Ggf in c:\8Server\bin\startup.cmd das "net use" anpassen.

Verknüpfungen

Verknüpfung von 

c:\8Server\bin\startup_launcher.cmd

Auf den Desktop sowie nach shell:startup legen.

Aculab Konfiguration für 8-Server

giAculab config erzeugen (cmd als ADMIN):

Achtung: manchmal schluckt Windows das Verändern des Pfads nicht 100% sofort. Wenn nicht (falls gihal.exe nicht gefunden wird), dann neu booten.

Translations Ignore
Code Block
titlecmd (as ADMIN)
gihal
 
# If it starts, press CTRL+C then cancel

giAculab.cfg muss nun angepasst werden.

Den Einstellungsbereich unten kopieren und in der Zieldatei ersetzen.

  • channel_count auf die Anzahl der SIP Kanäle stellen
  • netsh advfirewall firewall add rule name="ICMPv4" protocol=icmpv4:8,any dir=in action=allow edge=yes
    netsh advfirewall firewall add rule name="Hazelcast" dir=in action=allow protocol=TCP localport=5701-5801 edge=no
    netsh advfirewall firewall add rule name="RTP" dir=in action=allow protocol=UDP localport=30000-34999 edge=yes
    netsh advfirewall firewall add rule name="SIP" dir=in action=allow protocol=UDP localport=5060 edge=yes
    netsh advfirewall firewall add rule name="UDP Local" dir=in action=allow protocol=UDP localport=1-65535 edge=no


    Install Aculab SIP and RTP Stack

    Install AIT

    Run the following commands from a non elevated command prompt, and install for all users:

    Translations Ignore


    Code Block
    start %USERPROFILE%\Downloads\AculabInstaller.msi


    Install Aculab v67

    • Start the AIT application
    • Choose "Connection" -> "Work offline".
    • "File" -> ""Import"  -> Load Aculab Package File...".
      • c:\8Server\deploy\oem\jtel\aculab\v67.apf
    • Target Directory:
      • C:\aculab\v67
    • "Install"

      Image Added


    Warning

    Note - if secure boot is not switched off in the virtual environment, the installation of the drivers might fail.

    Configure Aculab

    • Start ACT 


    • Add a Prosody-S instance
    • Choose "Prosody S" ... "Add...":
    • The serial number can be freely chosen, as can the security key. We recommend 100000 and jtel respectively.

    Image Added

    • Install the licenses
    • Choose "License Manager", Install Licence Keys...

    Image Added

    • Save and apply
    • Choose "Save Settings" then "Apply Settings".

    Symmetric RTP

    To configure symmetric RTP, a file is created in C:\Aculab\v67\cfg\mhp.cfg with the following content:

    Translations Ignore


    Code Block
    LocalRtpSymmetric=1


    Port Range

    If it is required, that a port range is used for RTP, then the file C:\aculab\v67\cfg\aculab.config must be edited, set the port range as is required by the remote end (PBX / SIP Trunk):

    Translations Ignore


    Code Block
    ...
    							<rxrange minvalue="30000" maxvalue="34999"/>
    ...


    Services

    Status
    colourYellow
    titleVery Important for Windows Server 2019

    Setup the following Aculab services to start only manually:

    • Aculab Prosody S
    • Aculab Resource Manager
    • Aculab Startup Service

    Setup the following Aculab services to be disabled:

    • Aculab SS7 TS Manager

    Startup Scripts

    Net Use

    Check the file c:\8Server\bin\startup.cmd - to see whether the net use command needs to be changed or not.

    Warning
    titleWindows Server 2019

    Comment out the following lines in the startup.cmd file:


    aculabservicemanager -stop sip
    net use \\acd-store\shared /u:jtel fireball

    Shortcut

    Create a shortcut for:

    c:\8Server\bin\startup_launcher.cmd

    and place this in shell:startup.

    Configuration Files

    Create Default Configuration giAculab.cfg

    Start a cmd up, and start gihal. This will create a default giAculab.cfg file.

    Warning

    Note - make sure the aculab services are started at this point.


    Note

    Sometimes windows does not update the path immediately after installation of the components above. The following must be present in the path, and as an environment variable, for the rest of the installation to work:


    PATH=...;c:\8Server\gi2\bin
    R5_CONFIG_DIR=c:\8Server\Config\


    Translations Ignore


    Code Block
    gihal
     
    # If it starts, press CTRL+C then cancel


    Edit giAculab.cfg

    The file is in:

    c:\8Server\gi2\config\giAculab.cfg

    giAculab.cfg is now configured for SIP with 8-Server. Replace the SIP section in the newly created file with the section below, changing the following:

    • channel_count to the number of licensed SIP channels
    • default_rtp_ip should be changed to the IP address of the NIC in the telephony network in multi-homed systems. Leave as is, if the system is not multi-homed.

    Translations Ignore


    Code Block
        [SIP]
        {
          netport			                = 0
          channel_count		                = 30
          default_vmp_set		            = "VMP_SET1"
          default_rtp_ip		            = "0.0.0.0"
          default_rtp_dscp		            = 46
          defaultSignallingGateway	        = ""
          numberOnly		    
    default_rtp_ip muss bei Multi-Homed Maschinen auf die IP Adresse der Netzwerkkarte für die Telefonie gesetzt werden
    Translations Ignore
    Code Block
    titleChanges to C: \\ 8Server \\ gi2 \\ config \\ giAculab.cfg
        [SIP]
        {
          netport			                = 0
          channel_count		                = 30
          default_vmp_set		            = "VMP_SET1"
          default_rtp_ip		            = "0.0.0.0"
          default_rtp_dscp		            = 46
          defaultSignallingGateway	        = ""
          numberOnly		                = FALSE
          rfc2833RxToneEvent	            = TRUE
          rfc2833RxInbandToneRegeneration	= TRUE
          rfc2833TxToneConversion	        = TRUE
        }

    Eine weitere Änderung betrifft die Datei C:\8Server\gi2\bin\gi2.ini: hier sollte der Wert DISABLE_ERROR_DIALOG folgendermaßen angepasst werden:

    Translations Ignore
    Code Block
    titleChanges to C: \\ 8Server \\ gi2 \\ bin \\ gi2.ini
    DISABLE_ERROR_DIALOG = 2

    Zusätzlich wird eine Datei C:\8Server\bin\gi2.ini angelegt, mit folgenden Inhalt:

    Translations Ignore
    Code Block
    titleChanges to C: \\ 8Server \\ bin \\ gi2.ini
    CONFIG_DIR = ../gi2/config
    LOG_DIR = ../log
    Die letzte Datei, an der manuelle Anpassungen erfolgen müssen, ist C:\8Server\config\StdCall_MCP.cfg 

    Folgende Einstellungen insbesonders beleuchten:

  • Enable_SIP_Registrar - für Installationen mit eingehende Registrierungen (insbesonders Panasonic)
  • Default_SIP_Contact - hier die IP Adresse des SIP Interfaces eintragen
  • Startup_Command4 und Startup_Sleep4 - löschen, falls die Maschine keine Registrierung nach Aussen aufbauen muss (derzeit alle Installationen ausser NFON)
  • Total_Channel_Count - Entspricht die Gesamtzahl der SIP Kanäle
  • Inbound_Use_Channels - Entspricht nAgents + nSupervisor + nQueueChannels
  • Outbound_Use_Channels - Entspricht nAgents + nSupervisor + nCallTransferChannels
  • Beachte: Total_Channel_Count = Inbound_Use_Channels + Outbound_Use_Channels
  • Translations Ignore
    Code Block
    titleChanges to C: \\ 8Server \\ config \\ StdCall_MCP.cfg
    ROOT
    {
       StdCall_MCP
       {    
          bool    Use_RemoteHAL            = FALSE
          rfc2833RxToneEvent	      = TRUE;
    	  
       = TRUE
      integer LocalStream_RX_Port   rfc2833RxInbandToneRegeneration	= TRUE
          rfc2833TxToneConversion	         = 0;	  TRUE
        }


    Edit gi2.ini

    Edit the file C:\8Server\gi2\bin\gi2.ini

    At the very bottom, change the following setting to 2 (standard is 1):

    Translations Ignore


    Code Block
    DISABLE_ERROR_DIALOG = 2


    Edit StdCall_MCP.cfg

    Status
    colourYellow
    titleImportant - do not use an older config under Windows Server 2019

    The following settings are changed in the file:

    c:\8Server\config\StdCall_MCP.cfg
    • Enable_SIP_Registrar - for installations which require a registrar for the SIP trunk (e.g. Panasonic PBX installations)
    • Default_SIP_Contact - change to the IP address of the server (for multi-homed systems use the IP address of the NIC in the telephony network
    • Startup_Command4 und Startup_Sleep4 - delete these lines if the machine does not require registration to a SIP trunk (for example NFON requires registration - in this case leave in!)
    • Total_Channel_Count - Set to the total licensed SIP channel count
    • Inbound_Use_Channels - Set to the number of agents + supervisors + queue + IVR channels
    • Outbound_Use_Channels - Set to the number of agents + supervisors + call transfer channels
    • Note: Total_Channel_Count = Inbound_Use_Channels + Outbound_Use_Channels
    Translations Ignore


    Code Block
    ROOT
    {
       StdCall_MCP
       {    
          bool    Use_RemoteHAL              integer Dispatcher_ThreadCount                = 4;
    	  
          bool    Auto_SETUP_ACK                        = FALSE;
          string  Alert_DefaultFile                     = "c:\8Server\Voice\System\070.wav";
    	  
          integer Stream_Receiver_MaxUnconfirmedPackets = 8;
          integer Stream_Receiver_MaxBufferSize         = 16384;
          integer Stream_Sender_Timeout                 = 2000;
          integer Stream_Sender_MaxBufferSize           = 16384;
    	  
          integer SIP_Interceptor_Port                  = 5060;
          bool    Enable_SIP_Interceptor                = TRUE;
    	  
      integer Start_SIP_Interceptor_After_Command    integer LocalStream_RX_Port                   = 10;
    	  bool
         Enable_SIP_Registrar integer Dispatcher_ThreadCount                = FALSE4;
    	  
          bool    EnableAuto_L3_MonitorSETUP_ACK                        = FALSE;
    
          string  Default_SIP_ContactAlert_DefaultFile                     = "<sip:10.4.11.81>c:\8Server\Voice\System\070.wav";
    
    	  string
      Startup_Command0    integer Stream_Receiver_MaxUnconfirmedPackets = 8;
          integer Stream_Receiver_MaxBufferSize         = "c:/windows/system32/taskkill.exe /im gihal.exe /f"16384;
    	  integer Startup_Sleep0      integer Stream_Sender_Timeout                  = 2000;
    	  string  Startup_Command1  integer  Stream_Sender_MaxBufferSize                  = "c:/aculab/v67/bin/amd64/aculabservicemanager -stop sip"= 16384;
    	  integer
     Startup_Sleep1     integer SIP_Interceptor_Port                  = 20005060;
    	  string  Startup_Command2   bool    Enable_SIP_Interceptor                = "c:/aculab/v67/bin/amd64/aculabservicemanager -start sip"TRUE;
    	  integer Startup_Sleep2  Start_SIP_Interceptor_After_Command   = 5;
    	  bool    Enable_SIP_Registrar                  = 2000FALSE;
    	     string bool Startup_Command3   Enable_L3_Monitor                   = "c:/8Server/gi2/bin/giHal.exe -w -tingtrace";
    	  integer Startup_Sleep3 = FALSE;
    
          string  Default_SIP_Contact                   = 5000;"<sip:10.42.13.84>";
    
    	  string  Startup_Command4Command0                      = "c:/windows/8Server/bin/startup_registrations.cmdsystem32/taskkill.exe /im gihal.exe /f";
    	  integer Startup_Sleep4Sleep0                        = 10002000;
    	  
    	  string  ShutdownStartup_Command0Command1                      = "c:/windows/system32/taskkill.exe /im gihalgiacu.exe /f";
    	  integer ShutdownStartup_Sleep0Sleep1                        = 2000;	  
    	  string  ShutdownStartup_Command1Command2                      = "c:/windowsaculab/v67/system32/taskkill.exe /im giacu.exe /fbin/amd64/aculabservicemanager -stop sip";
    	  integer ShutdownStartup_Sleep1Sleep2                        = 2000;
    	  string  ShutdownStartup_Command2Command3                      = "c:/aculabwindows/v67/bin/amd64/aculabservicemanager -stop sipsystem32/net.exe stop acuresmgr";
    	  integer ShutdownStartup_Sleep2Sleep3                        = 2000;
    
    	  string  Startup_Command4  Controller1
          {
             integer Total_Channel_Count    = 0 "c:/windows/system32/net.exe stop prosodysserv";
    	  integer Startup_Sleep4      integer  Inbound_Use_Channels   = 0;
             integer Outbound_Use_Channels  = 02000;	  
    	  string  Startup_Command5     string      HAL_HostName           = "127.0.0.1c:/windows/system32/net.exe stop aculabstartupservice";
    	  integer Startup_Sleep5      bool          SIP_URL_Cleaner        = TRUE2000;
    	  string  Startup_Command6 
             bool    Ignore_L1Status        = TRUE "c:/windows/system32/net.exe start aculabstartupservice";
    	  integer Startup_Sleep6         bool              RFC2833_DTMF_Detection = TRUE2000;
    	  string    };
       };
    };


    Symmetrisches RTP

    Wir installieren alle Systeme mit symmetrisches RTP.

    Dies erfordert, dass eine neue Konfigurationsdatei Namens C:\Aculab\v67\cfg\mhp.cfg mit folgendem Inhalt angelegt wird:

    Translations Ignore
    Code Block
    titleFile C: \\ aculab \\ v67 \\ cfg \\ mhp.cfg
     LocalRtpSymmetric=1
    Startup_Command7                      = "c:/windows/system32/net.exe start acuresmgr";
    	  integer Startup_Sleep7                        = 2000;
    	  string  Startup_Command8                      = "c:/windows/system32/net.exe start prosodysserv";
    	  integer Startup_Sleep8                        = 2000;
    	  string  Startup_Command9                      = "c:/aculab/v67/bin/amd64/aculabservicemanager -start sip";
    	  integer Startup_Sleep9                        = 2000;
    	  string  Startup_Command10                     = "c:/8Server/gi2/bin/giHal.exe -w -tingtrace";
    	  integer Startup_Sleep10                       = 20000;	  
    	  string  Startup_Command11                     = "c:/8Server/bin/startup_registrations.cmd";
    	  integer Startup_Sleep11                       = 1000;
    	  
    	  string  Shutdown_Command0                     = "c:/windows/system32/taskkill.exe /im gihal.exe /f";
    	  integer Shutdown_Sleep0                       = 2000;
    	  string  Shutdown_Command1                     = "c:/windows/system32/taskkill.exe /im giacu.exe /f";
    	  integer Shutdown_Sleep1                       = 2000;
    
          Controller1
          {
             integer Total_Channel_Count    = 20;
             integer Inbound_Use_Channels   = 10;
             integer Outbound_Use_Channels  = 10;
             string  HAL_HostName           = "127.0.0.1";
             bool    SIP_URL_Cleaner        = TRUE;     
    		 bool    SIP_Number_Cleaner     = TRUE;  
             bool    Ignore_L1Status        = TRUE;
             bool    RFC2833_DTMF_Detection = TRUE;
          };
       };
    };


    8-Server Configuration

    Startup 8-Server:

    Translations Ignore


    Code Block
    c:\8Server\Bin\robot5.exe


    Configuration

    Machine ID (Settings ... General)

    Set to the last byte of the IPv4 address of the machine.

    Internet Components

    Increase the number of UDP components, but only on machines which have a lot of lines. 

    Recommend: up to 200 lines use 40. Above 200 lines, increase by 20 for every additional 100 lines.

    UDP Settings

    If building a cluster with more than one 8-Server, enter the broadcast address for interchassis communication, using port 20202:

    Image Added


    Daemon Processes

    Check the loaded deamons, and possibly remove not needed processes.

    The following list is for a combined server (telephony and daemon applications):


    Translations Ignore


    Code Block

    8-Server Konfiguration

    Von diese URL, die Registry Datei importieren:

    MySQL 8.x

    http://cdn.jtel.de/downloads/configs/8server_config_v8.reg

    MySQL 5.x

    http://cdn.jtel.de/downloads/configs/8server_config.reg

    8-Server als ADMIN starten (rechter Mausklick auf robot5.exe im Verzeichnis c:\8Server\Config).

    WICHTIG: Nicht über startup.cmd oder startup_launcher.cmd!

     General Settings, General

    • "Machine ID" letztes Byte der IP Adresse

    Bereich Internet Components

    Nur bei Maschinen mit viele Leitungen: ggf. der Wert von "UDP" erhöhen. 

    Bereich UDP Settings

    Nur bei den Betrieb von mehreren 8-Server:

  • Die Broadcast-Adresse des LAN Segments eintragen
  • Port 20202 bestimmen
    Image Removed

    Bereich Daemon Processes

    Ggf. bei ein reiner Daemonen-Server oder reine Telefonie-Server einige der Daemonen entfernen.
    Translations Ignore
    Code Block
    titleList of daemons of a combination server
    \\acd-store\shared\JTELCarrierPortal\AppServer\acd\Daemons\acd.Daemon.AcdEvents.Cleaner.r5
    \\acd-store\shared\JTELCarrierPortal\AppServer\acd\Daemons\acd.Daemon.AcdEvents.Distribute.r5
    \\acd-store\shared\JTELCarrierPortal\AppServer\acd\Daemons\acd.Daemon.DailyAutoGroupLogout.r5
    \\acd-store\shared\JTELCarrierPortal\AppServer\acd\Daemons\acd.Daemon.DailyAutoUserLogout.r5
    \\acd-store\shared\JTELCarrierPortal\AppServer\acd\Daemons\acd.Daemon.GroupDistribute.r5
    \\acd-store\shared\JTELCarrierPortal\AppServer\acd\Daemons\acd.Daemon.LongCalls.Warning.r5
    \\acd-store\shared\JTELCarrierPortal\AppServer\acd\Daemons\acd.Daemon.UDP.r5
    \\acd-store\shared\JTELCarrierPortal\AppServer\conf\ConfServer.Daemon.UDP.r5
    \\acd-store\shared\JTELCarrierPortal\AppServer\Portal.Daemon.8Server.LogFileCleaner.r5
    \\acd-store\shared\JTELCarrierPortal\AppServer\Portal.Daemon.Audio.Converter.r5
    \\acd-store\shared\JTELCarrierPortal\AppServer\Portal.Daemon.ChangeEvent.Manager.r5
    \\acd-store\shared\JTELCarrierPortal\AppServer\Portal.Daemon.EventSpool.SMS.r5
    \\acd-store\shared\JTELCarrierPortal\AppServer\Portal.Daemon.EventSpool.SMTP.r5
    \\acd-store\shared\JTELCarrierPortal\AppServer\Portalacd\Daemons\acd.Daemon.RecordingsAcdEvents.Cleaner.r5
    \\acd-store\shared\JTELCarrierPortal\AppServer\Portalacd\Daemons\acd.Daemon.RecordingsAcdEvents.ManagerDistribute.r5
    \\acd-store\shared\JTELCarrierPortal\AppServer\acd\PortalDaemons\acd.Daemon.ReportSubscriptions2DailyAutoGroupLogout.r5
    \\acd-store\shared\JTELCarrierPortal\AppServer\acd\Daemons\Portalacd.Daemon.SystemStartSequence.CleanerDailyAutoUserLogout.v2.r5
    \\acd-store\shared\JTELCarrierPortal\AppServer\Portalacd\Daemons\acd.Daemon.SystemStartSequence.Update.v2GroupDistribute.r5
    \\acd-store\shared\JTELCarrierPortal\AppServer\TimeServiceMonitor\portal.Daemon.TimeServiceMonitor.r5
    C:\8Server\Samples\LogFileCleaner\8Serveracd\Daemons\acd.Daemon.LogFileCleanerLongCalls.mySQL.r5

    Bei einem reinen Telefonie-Server müssen mindestens folgende Daemonen eingetragen werden (Die Pfade orientieren sich an der Beispielskonfiguration):

    Translations Ignore Code Block
    titleList of daemons of a telephony server
    Warning.r5
    \\acd-store\shared\JTELCarrierPortal\AppServer\acd\Daemons\acd.Daemon.UDP.r5
    \\acd-store\shared\JTELCarrierPortal\AppServer\conf\ConfServer.Daemon.UDP.r5
    \\acd-store\shared\JTELCarrierPortal\AppServer\Portal.Daemon.
    SystemStartSequence
    8Server.
    Update.v2
    LogFileCleaner.r5
    \\acd-store\shared\JTELCarrierPortal\AppServer\
    TimeServiceMonitor\portal
    Portal.Daemon.Audio.
    TimeServiceMonitor
    Converter.r5
    
    C:
    \
    8Server
    \
    Samples\LogFileCleaner\8Server
    acd-store\shared\JTELCarrierPortal\AppServer\Portal.Daemon.
    LogFileCleaner
    ChangeEvent.
    mySQL.r5

    Bei einem Daemonen-Server müssen mindestens folgende Daemonen eingetragen werden (Die Pfade orientieren sich an der Beispielskonfiguration):

    Translations Ignore
    Code Block
    titleList of daemons in a daemon server
    Manager.r5
    \\acd-store\shared\JTELCarrierPortal\AppServer\acd\Daemons\acdPortal.Daemon.AcdEventsEventSpool.CleanerSMS.r5
    \\acd-store\shared\JTELCarrierPortal\AppServer\acd\Daemons\acdPortal.Daemon.AcdEventsEventSpool.DistributeSMTP.r5
    \\acd-store\shared\JTELCarrierPortal\AppServer\acd\Daemons\acdPortal.Daemon.DailyAutoGroupLogoutRecordings.Cleaner.r5
    \\acd-store\shared\JTELCarrierPortal\AppServer\acd\Daemons\acdPortal.Daemon.Recordings.DailyAutoUserLogoutManager.r5
    \\acd-store\shared\JTELCarrierPortal\AppServer\acd\Daemons\acdPortal.Daemon.GroupDistributeReportSubscriptions2.r5
    \\acd-store\shared\JTELCarrierPortal\AppServer\acd\Daemons\acd.Daemon.LongCalls.WarningPortal.Daemon.SystemStartSequence.Cleaner.v2.r5
    \\acd-store\shared\JTELCarrierPortal\AppServer\acd\Daemons\acdPortal.Daemon.UDPSystemStartSequence.Update.v2.r5
    \\acd-store\shared\JTELCarrierPortal\AppServer\TimeServiceMonitor\Portalportal.Daemon.TimeServiceMonitor.r5
    C:\8Server\Samples\LogFileCleaner\8Server.Daemon.LogFileCleaner.r5
    mySQL.r5


    The following list is for a pure telephony server (daemon applications are running on a separate server):


    Translations Ignore


    Code Block
    titleList of daemons of a telephony server
    \\acd-store\shared\JTELCarrierPortal\AppServer\
    Portal
    acd\Daemons\acd.Daemon.
    Audio
    UDP.
    Converter.
    r5
    \\acd-store\shared\JTELCarrierPortal\AppServer\conf\
    Portal
    ConfServer.Daemon.
    ChangeEvent.Manager
    UDP.r5
    \\acd-store\shared\JTELCarrierPortal\AppServer\Portal.Daemon.
    EventSpool
    SystemStartSequence.
    SMS
    Update.v2.r5
    \\acd-store\shared\JTELCarrierPortal\AppServer
    \Portal
    \TimeServiceMonitor\portal.Daemon.TimeServiceMonitor.r5
    C:\8Server\Samples\LogFileCleaner\8Server.Daemon.
    EventSpool
    LogFileCleaner.mySQL.r5


    The following list is for a pure daemon application server:

    Translations Ignore


    Code Block
    titleList of daemons in a daemon server
    SMTP.r5
    \\acd-store\shared\JTELCarrierPortal\AppServer\Portalacd\Daemons\acd.Daemon.RecordingsAcdEvents.Cleaner.r5
    \\acd-store\shared\JTELCarrierPortal\AppServer\acd\PortalDaemons\acd.Daemon.RecordingsAcdEvents.ManagerDistribute.r5
    \\acd-store\shared\JTELCarrierPortal\AppServer\Portalacd\Daemons\acd.Daemon.ReportSubscriptions2DailyAutoGroupLogout.r5
    \\acd-store\shared\JTELCarrierPortal\AppServer\Portalacd\Daemons\acd.Daemon.SystemStartSequence.Cleaner.v2DailyAutoUserLogout.r5
    \\acd-store\shared\JTELCarrierPortal\AppServer\acd\Daemons\Portalacd.Daemon.SystemStartSequence.Update.v2GroupDistribute.r5
    \\acd-store\shared\JTELCarrierPortal\AppServer\acd\Daemons\acd.Daemon.LongCalls.Warning.r5
    \\acd-store\shared\JTELCarrierPortal\AppServer\acd\TimeServiceMonitorDaemons\portalacd.Daemon.TimeServiceMonitorUDP.r5
    C:\8Server\Samples\LogFileCleaner\8Server\\acd-store\shared\JTELCarrierPortal\AppServer\Portal.Daemon.8Server.LogFileCleaner.mySQL.r5

    Hiermit ist die Interaktive Grund-Konfiguration des 8Servers abgeschlossen. Der 8Server kann nun beendet werden, so dass eine gültige Lizenz generiert und eingespielt werden kann.

    8Server Lizenz anfordern

    Die Anforderung der Lizenz erfolgt mittels des Programms C:\8Server\bin\KeyOrder6.exe direkt aus dem Explorer:

    Image Removed

    Die Datei C:\8Server\bin\8server.key wird an support@jtel.de gesendet.

    Sobald eine gültige Lizenzdatei verfügbar ist, muss diese ins Verzeichnis C:\8Server\Config Verzeichnis eingespielt werden.

    Installation des Hazelcast Platform UDP Listeners

    Platform UDP Listener Installieren

    Im Anschluss wird der Platform UDP Listener mit folgenden Befehlen installiert:

    Translations Ignore Code Block
    titleInstallation des Platform UDP Listeners
    C: md \PlatformUDPlistener xcopy /E \\
    
    \\acd-store\shared\JTELCarrierPortal\AppServer\Portal.Daemon.Audio.Converter.r5
    \\acd-store\shared\JTELCarrierPortal\AppServer\Portal.Daemon.ChangeEvent.Manager.r5
    \\acd-store\shared\JTELCarrierPortal\AppServer\Portal.Daemon.EventSpool.SMS.r5
    \\acd-store\shared\JTELCarrierPortal\AppServer\Portal.Daemon.EventSpool.SMTP.r5
    \\acd-store\shared\JTELCarrierPortal\
    Utils\Install\PlatformUDPListener C:\PlatformUDPlistener copy
    AppServer\Portal.Daemon.Recordings.Cleaner.r5
    \\acd-store\shared\
    hazelcast.xml C:\PlatformUDPlistener\conf
    JTELCarrierPortal\AppServer\Portal.Daemon.Recordings.Manager.r5
    \\acd-store\shared\JTELCarrierPortal\AppServer\Portal.Daemon.ReportSubscriptions2.r5
    \\acd-store\shared\JTELCarrierPortal\AppServer\Portal.Daemon.SystemStartSequence.Cleaner.v2.r5
    \\acd-store\shared\JTELCarrierPortal\AppServer\Portal.Daemon.SystemStartSequence.Update.v2.r5
    \\acd-store\shared\JTELCarrierPortal\AppServer\TimeServiceMonitor\portal.Daemon.TimeServiceMonitor.r5
    C:\8Server\Samples\LogFileCleaner\8Server.Daemon.LogFileCleaner.mySQL.r5


    Stop 8-Server

    Now shutdown 8-Server using File ... Exit.

    8-Server License

    Use C:\8Server\bin\KeyOrder6.exe to request a license for 8-Server:

    Image Added

    Send the file C:\8Server\bin\8server.key to support@jtel.de 

    Once the license file is received, delete the file: 

    C:\8Server\bin\8server.key 

    and place the license file in:

    C:\8Server\Config

    Install the Platform UDP Listener

    Installation

    Install the platform UDP listener with the following commands

    Verknüpfungen

    Verknüpfung von 

    c:\PlatformUDPListener\startListener.bat

    Auf den Desktop sowie nach shell:startup legen.

    Test

    Platform UDP Listener starten. Es sollten nun im Cluster alle TEL Nodes gefunden werden. Wenn zuvor, die Webserver und DBM installiert wurden, sollten diese Nodes nun auch im Cluster aktiv sein.

    Windows Autostart

    Bedingung für die Installation durch uns, ist ein lokaler Administrator Account. 

    Ferner ist es zu empfehlen, dass die Maschine nicht in der Domäne des Kunden eingebunden ist. Hier gibt es einfach die Möglichkeit, dass zu viele Policies uns in die Suppe spucken.

    Maschine ohne "Administrator" Login

    Dies betrifft meistens Maschinen die in der Kunden-Domäne sind.

    Damit der 8-Server korrekt läuft, muss es mit "Als Administrator ausführen" gestartet werden. 

    Es gibt jedoch einen Weg, dies automatisch zu machen. 

    Voraussetzung ist, dass wir die Einstellungen der Benutzerkontensteuerung verändern können, sollte dies nicht möglich sein, MUSS der Kunde das anpassen. Sonst an dieser Stelle: HALT.

    Einstellungen der Benutzerkontensteuerung ändern

    Auf den Startmenü clicken oder Windows Taste drücken.

    Dann eingeben:

    Benutzerkontensteuerung (Deutsches Windows) oder User Account Control.

    Siehe Screenshot:

    Image Removed

    Den entsprechenden Menüpunkt auswählen, und dann die Benutzerkontensteuerung auf die Niedrigste Stufe stellen - siehe Screenshot. 

    Image Removed

    Autostart Installieren

    http://cdn.jtel.de/downloads/tools/AutoLogon.zip 

    Entpacken, und für den Benutzer (Administrator oder den jtel Benutzer) ein Autologin einrichten.

    Anschließend testen:

    • Maschine neu starten
    • Nachdem die Maschine gebootet ist, sollte der User sich automatisch angemeldet haben, und alle relevanten Dienste sollten laufen

    Windows Firewall

    Falls die Windows Firewall aktiviert bleiben soll, müssen ein paar Anpassungen getätigt werden.

    Folgende Befehle als Administrator im cmd Fenster ausführen:

    Translations Ignore


    Code Block
    titleWindows Firewall adjustments - run as administrator in cmd
    netsh advfirewall firewall add rule name="ICMPv4" protocol=icmpv4:8,any dir=in action=allow edge=yes
    netsh advfirewall firewall add rule name="Hazelcast" dir=in action=allow protocol=TCP localport=5701-5801 edge=no
    netsh advfirewall firewall add rule name="RTP" dir=in action=allow protocol=UDP localport=30000-34999 edge=yes
    netsh advfirewall firewall add rule name="SIP" dir=in action=allow protocol=UDP localport=5060 edge=yes
    netsh advfirewall firewall add rule name="UDP Local" dir=in action=allow protocol=UDP localport=1-65535 edge=no

    Aculab Port Eingrenzung

    Damit das UDP von Remote auch an bestimmte Ports in Aculab ankommt, muss zusätzlich die Aculab Konfiguration angepasst werden.

    Mit notepad++ folgende Datei bearbeiten: C:\aculab\v67\cfg\aculab.config und die Port Range auf 30000 bis 34999 setzen:

    Translations Ignore Code Block
    titleC:\aculab\v67\cfg\aculab.config
    Installation des Platform UDP Listeners
    C:
    md \PlatformUDPlistener
    xcopy /E \\acd-store\shared\JTELCarrierPortal\Utils\Install\PlatformUDPListener C:\PlatformUDPlistener 
    copy \\acd-store\shared\hazelcast.xml C:\PlatformUDPlistener\conf


    Shortcut

    Create a shortcut from:

    c:\PlatformUDPListener\startListener.bat

    and place this in shell:startup

    Test

    Start the platform UDP listener. It should find other cluster members, for example the webserver or database master, if other machines are already active.

    Windows Autostart

    To enable all applications to startup automatically (unless they are installed as services), an automatic login should be configured on windows.

    Unpack AutoLogin.zip, and run the executable. 

    Setup the required account details, and save. 

    Reboot the machine to test! Note - give the machine a couple of minutes since if you attach via RDP to the account running the jtel applications, you will cause a login to occur and the applications to be started.

    ... <rxrange minvalue="30000" maxvalue="34999"/> ...


    Sv translation
    languagede

    Status
    colourRed
    titleThis page is only available in English

    Sv translation
    languagefr

    Introduction

    Le serveur TEL gère les flux d'appels pour les appels téléphoniques dans le système jtel.

    Il exécute également des processus en arrière-plan, tels que des emplois pour créer des e-mails d'abonnement aux statistiques et convertir des fichiers audio ou créer des fichiers audio avec un moteur TTS.

    En outre, les connecteurs PBX sont généralement exécutés sur le serveur TEL. 

    Installation

    Téléchargement de fichiers

    Le script suivant permet de télécharger tous les fichiers nécessaires dans cette section.

    Translations Ignore


    Code Block
    powershell -command "& { Start-BitsTransfer -Source https

    Table of Contents
    maxLevel3
    printablefalse

    Beschreibung der Rolle

    Die TEL Server sind dafür zuständig Call-Flow-Applikationen und zentrale Verwaltungs- und Steuerfunktionen in Form von R5-Skripten auszuführen. Des weiteren werden auf diesen Servern in der Regel auch die Connectoren für Synchronisation verschiedner Bentzer und Telefonie-Stati der Telefonanlagen installiert.

    Einrichtung der Zeitsynchronisation (Alternativer Zeitdienst)

    portal.Daemon.TimeServiceMonitor.r5 stoppen im 8-Server falls installiert. 

    Zeitdienst herunterladen und installieren:

    http
    ://cdn.jtel.de/downloads/
    NTP/ntp-4.2.8p10-win32-setup.exe

    Immer auf next, bis zur Auswahl der Zeitserver. Zuerst den Kundenserver angeben (falls vorhanden), dann die ptb Zeitserver: ptbtime1.ptb.de,ptbtime2.ptb.de,ptbtime3.ptb.de

    Image Removed

    Dann installation abschließen. 

    Monitor installieren:

    configs/8server_config_v8.reg -Destination $Env:UserProfile\Downloads }" powershell -command "& { Start-BitsTransfer -Source https://cdn.jtel.de/downloads/configs/odbc_ini_v52.reg -Destination $Env:UserProfile\Downloads }" powershell -command "& { Start-BitsTransfer -Source http://cdn.jtel.de/downloads/
    NTP/ntp-time-server-monitor-104.exe

    Sicherstellen dass dienst läuft. Monitor prüfen, dass mindestens einer der Zeitserver "grün" ist.

    Image Removed

    Achtung:

    • Sicherstellen, dass der Parameter im Portal Portal.Alarming.Time.WindowsTimeService auf 0 gestellt ist.

    Konfigurieren der Datenquellen

    Als nächstes müssen die Datenquellen im ODBC Administrator konfiguriert werden.

    Folgende Registry-File downloaden und importieren:

    https://cdn.jtel.de/downloads/configs/odbc_ini_v52.reg

    Hinweis: Konfigurationsdateien für neuere ODBC Treiber sind ebenfalls vorhanden. Es wird jedoch empfohlen, wegen Speicherprobleme im MySQL ODBC Treiber, mit dieser Version zu arbeiten. Auch mit den neuesten 8.x Treiber treten Speicherprobleme auf, wenn Datenbankverbindungen abbrechen.

    Installieren des 8Servers

    Repository Clonen

  • https://bitbucket.org/jtelgmbh/8-server-deploy.git in das zu erstellende Verzeichnis c:\8Server\deploy
  • aculab/AculabInstaller.msi -Destination $Env:UserProfile\Downloads }" powershell -command "& { Start-BitsTransfer -Source https://cdn.jtel.de/downloads/tools/AutoLogon.zip -Destination $Env:UserProfile\Downloads }"


    Configurer les ressources données

    Importer le fichier téléchargé odbc_ini_v52.reg au registre pour configurer les sources de données dans windows.

    Vous devrez peut-être modifier les entrées du mot de passe pour chaque source de données, en fonction du mot de passe configuré pour la base de données mysql.

    Préparer un registre de 8-Server

    Importer le fichier téléchargé 8server_config_v8.reg au registre pour préparer le registre pour 8-Server.

    Vous devrez modifier le ID Machine setting - régler ce paramètre sur le dernier octet de l'adresse IPv4 dans le réseau local. Vous devez changer cette valeur en HEX.

    Installer 8-Server

    cloner le dépôt

    Status
    colourYellow
    titleImportant - LA PROCÉDURE DE DÉMARRAGE DANS STDCALL_MCP.CFG EXIGE RC-5.23.13 AINSI QUE PLUS DE 10 COMMANDES

    Exécutez les commandes suivantes à partir d'un invite de commande non élevé:

    Translations Ignore


    Code Block
    c: cd \ mkdir \8Server cd \8Server git clone https://bitbucket.org/jtelgmbh/8-server-deploy.git deploy cd deploy git checkout release/rc-5.23.14


    Installer 8-Server

    Téléphonie et Démons

    Exécutez les commandes suivantes à partir d'un invite de commande non élevé:

    Translations Ignore


    Code Block
    c: cd 
    Wechsel auf das gewünschte Release, beispielsweise release/rc-5.23.9 (derzeit aktuell empfohlen)
    Note
    titleHinweis

    Beide Aktionen erfordern die Kenntnis gültiger Zugangsberechtigungen zum zentralen jtel Software-Server.

    Software Installieren

    Telefonie und Daemonen:

    Translations Ignore
    Code Block
    titleInstallation of an 8 server for telephony and daemons
    c:\8Server\deploy\OEM\JTEL\ first_install.cmd
    c:\8Server\deploy\OEM\JTEL\copy copy_keyfile_en_mcp_v67.cmd


    Uniquement Démons

    Exécutez les commandes suivantes à partir d'un invite de commande non élevéNur Daemonen:

    Translations Ignore


    Installation of an 8 server for administration and control functions
    Code Block
    title
    c: cd \8Server\deploy\OEM\JTEL\ first_install.cmd
    c:\8Server\deploy\OEM\JTEL\ copy_keyfile_en_daemon.cmd

    C++ Runtimes installieren


    Pare-feu Windows

    Les commandes suivantes permettent de configurer le pare-feu Windows. Exécutez-les dans un cmd windows élevéFolgende Runtimes installieren:

    Translations Ignore


    Code Block
    titleC++ Runtimes
    C:\8Server\deploy\OEM\JTEL\Required\vcredist_2012_x64_11.0.61030.exe /passive /norestart
    C:\8Server\deploy\OEM\JTEL\Required\vcredist_2012_x86_11.0.61030.exe /passive /norestart
    C:\8Server\deploy\OEM\JTEL\Required\vcredist_2015_x64_14.0.24123.exe /install /passive /norestart
    C:\8Server\deploy\OEM\JTEL\Required\vcredist_2015_x86_14.0.24123.exe /install /passive /norestart
    C:\8Server\deploy\OEM\JTEL\Required\ww_icl_redist_ia32_2017.1.143.msi /quiet /passive
    C:\8Server\deploy\OEM\JTEL\Required\ww_icl_redist_intel64_2017.1.143.msi /quiet /passive

    Installieren des Aculab Media Servers

    AIT Installieren

    v67 Paket installieren

    netsh advfirewall firewall add rule name="ICMPv4" protocol=icmpv4:8,any dir=in action=allow edge=yes netsh advfirewall firewall add rule name="Hazelcast" dir=in action=allow protocol=TCP localport=5701-5801 edge=no netsh advfirewall firewall add rule name="RTP" dir=in action=allow protocol=UDP localport=30000-34999 edge=yes netsh advfirewall firewall add rule name="SIP" dir=in action=allow protocol=UDP localport=5060 edge=yes netsh advfirewall firewall add rule name="UDP Local" dir=in action=allow protocol=UDP localport=1-65535 edge=no


    Installer Aculab SIP et RTP Stack

    Installer AIT

    Exécutez les commandes suivantes à partir d'un invite de commande non élevéet l'installer pour tous les utilisateurs :

    Translations Ignore


    Code Block
    start %USERPROFILE%\Downloads\AculabInstaller.msi


    Installer Aculab v67

    • Démarrer l'application AIT
    • Choisissez "Connexion" -> "Travailler hors ligne".
    • "Fichier" -> ""Importer" -> Charger le fichier du paquet Aculab
    • AIT Starten
    • "Connection" -> "Work offline".
    • "File" -> ""Import"  -> Load Aculab Package File...".
      • c:\8Server\deploy\oem\jtel\aculab\v67.apf
    • ZielpfadRépertoire Cible:
      • C:\aculab\v67
    • "Install« Installer"

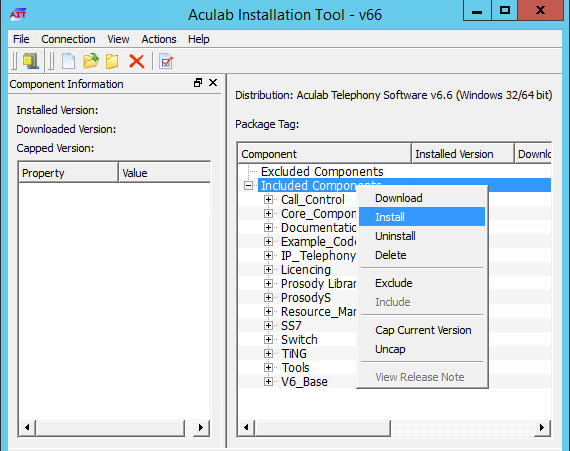
    • Installation von allen Treibern (Windows Abfragen) bestätigen

    Aculab Konfiguration


    Warning

    Remarque - si le démarrage sécurisé n'est pas désactivé dans l'environnement virtuel, l'installation des pilotes peut échouer.

    Configurer Aculab

    • Démarrer ACT 


    • Ajouter une instance de Prosody-S
    • ACT Starten
    • Choisissez
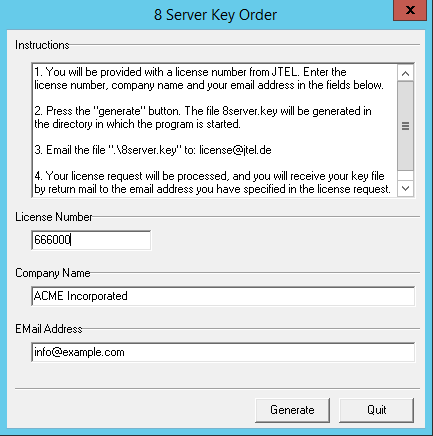
    • "Prosody S"  ... "Add« Ajouter...":Die Seriennummer kann frei gewählt werden. Als Security Key jtel angeben.
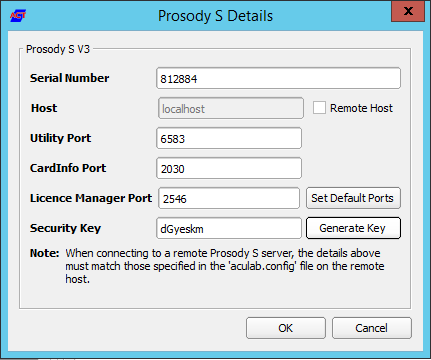
      Image Removed
      "IP Settings", "Enable SIP on Host" aktivieren:
      Image Removed
      "License Manager", Lizenz einspielen (Install Licence Keys...)
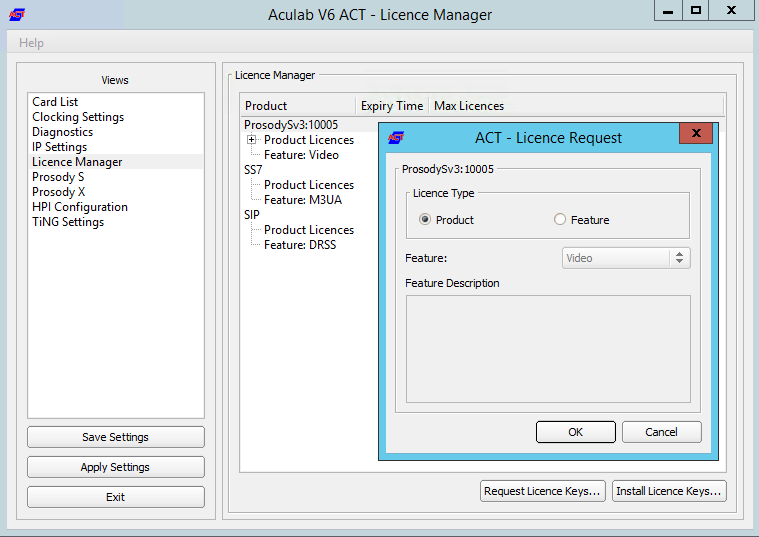
      Image Removed
    • "Save Settings" gefolgt dann "Apply Settings".

    Startup Scripts

    Ggf in c:\8Server\bin\startup.cmd das "net use" anpassen.

    Verknüpfungen

    Verknüpfung von 

    c:\8Server\bin\startup_launcher.cmd

    Auf den Desktop sowie nach shell:startup legen.

    Aculab Konfiguration für 8-Server

    giAculab config erzeugen (cmd als ADMIN):

    Achtung: manchmal schluckt Windows das Verändern des Pfads nicht 100% sofort. Wenn nicht (falls gihal.exe nicht gefunden wird), dann neu booten.

    Translations Ignore
    Code Block
    titlecmd (as ADMIN)
    gihal
     
    # If it starts, press CTRL+C then cancel

    giAculab.cfg muss nun angepasst werden.

    Den Einstellungsbereich unten kopieren und in der Zieldatei ersetzen.

  • channel_count auf die Anzahl der SIP Kanäle stellen
  • default_rtp_ip muss bei Multi-Homed Maschinen auf die IP Adresse der Netzwerkkarte für die Telefonie gesetzt werden
    Translations Ignore
    • Le numéro de série peut être choisi librement, tout comme la clé de sécurité. Nous recommandons respectivement 100000 et jtel.

    Image Added

    • Installer les licences
    • Choisissez "Gestionnaire de licences", Installer des clés de licence...

    Image Added

    • Enregistrer et appliquer
    • Choisissez "Enregistrer Paramètres" ensuite "Appliquer Paramètres".

    RTP Symétrique

    Pour configurer le RTP symétrique, un fichier est créé dans C:\Aculab\v67\cfg\mhp.cfg avec le contenu suivant :

    Translations Ignore


    Code Block
    LocalRtpSymmetric=1


    Plage Port

    S'il est nécessaire qu'une plage de ports soit utilisée pour le RTP, alors le fichier C:\aculab\v67\cfg\aculab.config doit être édité, définissez la plage de ports requise par l'extrémité distante (PBX / SIP Trunk) :

    Translations Ignore


    Code Block
    ... <rxrange minvalue="30000" maxvalue="34999"/> ...


    Services

    Status
    colourYellow
    titleTrès important pour Windows Server 2019

    Configurez les services Aculab suivants pour qu'ils ne démarrent que manuellement :

    • Aculab Prosody S
    • Responsable des ressources d'Aculab
    • Service de démarrage d'Aculab

    Configurez les services Aculab suivants pour qu'ils soient handicapés :

    • Gestionnaire Aculab SS7 TS

    Scripts de démarrage

    Utilisation du net

    Vérifiez the fichier c:\8Server\bin\startup.cmd - pour voir si la commande d'utilisation du net doit être modifiée ou non.

    Warning
    titleServeur Windows 2019

    Commentez les lignes suivantes dans le fichier startup.cmd :


    aculabservicemanager -stop sip
    net use \\acd-store\shared /u:jtel fireball

    Raccourci

    Créer un raccourci pour :

    c:\8Server\bin\startup_launcher.cmd

    et le placer dans shell:startup.

    Fichiers de configuration

    Créer une configuration par défaut giAculab.cfg

    Démarrez un cmd up, et commencez gihal. Cela créera un défaut fichier giAculab.cfg.

    Warning

    Note - assurez-vous que les services aculab sont lancés à ce stade.


    Note

    Parfois, Windows ne met pas à jour le chemin d'accès immédiatement après l'installation des composants ci-dessus. Les éléments suivants doivent être présents dans le chemin, et en tant que variable d'environnement, pour que le reste de l'installation fonctionne :


    PATH=...;c:\8Server\gi2\bin
    R5_CONFIG_DIR=c:\8Server\Config\


    Translations Ignore


    Code Block
    gihal # Si elle commence, appuyez sur CTRL+C puis annulez


    Modifier giAculab.cfg

    Le dossier est en cours :

    c:\8Server\gi2\config\giAculab.cfg

    giAculab.cfg est maintenant configuré pour SIP avec 8-Server. Remplacez la section SIP dans le fichier nouvellement créé par la section ci-dessous, en modifiant ce qui suit :

    • channel_count à la nombre de chaînes SIP autorisées
    • default_rtp_ip doit être remplacé par l'adresse IP du NIC dans le réseau téléphonique dans les systèmes à plusieurs foyers. Laisser telle quelle, si le système n'est pas multihébergement.

    Translations Ignore


    Code Block
     [SIP] { netport = 0 channel_count = 30 default_vmp_set = "VMP_SET1" default_rtp_ip = "0.0.0.0" default_rtp_dscp = 46 defaultSignallingGateway = "" numberOnly = FALSE rfc2833RxToneEvent = TRUE rfc2833RxInbandToneRegeneration = TRUE rfc2833TxToneConversion = TRUE }


    Modifier gi2.ini

    Modifier le fichier C:\8Server\gi2\bin\gi2.ini

    Tout en bas, changez le paramètre suivant pour 2 (la norme est 1) :

    Translations Ignore


    Code Block
    DISABLE_ERROR_DIALOG = 2


    Modifier StdCall_MCP.cfg

    Status
    colourYellow
    titleImportant - n'utilisez pas une ancienne configuration sous Windows Server 2019

    Les paramètres suivants sont modifiés dans le fichier :

    c:\8Server\config\StdCall_MCP.cfg
    • Enable_SIP_Registrar - pour les installations qui nécessitent un bureau d'enregistrement pour le tronc du SIP (par exemple, les installations PBX Panasonic)
    • Default_SIP_Contact - changement de l'adresse IP du serveur (pour les systèmes multi-homed, utiliser l'adresse IP du NIC dans le réseau téléphonique
    • Startup_Command4 und Startup_Sleep4 - supprimer ces lignes si la machine n'a pas besoin d'être enregistrée dans un coffre SIP (par exemple NFON exige l'enregistrement - dans ce cas, partez !)
    • Total_Channel_Count - Réglé sur le nombre total de chaînes SIP sous licence
    • Inbound_Use_Channels - Fixer le nombre d'agents + superviseurs + file d'attente + canaux IVR
    • Outbound_Use_Channels - Définir le nombre d'agents + superviseurs + canaux de transfert d'appels
    • Note: Total_Channel_Count = Inbound_Use_Channels + Outbound_Use_Channels
    Translations Ignore


    Code Block
    ROOT { StdCall_MCP { bool Use_RemoteHAL = TRUE; integer LocalStream_RX_Port = 0; integer Dispatcher_ThreadCount = 4; bool Auto_SETUP_ACK = FALSE; string Alert_DefaultFile = "c:\8Server\Voice\System\070.wav"; integer Stream_Receiver_MaxUnconfirmedPackets = 8; integer Stream_Receiver_MaxBufferSize = 16384; integer Stream_Sender_Timeout = 2000; integer Stream_Sender_MaxBufferSize = 16384; integer SIP_Interceptor_Port = 5060; bool Enable_SIP_Interceptor = TRUE; integer Start_SIP_Interceptor_After_Command = 5; bool Enable_SIP_Registrar = FALSE; bool Enable_L3_Monitor = FALSE; string Default_SIP_Contact = "<sip:10.42.13.84>"; string Startup_Command0 = "c:/windows/system32/taskkill.exe /im gihal.exe /f"; integer Startup_Sleep0 = 2000; string Startup_Command1 = "c:/windows/system32/taskkill.exe /im giacu.exe /f"; integer Startup_Sleep1 = 2000; string Startup_Command2 = "c:/aculab/v67/bin/amd64/aculabservicemanager -stop sip"; integer Startup_Sleep2 = 2000; string Startup_Command3 = "c:/windows/system32/net.exe stop acuresmgr"; integer Startup_Sleep3 = 2000; string Startup_Command4 = "c:/windows/system32/net.exe stop prosodysserv"; integer Startup_Sleep4 = 2000; string Startup_Command5 = "c:/windows/system32/net.exe stop aculabstartupservice"; integer Startup_Sleep5 = 2000; string Startup_Command6 = "c:/windows/system32/net.exe start aculabstartupservice"; integer Startup_Sleep6 = 2000; string Startup_Command7 = "c:/windows/system32/net.exe start acuresmgr"; integer Startup_Sleep7 = 2000; string Startup_Command8 = "c:/windows/system32/net.exe start prosodysserv"; integer Startup_Sleep8 = 2000; string Startup_Command9 = "c:/aculab/v67/bin/amd64/aculabservicemanager -start sip"; integer Startup_Sleep9 = 2000; string Startup_Command10 = "c:/8Server/gi2/bin/giHal.exe -w -tingtrace"; integer Startup_Sleep10 = 20000; string Startup_Command11 = "c:/8Server/bin/startup_registrations.cmd"; integer Startup_Sleep11 = 1000; string Shutdown_Command0 = "c:/windows/system32/taskkill.exe /im gihal.exe /f"; integer Shutdown_Sleep0 = 2000; string Shutdown_Command1 = "c:/windows/system32/taskkill.exe /im giacu.exe /f"; integer Shutdown_Sleep1 = 2000; Controller1 { integer Total_Channel_Count = 20; integer Inbound_Use_Channels = 10; integer Outbound_Use_Channels = 10; string HAL_HostName = "127.0.0.1"; bool SIP_URL_Cleaner = TRUE; bool SIP_Number_Cleaner = TRUE; bool Ignore_L1Status = TRUE; bool RFC2833_DTMF_Detection = TRUE; }; }; }; 


    Configuration 8-Server

    Démarrage 8-Server:

    Translations Ignore


    Code Block
    c:\8Server\Bin\robot5.exe


    Configuration

    ID Machine (Paramètres ... Général)

    Réglé sur le dernier octet de l'adresse IPv4 de la machine.

    Composantes de l'Internet

    Augmenter le nombre de composants UDP, mais seulement sur les machines qui ont beaucoup de lignes. 

    Recommandation : jusqu'à 200 lignes, il faut en utiliser 40. Au-delà de 200 lignes, augmentez de 20 pour chaque 100 lignes supplémentaires.

    Paramètres UDP

    Si vous construisez un cluster avec plus d'un 8-serveur, entrez l'adresse de diffusion pour la communication interchâssis, en utilisant le port 20202 :

    Image Added


    Processus des démons

    Vérifiez les deamons chargés, et éventuellement supprimez les processus non nécessaires.

    La liste suivante concerne un serveur combiné (téléphonie et applications démoniaques) :
    Code Block
    titleChanges to C: \\ 8Server \\ gi2 \\ config \\ giAculab.cfg
        [SIP]
        {
          netport			                = 0
          channel_count		                = 30
          default_vmp_set		            = "VMP_SET1"
          default_rtp_ip		            = "0.0.0.0"
          default_rtp_dscp		            = 46
          defaultSignallingGateway	        = ""
          numberOnly		                = FALSE
          rfc2833RxToneEvent	            = TRUE
          rfc2833RxInbandToneRegeneration	= TRUE
          rfc2833TxToneConversion	        = TRUE
        }

    Eine weitere Änderung betrifft die Datei C:\8Server\gi2\bin\gi2.ini: hier sollte der Wert DISABLE_ERROR_DIALOG folgendermaßen angepasst werden:

    Translations Ignore
    Code Block
    titleChanges to C: \\ 8Server \\ gi2 \\ bin \\ gi2.ini
    DISABLE_ERROR_DIALOG = 2

    Zusätzlich wird eine Datei C:\8Server\bin\gi2.ini angelegt, mit folgenden Inhalt:

    Translations Ignore
    Code Block
    titleChanges to C: \\ 8Server \\ bin \\ gi2.ini
    CONFIG_DIR = ../gi2/config
    LOG_DIR = ../log
    Die letzte Datei, an der manuelle Anpassungen erfolgen müssen, ist C:\8Server\config\StdCall_MCP.cfg 

    Folgende Einstellungen insbesonders beleuchten:

  • Enable_SIP_Registrar - für Installationen mit eingehende Registrierungen (insbesonders Panasonic)
  • Default_SIP_Contact - hier die IP Adresse des SIP Interfaces eintragen
  • Startup_Command4 und Startup_Sleep4 - löschen, falls die Maschine keine Registrierung nach Aussen aufbauen muss (derzeit alle Installationen ausser NFON)
  • Total_Channel_Count - Entspricht die Gesamtzahl der SIP Kanäle
  • Inbound_Use_Channels - Entspricht nAgents + nSupervisor + nQueueChannels
  • Outbound_Use_Channels - Entspricht nAgents + nSupervisor + nCallTransferChannels
  • Beachte: Total_Channel_Count = Inbound_Use_Channels + Outbound_Use_Channels
  • Translations Ignore
    Code Block
    titleChanges to C: \\ 8Server \\ config \\ StdCall_MCP.cfg
    ROOT
    {
       StdCall_MCP
       {    
          bool    Use_RemoteHAL                         = TRUE;
    	  
          integer LocalStream_RX_Port                   = 0;	  
          integer Dispatcher_ThreadCount                = 4;
    	  
          bool    Auto_SETUP_ACK                        = FALSE;
          string  Alert_DefaultFile                     = "c:\8Server\Voice\System\070.wav";
    	  
          integer Stream_Receiver_MaxUnconfirmedPackets = 8;
          integer Stream_Receiver_MaxBufferSize         = 16384;
          integer Stream_Sender_Timeout                 = 2000;
          integer Stream_Sender_MaxBufferSize           = 16384;
    	  
          integer SIP_Interceptor_Port                  = 5060;
          bool    Enable_SIP_Interceptor                = TRUE;
    	  integer Start_SIP_Interceptor_After_Command   = 1;
    	  bool    Enable_SIP_Registrar                  = FALSE;
          bool    Enable_L3_Monitor                     = FALSE;
    
          string  Default_SIP_Contact                   = "<sip:10.4.11.81>";
    
    	  string  Startup_Command0                      = "c:/windows/system32/taskkill.exe /im gihal.exe /f";
    	  integer Startup_Sleep0                        = 2000;
    	  string  Startup_Command1                      = "c:/aculab/v67/bin/amd64/aculabservicemanager -stop sip";
    	  integer Startup_Sleep1                        = 2000;
    	  string  Startup_Command2                      = "c:/aculab/v67/bin/amd64/aculabservicemanager -start sip";
    	  integer Startup_Sleep2                        = 2000;
    	  string  Startup_Command3                      = "c:/8Server/gi2/bin/giHal.exe -w -tingtrace";
    	  integer Startup_Sleep3                        = 5000;
    	  string  Startup_Command4                      = "c:/8Server/bin/startup_registrations.cmd";
    	  integer Startup_Sleep4                        = 1000;
    	  
    	  string  Shutdown_Command0                     = "c:/windows/system32/taskkill.exe /im gihal.exe /f";
    	  integer Shutdown_Sleep0                       = 2000;
    	  string  Shutdown_Command1                     = "c:/windows/system32/taskkill.exe /im giacu.exe /f";
    	  integer Shutdown_Sleep1                       = 2000;
    	  string  Shutdown_Command2                     = "c:/aculab/v67/bin/amd64/aculabservicemanager -stop sip";
    	  integer Shutdown_Sleep2                       = 2000;
    
          Controller1
          {
             integer Total_Channel_Count    = 0;
             integer Inbound_Use_Channels   = 0;
             integer Outbound_Use_Channels  = 0;
             string  HAL_HostName           = "127.0.0.1";
             bool    SIP_URL_Cleaner        = TRUE;     
             bool    Ignore_L1Status        = TRUE;
             bool    RFC2833_DTMF_Detection = TRUE;
          };
       };
    };


    Symmetrisches RTP

    Wir installieren alle Systeme mit symmetrisches RTP.

    Dies erfordert, dass eine neue Konfigurationsdatei Namens C:\Aculab\v67\cfg\mhp.cfg mit folgendem Inhalt angelegt wird:

    Translations Ignore
    Code Block
    titleFile C: \\ aculab \\ v67 \\ cfg \\ mhp.cfg
     LocalRtpSymmetric=1

    8-Server Konfiguration

    Von diese URL, die Registry Datei importieren:

    MySQL 8.x

    http://cdn.jtel.de/downloads/configs/8server_config_v8.reg

    MySQL 5.x

    http://cdn.jtel.de/downloads/configs/8server_config.reg

    8-Server als ADMIN starten (rechter Mausklick auf robot5.exe im Verzeichnis c:\8Server\Config).

    WICHTIG: Nicht über startup.cmd oder startup_launcher.cmd!

     General Settings, General

    • "Machine ID" letztes Byte der IP Adresse

    Bereich Internet Components

    Nur bei Maschinen mit viele Leitungen: ggf. der Wert von "UDP" erhöhen. 

    Bereich UDP Settings

    Nur bei den Betrieb von mehreren 8-Server:

  • Die Broadcast-Adresse des LAN Segments eintragen
  • Port 20202 bestimmen
    Image Removed

    Bereich Daemon Processes

    Ggf. bei ein reiner Daemonen-Server oder reine Telefonie-Server einige der Daemonen entfernen. Translations Ignore Code Block
    titleList of daemons of a combination server
    \\acd-store\shared\JTELCarrierPortal\AppServer\acd\Daemons\acd.Daemon.AcdEvents.Cleaner.r5 \\acd-store\shared\JTELCarrierPortal\AppServer\acd\Daemons\acd.Daemon.AcdEvents.Distribute.r5 \\acd-store\shared\JTELCarrierPortal\AppServer\acd\Daemons\acd.Daemon.DailyAutoGroupLogout.r5 \\acd-store\shared\JTELCarrierPortal\AppServer\acd\Daemons\acd.Daemon.DailyAutoUserLogout.r5 \\acd-store\shared\JTELCarrierPortal\AppServer\acd\Daemons\acd.Daemon.GroupDistribute.r5 \\acd-store\shared\JTELCarrierPortal\AppServer\acd\Daemons\acd.Daemon.LongCalls.Warning.r5 \\acd-store\shared\JTELCarrierPortal\AppServer\acd\Daemons\acd.Daemon.UDP.r5


    Translations Ignore


    Code Block
    \\acd-store\shared\JTELCarrierPortal\AppServer\acd\
    conf
    Daemons\
    ConfServer
    acd.Daemon.AcdEvents.
    UDP
    Cleaner.r5
     \\acd-store\shared\JTELCarrierPortal\AppServer\acd\Daemons\
    Portal
    acd.Daemon.
    8Server
    AcdEvents.
    LogFileCleaner
    Distribute.r5
     \\acd-store\shared\JTELCarrierPortal\AppServer\
    Portal
    acd\Daemons\acd.Daemon.
    Audio.Converter
    DailyAutoGroupLogout.r5
     \\acd-store\shared\JTELCarrierPortal\AppServer\
    Portal
    acd\Daemons\acd.Daemon.
    ChangeEvent.Manager
    DailyAutoUserLogout.r5
     \\acd-store\shared\JTELCarrierPortal\AppServer\
    Portal.Daemon.EventSpool.SMS.r5 \\acd-store\shared\JTELCarrierPortal\AppServer\Portal
    acd\Daemons\acd.Daemon.
    EventSpool
    GroupDistribute.
    SMTP.
    r5
     \\acd-store\shared\JTELCarrierPortal\AppServer\
    Portal.Daemon.Recordings.Cleaner.r5 \\
    acd
    -store\shared\JTELCarrierPortal\AppServer\Portal
    \Daemons\acd.Daemon.
    Recordings
    LongCalls.
    Manager
    Warning.r5
     \\acd-store\shared\JTELCarrierPortal\AppServer\acd\Daemons\
    Portal
    acd.Daemon.
    ReportSubscriptions2
    UDP.r5
     \\acd-store\shared\JTELCarrierPortal\AppServer\
    Portal
    conf\ConfServer.Daemon.
    SystemStartSequence.Cleaner.v2
    UDP.r5
     \\acd-store\shared\JTELCarrierPortal\AppServer\Portal.Daemon.
    SystemStartSequence
    8Server.
    Update.v2
    LogFileCleaner.r5
     \\acd-store\shared\JTELCarrierPortal\AppServer\
    TimeServiceMonitor\portal
    Portal.Daemon.
    TimeServiceMonitor.r5 C:\8Server\Samples\LogFileCleaner\8Server.Daemon.LogFileCleaner.mySQL.r5

    Bei einem reinen Telefonie-Server müssen mindestens folgende Daemonen eingetragen werden (Die Pfade orientieren sich an der Beispielskonfiguration):

    Translations Ignore Code Block
    titleList of daemons of a telephony server
    Audio.Converter.r5 \\acd-store\shared\JTELCarrierPortal\AppServer\
    acd\Daemons\acd
    Portal.Daemon.ChangeEvent.
    UDP
    Manager.r5
     \\acd-store\shared\JTELCarrierPortal\AppServer\
    conf\ConfServer
    Portal.Daemon.EventSpool.
    UDP
    SMS.r5
     \\acd-store\shared\JTELCarrierPortal\AppServer\Portal.Daemon.
    SystemStartSequence
    EventSpool.
    Update
    SMTP.
    v2.
    r5
     \\acd-store\shared\JTELCarrierPortal\AppServer\
    TimeServiceMonitor\portal
    Portal.Daemon.Recordings.
    TimeServiceMonitor
    Cleaner.r5
    C:\8Server\Samples\LogFileCleaner\8Server
     \\acd-store\shared\JTELCarrierPortal\AppServer\Portal.Daemon.
    LogFileCleaner
    Recordings.
    mySQL.r5

    Bei einem Daemonen-Server müssen mindestens folgende Daemonen eingetragen werden (Die Pfade orientieren sich an der Beispielskonfiguration):

    Translations Ignore Code Block
    titleList of daemons in a daemon server
    Manager.r5 \\acd-store\shared\JTELCarrierPortal\AppServer\Portal.Daemon.ReportSubscriptions2.r5 \\acd
    \Daemons\acd
    -store\shared\JTELCarrierPortal\AppServer\Portal.Daemon.
    AcdEvents
    SystemStartSequence.Cleaner.v2.r5
     \\acd-store\shared\JTELCarrierPortal\AppServer\
    acd\Daemons\acd
    Portal.Daemon.SystemStartSequence.
    AcdEvents
    Update.
    Distribute
    v2.r5
     \\acd-store\shared\JTELCarrierPortal\AppServer\
    acd\Daemons\acd.Daemon.DailyAutoGroupLogout.r5
    TimeServiceMonitor\portal.Daemon.TimeServiceMonitor.r5 C:\8Server\Samples\LogFileCleaner\8Server.Daemon.LogFileCleaner.mySQL.r5


    La liste suivante concerne un serveur de téléphonie pure (les applications des démons fonctionnent sur un serveur séparé) :


    Translations Ignore


    Code Block
    titleListe des démons d'un serveur de téléphonie
    \\acd-store\shared\JTELCarrierPortal\AppServer\acd\Daemons\acd.Daemon.
    DailyAutoUserLogout
    UDP.r5
     \\acd-store\shared\JTELCarrierPortal\AppServer\
    acd
    conf\
    Daemons\acd
    ConfServer.Daemon.
    GroupDistribute
    UDP.r5
     \\acd-store\shared\JTELCarrierPortal\AppServer\
    acd\Daemons\acd
    Portal.Daemon.SystemStartSequence.
    LongCalls
    Update.
    Warning
    v2.r5
     \\acd-store\shared\JTELCarrierPortal\AppServer\
    acd
    TimeServiceMonitor\
    Daemons\acd
    portal.Daemon.
    UDP
    TimeServiceMonitor.r5
     C:\8Server\
    acd-store
    Samples\
    shared\JTELCarrierPortal\AppServer\Portal
    LogFileCleaner\8Server.Daemon.
    8Server
    LogFileCleaner.
    LogFileCleaner.r5
    mySQL.r5


    La liste suivante concerne un serveur d'application purement démoniaque :

    Translations Ignore


    Code Block
    titleListe des démons dans un serveur de démons
    \\acd-store\shared\JTELCarrierPortal\AppServer\
    Portal
    acd\Daemons\acd.Daemon.
    Audio
    AcdEvents.
    Converter
    Cleaner.r5
     \\acd-store\shared\JTELCarrierPortal\AppServer\
    Portal
    acd\Daemons\acd.Daemon.
    ChangeEvent
    AcdEvents.
    Manager
    Distribute.r5
     \\acd-store\shared\JTELCarrierPortal\AppServer\acd\
    Portal
    Daemons\acd.Daemon.
    EventSpool.SMS
    DailyAutoGroupLogout.r5
     \\acd-store\shared\JTELCarrierPortal\AppServer\acd\
    Portal
    Daemons\acd.Daemon.
    EventSpool.SMTP
    DailyAutoUserLogout.r5
     \\acd-store\shared\JTELCarrierPortal\AppServer\
    Portal.Daemon.Recordings.Cleaner.r5 \\acd-store\shared\JTELCarrierPortal\AppServer\Portal
    acd\Daemons\acd.Daemon.
    Recordings
    GroupDistribute.
    Manager.
    r5
     \\acd-store\shared\JTELCarrierPortal\AppServer\
    Portal.Daemon.ReportSubscriptions2.r5 \\acd-store\shared\JTELCarrierPortal\AppServer\Portal
    acd\Daemons\acd.Daemon.
    SystemStartSequence.Cleaner
    LongCalls.
    v2
    Warning.r5
     \\acd-store\shared\JTELCarrierPortal\AppServer\
    Portal
    acd\Daemons\acd.Daemon.
    SystemStartSequence.Update.v2
    UDP.r5
     \\acd-store\shared\JTELCarrierPortal\AppServer\
    TimeServiceMonitor\portal
    Portal.Daemon
    .TimeServiceMonitor
    .
    r5 C:\
    8Server
    \Samples\LogFileCleaner\8Server.Daemon
    .LogFileCleaner
    .mySQL.r5

    Hiermit ist die Interaktive Grund-Konfiguration des 8Servers abgeschlossen. Der 8Server kann nun beendet werden, so dass eine gültige Lizenz generiert und eingespielt werden kann.

    8Server Lizenz anfordern

    Die Anforderung der Lizenz erfolgt mittels des Programms C:\8Server\bin\KeyOrder6.exe direkt aus dem Explorer:

    Image Removed

    Die Datei C:\8Server\bin\8server.key wird an support@jtel.de gesendet.

    Sobald eine gültige Lizenzdatei verfügbar ist, muss diese ins Verzeichnis C:\8Server\Config Verzeichnis eingespielt werden.

    Installation des Hazelcast Platform UDP Listeners

    Platform UDP Listener Installieren

    Im Anschluss wird der Platform UDP Listener mit folgenden Befehlen installiert:

    Translations Ignore Code Block
    titleInstallation des Platform UDP Listeners
    C: md \PlatformUDPlistener xcopy /E
    .r5 \\acd-store\shared\JTELCarrierPortal\AppServer\Portal.Daemon.Audio.Converter.r5 \\acd-store\shared\JTELCarrierPortal\AppServer\Portal.Daemon.ChangeEvent.Manager.r5 \\acd-store\shared\JTELCarrierPortal\
    Utils\Install\PlatformUDPListener C:\PlatformUDPlistener copy \\
    AppServer\Portal.Daemon.EventSpool.SMS.r5 \\acd-store\shared
    \hazelcast.xml C:\PlatformUDPlistener\conf

    Verknüpfungen

    Verknüpfung von 

    c:\PlatformUDPListener\startListener.bat

    Auf den Desktop sowie nach shell:startup legen.

    Test

    Platform UDP Listener starten. Es sollten nun im Cluster alle TEL Nodes gefunden werden. Wenn zuvor, die Webserver und DBM installiert wurden, sollten diese Nodes nun auch im Cluster aktiv sein.

    Windows Autostart

    Bedingung für die Installation durch uns, ist ein lokaler Administrator Account. 

    Ferner ist es zu empfehlen, dass die Maschine nicht in der Domäne des Kunden eingebunden ist. Hier gibt es einfach die Möglichkeit, dass zu viele Policies uns in die Suppe spucken.

    Maschine ohne "Administrator" Login

    Dies betrifft meistens Maschinen die in der Kunden-Domäne sind.

    Damit der 8-Server korrekt läuft, muss es mit "Als Administrator ausführen" gestartet werden. 

    Es gibt jedoch einen Weg, dies automatisch zu machen. 

    Voraussetzung ist, dass wir die Einstellungen der Benutzerkontensteuerung verändern können, sollte dies nicht möglich sein, MUSS der Kunde das anpassen. Sonst an dieser Stelle: HALT.

    Einstellungen der Benutzerkontensteuerung ändern

    Auf den Startmenü clicken oder Windows Taste drücken.

    Dann eingeben:

    Benutzerkontensteuerung (Deutsches Windows) oder User Account Control.

    Siehe Screenshot:

    Image Removed

    Den entsprechenden Menüpunkt auswählen, und dann die Benutzerkontensteuerung auf die Niedrigste Stufe stellen - siehe Screenshot. 

    Image Removed

    Autostart Installieren

    http://cdn.jtel.de/downloads/tools/AutoLogon.zip 

    Entpacken, und für den Benutzer (Administrator oder den jtel Benutzer) ein Autologin einrichten.

    Anschließend testen:

    • Maschine neu starten
    • Nachdem die Maschine gebootet ist, sollte der User sich automatisch angemeldet haben, und alle relevanten Dienste sollten laufen

    Windows Firewall

    Falls die Windows Firewall aktiviert bleiben soll, müssen ein paar Anpassungen getätigt werden.

    Folgende Befehle als Administrator im cmd Fenster ausführen:

    Translations Ignore
    \JTELCarrierPortal\AppServer\Portal.Daemon.EventSpool.SMTP.r5 \\acd-store\shared\JTELCarrierPortal\AppServer\Portal.Daemon.Recordings.Cleaner.r5 \\acd-store\shared\JTELCarrierPortal\AppServer\Portal.Daemon.Recordings.Manager.r5 \\acd-store\shared\JTELCarrierPortal\AppServer\Portal.Daemon.ReportSubscriptions2.r5 \\acd-store\shared\JTELCarrierPortal\AppServer\Portal.Daemon.SystemStartSequence.Cleaner.v2.r5 \\acd-store\shared\JTELCarrierPortal\AppServer\Portal.Daemon.SystemStartSequence.Update.v2.r5 \\acd-store\shared\JTELCarrierPortal\AppServer\TimeServiceMonitor\portal.Daemon.TimeServiceMonitor.r5 C:\8Server\Samples\LogFileCleaner\8Server.Daemon.LogFileCleaner.mySQL.r5


    Stop 8-Server

    Fermez maintenant le 8-Server en utilisant le fichier ... Sortez.

    Licence 8-Server

    Utilisez C:\8Server\bin\KeyOrder6.exe pour demander une licence pour le 8-Server :

    Image Added

    Envoyer le fichier C:\8Server\bin\8server.key  ausupport@jtel.de 

    Envoyer le fichier Une fois le fichier de licence reçu, supprimez le fichier : 

    C:\8Server\bin\8server.key 

    et placer le fichier de licence dans:

    C:\8Server\Config

    Installation de la plate-forme UDP Listener

    Installation

    Installez la plate-forme UDP listener avec les commandes suivantes :

    Translations Ignore


    Code Block
    titleInstallez la plate-forme UDP listener avec les commandes suivantes :
    C: md \PlatformUDPlistener xcopy /E \\acd-store\shared\JTELCarrierPortal\Utils\Install\PlatformUDPListener C:\PlatformUDPlistener copy \\acd-store\shared\hazelcast.xml C:\PlatformUDPlistener\conf


    Raccourci

    Créer un raccourci de:

    c:\PlatformUDPListener\startListener.bat

    et le placer dans shell:startup.

    Test

    Démarrez l'auditeur de la plateforme UDP. Il devrait trouver d'autres membres du cluster, par exemple le serveur web ou le maître de la base de données, si d'autres machines sont déjà actives.

    Démarrage automatique de Windows

    Pour permettre à toutes les applications de démarrer automatiquement (sauf si elles sont installées en tant que services), une connexion automatique doit être configurée sur Windows.

    Décompressez AutoLogin.zip, et lancez l'exécutable. 

    Définissez les détails du compte requis et enregistrez. 

    Redémarrez la machine pour la tester ! Note - donnez quelques minutes à la machine car si vous vous connectez via RDP au compte qui exécute les applications jtel, vous provoquerez une connexion et les applications seront lancées

    Code Block
    titleWindows Firewall adjustments - run as administrator in cmd
    netsh advfirewall firewall add rule name="ICMPv4" protocol=icmpv4:8,any dir=in action=allow edge=yes
    netsh advfirewall firewall add rule name="Hazelcast" dir=in action=allow protocol=TCP localport=5701-5801 edge=no
    netsh advfirewall firewall add rule name="RTP" dir=in action=allow protocol=UDP localport=30000-34999 edge=yes
    netsh advfirewall firewall add rule name="SIP" dir=in action=allow protocol=UDP localport=5060 edge=yes
    netsh advfirewall firewall add rule name="UDP Local" dir=in action=allow protocol=UDP localport=1-65535 edge=no

    Aculab Port Eingrenzung

    Damit das UDP von Remote auch an bestimmte Ports in Aculab ankommt, muss zusätzlich die Aculab Konfiguration angepasst werden.

    Mit notepad++ folgende Datei bearbeiten: C:\aculab\v67\cfg\aculab.config und die Port Range auf 30000 bis 34999 setzen:

    Translations Ignore Code Block
    titleC:\aculab\v67\cfg\aculab.config
    ... <rxrange minvalue="30000" maxvalue="34999"/> ..

    .