Versions Compared

Key

  • This line was added.
  • This line was removed.
  • Formatting was changed.
Sv translation
languageen

Common Installation Tasks

These tasks are performed on all DB servers, no matter what role (master or slave) they are to perform.

Attach STORE

STORE must be mounted before installing this role. See Mounting STORE - All Linux except for STORE (Debian/Win2019).

Install MySQL

Configure Repositories

Enable the Debian MySQL 8.x repository and install it, and also install the GPG key. Note, you will get asked some questions. Just get MySQL 8.x and say OK.

Code Block
languagebash
apt-get install gnupg
wget https://dev.mysql.com/get/mysql-apt-config_0.8.1829-1_all.deb
wget https://repo.mysql.com/RPM-GPG-KEY-mysql-2023
apt-key add RPM-GPG-KEY-mysql-2023
apt-key adv --keyserver keyserver.ubuntu.com --recv-keys 605C66F00D6C9793 0E98404D386FA1D9 648ACFD622F3D138 B7B3B788A8D3785C
dpkg -i mysql-apt-config_0.8.1829-1_all.deb
Warning
titleDebian Buster vs Debian Bullseye

Starting with the introduction of Debian 11 (Bullseye), which has replaced Debian 10 (Buster), MySQL is no longer supported for Debian 11 (Bullseye)

Because of this, the following additional step is required as shown in the installation guide below.

Select

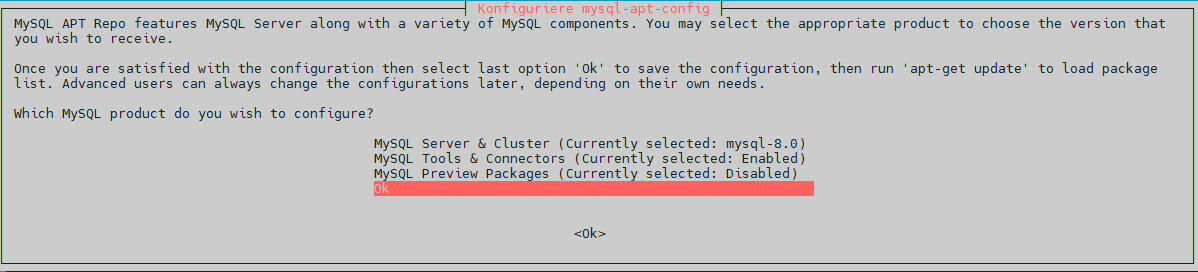
debian buster as the desired repository
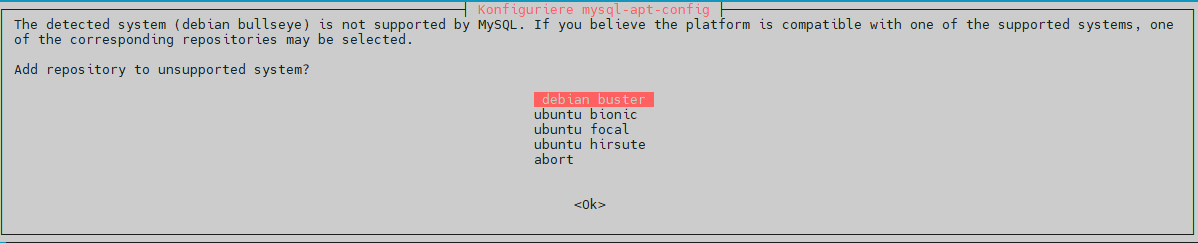
Image Removed

Select Ok to configure MySQL 8.x 

Remove the Temporary

.deb File

Files

Code Block
languagebash
rm -f mysql-apt-config_0.8.1829-1_all.deb
rm -f RPM-GPG-KEY-mysql-2023

Update the Package List and Install MySQL Server

Code Block
languagebash
apt-get update
apt-get -y install mysql-server

The debian installation will ask you some questions during installation:

  • MySQL root Password
  • Default authentication plugin - change to "Use Legacy Authentication Method"

The installer will also start and enable the mysql server.

Configure Firewall

Access to the MySQL Server is configured in the firewall:

Translations Ignore


Code Block
languagebash
ufw allow 3306/tcp


Or for a specific ethernet interface:

Translations Ignore


Code Block
languagebash
ufw allow in on eth1 to any port 3306 proto tcp


Configure MySQL

Configuration Files

The Debian MySQL 8.x creates a configuration directory /etc/mysql/mysql.conf.d/ when it installs. The jtel configuration file is downloaded and stored here. This file contains a lot of well commented settings which can be tweaked if required. The main parameter to be changed is the RAM usage of the sever. See below.

Translations Ignore


Code Block
languagebash
wget -P /etc/mysql/mysql.conf.d http://cdn.jtel.de/downloads/configs/jtel-enhanced-8-deb.cnf


Configure Server RAM and tmp_table_size

In order that the server makes the best use of the RAM available, the configuration file /etc/mysql/mysql.conf.d/jtel-enhanced-8-deb.cnf must be adapted.

The setting innodb_buffer_pool_size should be adapted to about 3/4 of the available RAM, but a minimum of 3-4 GB should remain for the use of other processes. For Servers with 4 GB RAM, this should not exceed 2 GB. 

Translations Ignore


Code Block
languagebash
# For 4 GB RAM
innodb_buffer_pool_size = 2048M

# For 8 GB RAM
innodb_buffer_pool_size = 4192M
 
# For 12 GB RAM
innodb_buffer_pool_size = 8192M
 
# For 16 GB RAM
innodb_buffer_pool_size = 12288M

...
# From 16 GB simply take 3/4 of the RAM


Code Block
languagebash
# ALWAYS
tmp_table_size = 32M


Restart MySQL

The MySQL server is restarted to load all configuration settings.

Translations Ignore


Code Block
languagebash
titleRestart the MySQL server
systemctl restart mysql


Configure Users

After the first restart, user access must be setup.

The following commands configure the users required:

Status
colourRed
titleCaution Password

Translations Ignore


Code Block
languagebash
mysql -u root -p<password> -v -e"CREATE USER 'root'@'%' IDENTIFIED WITH mysql_native_password BY '<password>'"
mysql -u root -p<password> -v -e"GRANT ALL ON *.* TO 'root'@'%' WITH GRANT OPTION"
mysql -u root -p<password> -v -e"FLUSH PRIVILEGES"


Install UDP Plugin

Next, the UDP plugin is installed. This is required for the communication with further software modules in the system, when certain DB changes are made.

The installation is slightly different for master and slave servers.

Installation

Master Server

Translations Ignore


Code Block
languagebash
cp /home/jtel/shared/JTELCarrierPortal/Libraries/jtel_udf_udpsend/jtel_udf_udpsend.so /usr/lib/mysql/plugin/
chown root:root /usr/lib/mysql/plugin/jtel_udf_udpsend.so
chmod 644 /usr/lib/mysql/plugin/jtel_udf_udpsend.so


Slave Server


Translations Ignore


Code Block
languagebash
cp /home/jtel/shared/JTELCarrierPortal/Libraries/jtel_udf_udpsend/dummy/jtel_udf_udpsend.so /usr/lib/mysql/plugin/
chown root:root /usr/lib/mysql/plugin/jtel_udf_udpsend.so
chmod 644 /usr/lib/mysql/plugin/jtel_udf_udpsend.so


Configuration

To configure the plugin, the following commands are executed:

Status
colourRed
titleCaution Password

Translations Ignore


Code Block
languagebash
mysql -u root -p<password> -v -e"DROP FUNCTION IF EXISTS udpsend"
mysql -u root -p<password> -v -e"CREATE FUNCTION udpsend RETURNS STRING SONAME 'jtel_udf_udpsend.so'"


Note
titleImportant

The configuration of the UDP plugin must be performed before the server is included in any replication between servers, otherwise replication will fail. The UDP plugin must be installed on all servers.


...

Sv translation
languagefr

Tâches d'installation communes

Ces tâches sont effectuées sur tous les serveurs de la base de données, quel que soit le rôle (maître ou esclave) qu'ils doivent jouer.

Joindre MAGASIN

STORE doit être monté avant d'installer ce rôle. Voir Mounting STORE - All Linux except for STORE (Debian/Win2019).

Installer MySQL

Configurer les dépôts

Activez le référentiel Debian MySQL 8.x et installez-le. Notez que certaines questions vous seront posées. Obtenez simplement MySQL 8.x et dites OK.

Code Block
languagebash
apt-get install gnupg wget https://dev.mysql.com/get/mysql-apt-config_0.8.1619-1_all.deb dpkg -i mysql-apt-config_0.8.1619-1_all.deb


Warning
titleDebian Buster vs Debian Bullseye

Debian 11 (Bullseye), qui a remplacé Debian 10 (Buster), n'est pas encore prise en charge par l'équipe MySQL. Cependant, les binaires pour buster fonctionnent bien aussi.

Cette situation va probablement changer bientôt.

Pour cette raison, l'étape supplémentaire suivante est nécessaire, comme indiqué dans le guide d'installation ci-dessous.

Sélectionnez debian buster comme dépôt souhaité.

Image Added

Select Ok to configure MySQL 8.x 

Image Added

Supprimer le fichier temporaire .deb

Code Block
languagebash
rm -f mysql-apt-config_0.8.1619-1_all.deb

Mettre à jour la liste des paquets et installer le serveur MySQL

Code Block
languagebash
apt-get update apt-get -y install mysql-server

L'installation debian vous posera quelques questions lors de l'installation :

  • Mot de passe de la racine MySQL
  • Plugin d'authentification par défaut - passage à "Use Legacy Authentication Method

L'installateur va également démarrer et activer le serveur mysql.

Configurer le pare-feu

L'accès au serveur MySQL est configuré dans le pare-feu :

Translations Ignore


Code Block
languagebash
ufw allow 3306/tcp


Ou pour une interface ethernet spécifique :

Translations Ignore


Code Block
languagebash
ufw allow in on eth1 to any port 3306 proto tcp


Configurer MySQL

Fichiers de configuration

Debian MySQL 8.x crée un répertoire de configuration /etc/mysql/mysql.conf.d/ lors de son installation. Le fichier de configuration jtel est téléchargé et stocké ici. Ce fichier contient de nombreux paramètres bien commentés qui peuvent être modifiés si nécessaire. Le principal paramètre à modifier est l'utilisation de la RAM du serveur. Voir ci-dessous.

Translations Ignore


Code Block
languagebash
wget -P /etc/mysql/mysql.conf.d http://cdn.jtel.de/downloads/configs/jtel-enhanced-8-deb.cnf


Configurer la mémoire vive du serveur

Pour que le serveur utilise au mieux la RAM disponible, le fichier de configuration /etc/mysql/mysql.conf.d/jtel-enhanced-8-deb.cnf doit être adapté.

Le paramètre innodb_buffer_pool_size doit être adapté à environ 3/4 de la RAM disponible, mais un minimum de 3-4 Go doit rester pour l'utilisation d'autres processus. Pour les serveurs dotés de 4 Go de RAM, cette quantité ne doit pas dépasser 2 Go. 

Translations Ignore


Code Block
languagebash
# For 4 GB RAM 
innodb_buffer_pool_size = 2048M 

# For 8 GB RAM 
innodb_buffer_pool_size = 4192M   

# For 12 GB RAM 
innodb_buffer_pool_size = 8192M   

# For 16 GB RAM 
innodb_buffer_pool_size = 12288M 

... 
# From 16 GB simply take 3/4 of the RAM


Démarrer MySQL

Le serveur MySQL est redémarré pour charger tous les paramètres de configuration.

Translations Ignore


Code Block
languagebash
titleRedémarrer le serveur MySQL
systemctl restart mysql


Configurer les utilisateurs

Après le premier redémarrage, l'accès de l'utilisateur doit être configuré.

Les commandes suivantes permettent de configurer les utilisateurs requis :

Status
colourRed
titleMot de passe de précaution

Translations Ignore


Code Block
languagebash
mysql -u root -p<password> -v -e"CREATE USER 'root'@'%' IDENTIFIED WITH mysql_native_password BY '<password>'" mysql -u root -p<password> -v -e"GRANT ALL ON *.* TO 'root'@'%' WITH GRANT OPTION" mysql -u root -p<password> -v -e"FLUSH PRIVILEGES"


Installer le plug-in UDP

Ensuite, le plugin UDP est installé. Ceci est nécessaire pour la communication avec les autres modules logiciels du système, lorsque certaines modifications du DB sont effectuées.

L'installation est légèrement différente pour les serveurs maître et esclave.

Installation

Serveur maître

Translations Ignore


Code Block
languagebash
cp /home/jtel/shared/JTELCarrierPortal/Libraries/jtel_udf_udpsend/jtel_udf_udpsend.so /usr/lib/mysql/plugin/ chown root:root /usr/lib/mysql/plugin/jtel_udf_udpsend.so chmod 644 /usr/lib/mysql/plugin/jtel_udf_udpsend.so


Serveur esclave


Translations Ignore


Code Block
languagebash
cp /home/jtel/shared/JTELCarrierPortal/Libraries/jtel_udf_udpsend/dummy/jtel_udf_udpsend.so /usr/lib/mysql/plugin/ chown root:root /usr/lib/mysql/plugin/jtel_udf_udpsend.so chmod 644 /usr/lib/mysql/plugin/jtel_udf_udpsend.so


Configuration

Pour configurer le plugin, les commandes suivantes sont exécutées :

Status
colourRed
titleMot de passe de précaution

Translations Ignore


Code Block
languagebash
mysql -u root -p<password> -v -e"DROP FUNCTION IF EXISTS udpsend" mysql -u root -p<password> -v -e"CREATE FUNCTION udpsend RETURNS STRING SONAME 'jtel_udf_udpsend.so'"


Note
titleImportant

La configuration du plugin UDP doit être effectuée avant que le serveur ne soit inclus dans une réplication entre serveurs, sinon la réplication échouera. Le plugin UDP doit être installé sur tous les serveurs.