| Sv translation | ||||||||||||||||||||||||||||||||||||||||||||||||||||||||||||||||||||||||||||||||||||||||||||||||||||||||||||||||||||||||||||||||||||||||||||||||||||||||||||||||||||||||||||||||||
|---|---|---|---|---|---|---|---|---|---|---|---|---|---|---|---|---|---|---|---|---|---|---|---|---|---|---|---|---|---|---|---|---|---|---|---|---|---|---|---|---|---|---|---|---|---|---|---|---|---|---|---|---|---|---|---|---|---|---|---|---|---|---|---|---|---|---|---|---|---|---|---|---|---|---|---|---|---|---|---|---|---|---|---|---|---|---|---|---|---|---|---|---|---|---|---|---|---|---|---|---|---|---|---|---|---|---|---|---|---|---|---|---|---|---|---|---|---|---|---|---|---|---|---|---|---|---|---|---|---|---|---|---|---|---|---|---|---|---|---|---|---|---|---|---|---|---|---|---|---|---|---|---|---|---|---|---|---|---|---|---|---|---|---|---|---|---|---|---|---|---|---|---|---|---|---|---|---|---|
| ||||||||||||||||||||||||||||||||||||||||||||||||||||||||||||||||||||||||||||||||||||||||||||||||||||||||||||||||||||||||||||||||||||||||||||||||||||||||||||||||||||||||||||||||||
The CHAT role is used for conducting chat sessions with agents from external websites. The CHAT role is also required for WhatsApp integrations. The chat server is a Java application, which can be installed in parallel on the web servers - with a corresponding additional RAM extension of about 4 GB per server - or . Alternatively, the chat-server can be installed on a separate server. Java 8 InstallationIn this step Java 8 is installed , or on the serverload balancer. Translations Ignore | The following recommendations are made:
InstallationJava 8 InstallationFirst of all, Java 8 is installed:
Installing and Configuring ClientMessengerClientMessenger InstallationThe ClientMessenger directory is copied to /home/jtel.
Hazelcast Cluster ConfigurationThe configuration of the Hazelcast cluster must be checked. For new installations of Release 3.11 as of April 1, 2018, the entries in hazelcast.xml are available, but not before.
The necessary configuration sections in hazelcast.xml are listed here Translations Ignore |
Installing and Configuring ClientMessengerClientMessenger InstallationFirst of all, the ClientMessenger directory is copied to /home/jtel
Hazelcast Cluster Configuration FileThe hazelcast.xml file is copied to the configuration directory of the chat server.
Client Messenger ConfigurationThe configuration or the start file jtel-clientmessenger may have to be adapted so that the database connection can be established. Here <password> must be replaced with the password for the root user of the database:
Install ClientMessenger with systemd
Create the Update ScriptAn update script is created for updating the chat server:
Configure the FirewallNext, the open ports for the chat service must be entered in the firewall and saved persistently. Here you can distinguish whether http (speak unsecure websocket) or https (secure websocket) is used. Since the load balancer usually decrypts the https, for https only port 3003 needs to be opened to the load balancer. Firewall configuration httpExecute the following commands, on the following machines:
Firewall configuration httpsView all computers in the Hazelcast cluster:
Install ClientMessenger as a daemon processIf the repositories are located on a Windows machine (this can only affect old installations), the start script /etc/init.d/jtel-clientmessenger must be repaired before, so that CR+LF becomes only LF. Translations Ignore |
The configuration or the start file jtel-clientmessenger may have to be adapted so that the database connection can be established. Here <password> must be replaced with the password for the root user of the database: Translations Ignore |
Create update scriptAn update script is created for updating the chat server:
Load Balancer Configurationhaproxy.cfg AdjustmentsFor httpThe following adjustments are made on the haproxy, in case of a http connection for the chat to the outside:
Firewall configurationNext, the open ports for the chat service must be entered in the firewall and saved persistently. Here you can distinguish whether http (speak unsecure websocket) or https (secure websocket) is used. Since the load balancer usually decrypts the https, for https only port 3003 needs to be opened to the load balancer. Firewall configuration httpExecute the following commands, on the following machines: On CHAT server (here the chat port and the Hazelcast Cluster ports)Translations Ignore |
For httpsOn all LB - with http connection to the outside
Firewall configuration httpsOn all LB - with https connection to the outsideTranslations Ignore |
Firewall Centos 6Translations Ignore |
Load Balancer Configurationhaproxy.cfg AdjustmentsFor httpThe following adjustments are made on the haproxy, in case of a http connection for the chat to the outside:
Reload HaproxyThen, reload the haproxy with the following command:
Reload HaproxyThen, reload the haproxy with the following command: Translations Ignore |
Chat ConfigurationParameters (as sysadmin)For https / wss | ||||||||||||||||||||||||||||||||||||||||||||||||||||||||||||||||||||||||||||||||||||||||||||||||||||||||||||||||||||||||||||||||||||||||||||||||||||||||||||||||||||||||||
ACD.Chat.Script.Library.URL | https://<load-balancer>:3003/gui/ | |||||||||||||||||||||||||||||||||||||||||||||||||||||||||||||||||||||||||||||||||||||||||||||||||||||||||||||||||||||||||||||||||||||||||||||||||||||||||||||||||||||||||||||||||
| ACD.Chat.Server.Base.URL | wss://<load-balancer>:3003 | |||||||||||||||||||||||||||||||||||||||||||||||||||||||||||||||||||||||||||||||||||||||||||||||||||||||||||||||||||||||||||||||||||||||||||||||||||||||||||||||||||||||||||||||||
ACD.Chat.Script.Library.URL | https://<load-balancer>:3000/gui/ | |||||||||||||||||||||||||||||||||||||||||||||||||||||||||||||||||||||||||||||||||||||||||||||||||||||||||||||||||||||||||||||||||||||||||||||||||||||||||||||||||||||||||||||||||
| ACD.Chat.Server.Base.URL | ws://<load-balancer>:3000 |
| Warning | ||
|---|---|---|
| ||
The load balancer must be operated with https and a valid certificate. |
Additional configuration in jtel-clientmessenger
The parameter DATADIR must be checked. This must point to either the /srv/jtel/shared/Data/Clients/ directory if it is hosted directly on the chat server, or /home/jtel/shared/Data/clients/ if the server has mooted the directory.
| Code Block |
|---|
DATADIR="/home/jtel/shared/Data/clients/" |
Additional configurations on the load balancer
Additional entries are required in the frontend area for the portal:
|
Chat Configuration
Parameters (as sysadmin)
For https / wss
ACD.Chat.Script.Library.URL | https://<load-balancer>:3003/gui/ |
| ACD.Chat.Server.Base.URL | wss://<load-balancer>:3003 |
For http / ws
ACD.Chat.Script.Library.URL | https://<load-balancer>:3000/gui/ |
| ACD.Chat.Server.Base.URL | ws://<load-balancer>:3000 |
Status
An appropriate agent status for "Chat" - or an existing status - must be configured so that chat is distributed to the agent:
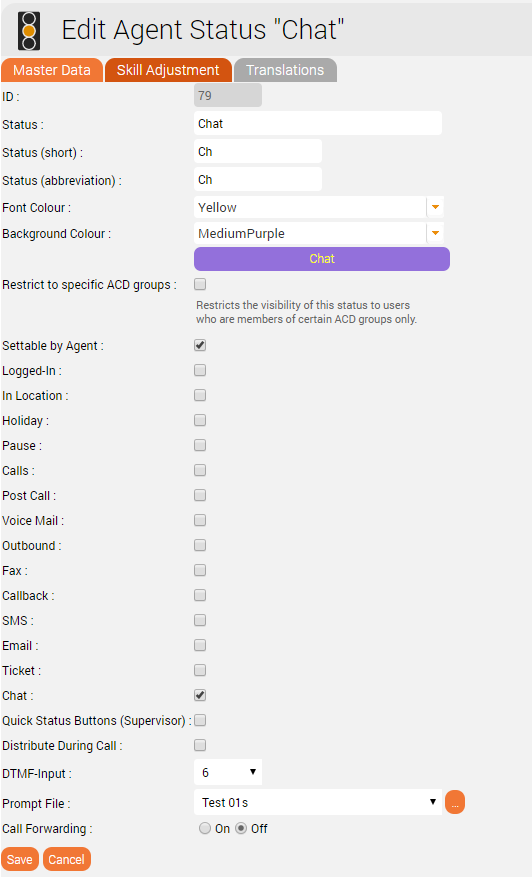
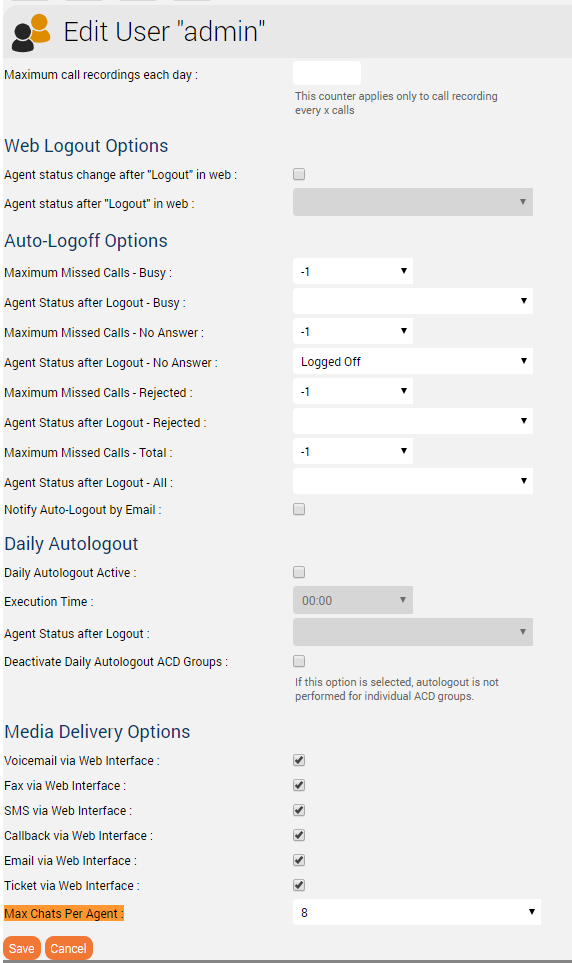
Max chats per agent
The maximum number of parallel chats per agent must be configured. This value is set to 0 by default for all agents.
Additional configurations for WhatsApp
In order for What's App to work, further configurations still need to be made.
Note: setting up the WhatsApp business account or connecting to the provider (currently TynTec) is done directly with the provider.
| Warning | ||
|---|---|---|
| ||
The load balancer must be operated with https and a valid certificate. |
Additional configuration in jtel-clientmessenger
The parameter DATADIR must be checked. This must point to either the /srv/jtel/shared/Data/Clients/ directory if it is hosted directly on the chat server, or /home/jtel/shared/Data/clients/ if the server has mouted the directory.
| Translations Ignore | ||
|---|---|---|
|
Additional configuration on the load balancer
Additional entries are required in the frontend area for the portal:
| Translations Ignore | ||
|---|---|---|
|
Additional parameters
The following system parameters must be checked in the portal:
| Parameter | Value | Comment |
|---|---|---|
| ACD.Whatsapp.Server.Base.URL | The URL used by the agent client to allow the agent to reply to messages. This must be resolved from all agent workstations to a valid URL via DNS, and is directed to the chat server via the haproxy. | |
| ACD.Whatsapp.Whatsapp.Url | https://jtel-portal:3003 | The URL used by the outside world (WhatsApp users) to download the attachments of the messages. This must be resolved from the Internet to a valid URL via DNS, and is directed to the chat server via the haproxy. |
| ACD.Whatsapp.Tyntec.Url | https://api.tyntec.com/chat-api/v2/messages | The URL of the TynTec API for WhatsApp. |
Customize TynTec API endpoints
It may be necessary to adjust the API endpoints to which the messages are sent. Currently TynTec does not offer the possibility to do this via a web configuration, this must be done via a REST call. The easiest way to do this is to use Postman.
The following parameters are required, both callback URLs are adjusted according to the end point of the system.
| Setting | Value | ||||
|---|---|---|---|---|---|
| URL | https://api.tyntec.com/chat-api/v2/applications/default | ||||
| Request Type | PATCH | ||||
| Authorization | apikey Value = the generated API Key from Tyntec | ||||
| Additional Headers | Accept application/problem+json | ||||
| Additional Headers | Content-Type application/json | ||||
| Body |
|
| Code Block |
|---|
frontend acdportal_https
...
        acl whatsapp_req    path /incoming
        acl whatsapp_req    path /delivery
...
use_backend backend_chat_ws if whatsapp_req |
Additional parameters
The following system parameters must be checked in the portal:
Customize TynTec API endpoints
It may be necessary to adjust the API endpoints to which the messages are sent. Currently TynTec does not offer the possibility to do this via a web configuration, this must be done via a REST call. The easiest way to do this is to use Postman.
The following parameters are required, both callback URLs are adjusted according to the end point of the system.
| Setting | Value | ||||||
|---|---|---|---|---|---|---|---|
| URL | https://api.tyntec.com/chat-api/v2/applications/default | ||||||
| Request Type | PATCH | ||||||
| Authorization | apikey Value = the generated API Key from Tyntec | ||||||
| Additional Headers | Accept application/problem+json | ||||||
| Additional Headers | Content-Type application/json | ||||||
| Body |
|
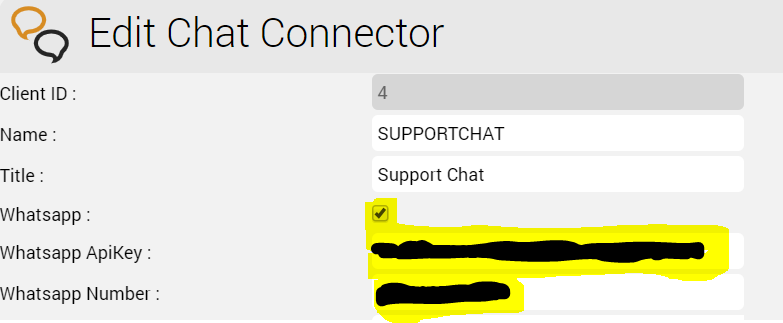
Chat Connector Configuration
The following additional parameters are configured in the Chat Connector:
- The check mark Whatsapp is set.
- The TynTec API Key is entered.
- The phone incoming service number for WhatsApp is entered configured and in E.164 format.and associated with the connector
| Sv translation | ||||||
|---|---|---|---|---|---|---|
| ||||||
|
| Sv translation | ||||||||||||||||||||||||||||||||||||||||||||||||||||||||||||||||||||||||||||||||||||||||||||||||||||||||||||||||||||||||||||||||||||||||||||||||||||||||||||||||||||||||||||||||||||||||||||||||||||||||||||||||||||||||||||||||||||||||||||||||||||||||||||||||||||||||||||||||||||||||||||||||||||||||||||||||||||||||||||||||||
|---|---|---|---|---|---|---|---|---|---|---|---|---|---|---|---|---|---|---|---|---|---|---|---|---|---|---|---|---|---|---|---|---|---|---|---|---|---|---|---|---|---|---|---|---|---|---|---|---|---|---|---|---|---|---|---|---|---|---|---|---|---|---|---|---|---|---|---|---|---|---|---|---|---|---|---|---|---|---|---|---|---|---|---|---|---|---|---|---|---|---|---|---|---|---|---|---|---|---|---|---|---|---|---|---|---|---|---|---|---|---|---|---|---|---|---|---|---|---|---|---|---|---|---|---|---|---|---|---|---|---|---|---|---|---|---|---|---|---|---|---|---|---|---|---|---|---|---|---|---|---|---|---|---|---|---|---|---|---|---|---|---|---|---|---|---|---|---|---|---|---|---|---|---|---|---|---|---|---|---|---|---|---|---|---|---|---|---|---|---|---|---|---|---|---|---|---|---|---|---|---|---|---|---|---|---|---|---|---|---|---|---|---|---|---|---|---|---|---|---|---|---|---|---|---|---|---|---|---|---|---|---|---|---|---|---|---|---|---|---|---|---|---|---|---|---|---|---|---|---|---|---|---|---|---|---|---|---|---|---|---|---|---|---|---|---|---|---|---|---|---|---|---|---|---|---|---|---|---|---|---|---|---|---|---|---|---|---|---|---|---|---|---|---|---|---|---|---|---|---|---|---|---|---|---|---|---|---|---|---|---|---|---|---|---|---|---|---|---|---|---|---|---|
| ||||||||||||||||||||||||||||||||||||||||||||||||||||||||||||||||||||||||||||||||||||||||||||||||||||||||||||||||||||||||||||||||||||||||||||||||||||||||||||||||||||||||||||||||||||||||||||||||||||||||||||||||||||||||||||||||||||||||||||||||||||||||||||||||||||||||||||||||||||||||||||||||||||||||||||||||||||||||||||||||||
Le rôle de CHAT est utilisé pour mener des sessions de chat avec des agents de sites web externes. Le rôle CHAT est également requis pour les intégrations WhatsApp. Le serveur de chat est une application Java, qui peut être installée en parallèle sur les serveurs web avec une mémoire vive supplémentaire correspondante d'environ 4 Go par serveur. Alternativement, le serveur de chat peut être installé sur un serveur séparé, ou sur l'équilibreur de charge. Les recommandations suivantes sont formulées :
InstallationInstallation de Java 8Tout d'abord, Java 8 est installé :
Installation et configuration de ClientMessengerInstallation ClientMessengerTout d'abord, le répertoire ClientMessenger est copié dans /home/jtel
Fichier de configuration du « Hazelcast Cluster »Le fichier hazelcast.xml est copié dans le répertoire de configuration du serveur de chat.
Configuration de la messagerie clientLa configuration ou le fichier de démarrage jtel-clientmessenger peut devoir être adapté afin que la connexion à la base de données puisse être établie. Ici <password> doit être remplacé par le mot de passe de l'utilisateur root de la base de données :
Installer ClientMessenger avec systemd
Créer le script de mise à jourUn script de mise à jour est créé pour mettre à jour le serveur de chat :
Configurer le pare-feuEnsuite, les Ouvrir ports du service de chat doivent être saisis dans le pare-feu et sauvegardés de façon permanente. Vous pouvez distinguer ici si http (speak unsecure websocket) ou https (secure websocket) est utilisé. Comme l'équilibreur de charge décrypte généralement le https, pour le https, seul le port 3003 doit être ouvert à l'équilibreur de charge. Configuration http du Pare-feuExécutez les commandes suivantes, sur les machines suivantes : Die Rolle CHAT wird für das Durchführen von Chat-Sessions, ausgehend von externe Webseiten, mit den Agenten verwendet. Der Chat-Server ist eine Java Anwendung, was parallel auf den Webservern - bei entsprechende RAM Erweiterung um ca. 4 GB pro Server - mit installiert werden kann, oder auf einem separaten Server installiert wird. Java 8 InstallationIn diesem Schritt wird Java 8 auf dem Server installiert. Translations Ignore |
ClientMessenger Installieren und KonfigurierenClientMessenger InstallationDas Verzeichnis ClientMessenger wird nach /home/jtel kopiert. Translations Ignore |
Hazelcast Cluster KonfigurationDie Konfiguration des Hazelcast-Clusters muss geprüft werden. Bei Neuinstallationen von Release 3.11 ab 01.04.2018 sind die Einträge in hazelcast.xml vorhanden, davor hingegen nicht.
Die notwendigen Konfigurationsabschnitte in hazelcast.xml sind hier aufgeführt: Translations Ignore |
Sämtliche Rechner im Hazelcast-Cluster betrachten:
ClientMessenger als Daemon Prozess installierenFalls die Repositories auf einer Windows Maschine liegen (dies kann nur alte Installationen betreffen), muss der Start-Skript /etc/init.d/jtel-clientmessenger vorher repariert werden, damit aus CR+LF nur LF wird. Translations Ignore |
Die Konfiguration, bzw. die Startdatei jtel-clientmessenger muss ggf. angepasst werden, damit die Datenbank-Verbindung aufgebaut werden kann. Hierbei muss <password> mit den Passwort für den root User der Datenbank ersetzt werden: Translations Ignore |
Anschließend, wird der Prozess als Linux Daemon installiert: Translations Ignore |
Update Skript anlegen Für das Updaten des Chat-Servers wird ein Update-Skript angelegt: Translations Ignore |
Firewall KonfigurationAls nächstes müssen in der Firewall die Port-Freigaben für den Chat Dienst eingetragen und persistent gespeichert werden. Hierbei kann unterschieden werden, ob http (sprich unsecure websocket) oder https (secure websocket) genutzt wird. Da der Load-Balancer den https üblicherweise entschlüsselt, muss bei https nur der Port 3003 auf den Load-Balancer geöffnet werden. Firewall Konfiguration httpFolgende Befehle, auf folgende Maschinen ausführen:
Translations Ignore |
Translations Ignore |
Firewall Konfiguration httpsAuf alle LB - bei https Verbindung nach AussenTranslations Ignore |
Firewall Centos 6Translations Ignore |
Load Balancer Konfigurationhaproxy.cfg AnpassungenFür httpFolgende Anpassungen werden am haproxy vorgenommen, bei einer http Verbindung für den Chat nach Aussen: Translations Ignore |
Configuration https du Pare-feu
Configuration de l'équilibreur de chargeréglages du haproxy.cfgFor httpLes ajustements suivants sont effectués sur l'haproxy, en cas de connexion http pour le chat vers l'extérieur :
For https
Haproxy neu ladenRecharger l'haproxieEnsuite, rechargez l'haproxy avec la commande suivante Anschließend, den haproxy neu laden mit folgenden Befehl :
Configuration ChatKonfigurationParameterParamètres (alsen tant que sysadmin)FürPour https / wss
For http / ws
StatusStatutUn statut d'agent approprié pour le Ein entsprechender Agentenstatus für "Chat" - oder einen vorhandenen Status - muss konfiguriert werden, sodass der Chat an den Agenten verteilt wird:
Max Chats pro AgentDie maximale Anzahl an parallele Chats pro Agent muss konfiguriert werden. Dieser Wert ist standardmäßig bei allen Agenten auf 0 eingestellt.
Zusätzliche Konfigurationen für WhatsAppDamt What's App funktioniert, müssen weitere Konfigurationen noch getätigt werden. ou un statut existant - doit être configuré de manière à ce que le chat soit distribué à l'agent :
Nombre maximum de chats par agentLe nombre maximum de chats parallèles par agent doit être configuré. Cette valeur est fixée à 0 par défaut pour tous les agents.
Configurations supplémentaires pour WhatsAppPour que What's App fonctionne, d'autres configurations doivent encore être effectuées. Remarque : la création du compte professionnel WhatsApp ou la connexion au fournisseur (actuellement TynTec) se fait directement avec le fournisseurHinweis: das Einrichten vom WhatsApp Business-Konto bzw. die Anbindung an den Provider (derzeit TynTec) erfolgt direkt mit dem Provider.
Configuration supplémentaire dans jtel-clientmessengerDer Parameter DATADIR muss geprüft werden. Dies muss entweder auf das Le paramètre DATADIR doit être vérifié. Il doit indiquer soit le/srv/jtel/shared/Data/Clients/ Verzeichnis zeigen, falls dieser am Chat-Server direkt gehostet ist, oder s'il est hébergé directement sur le serveur de chat, ou /home/jtel/shared/Data/clients/, falls der Server das Verzeichnis gemoutet hat si le serveur a mis en sourdine le répertoire.
Zusätzliche Konfigurationen am Load-BalancerConfigurations supplémentaires sur l'équilibreur de chargeDes entrées supplémentaires sont nécessaires dans la zone frontale du portail Im Bereich frontend für das Portal sind zusätzliche Einträge nötig :
Zusätzliche ParameterFolgende System-Parameter müssen im Portal geprüft werden: Paramètres supplémentairesLes paramètres suivants du système doivent être vérifiés dans le portail :
TynTec API Endpunkte anpassenEs kann notwendig sein, die API Endpunkte anzupassen, auf den die Nachrichten gesendet werden. Derzeit bietet TynTec keine Möglichkeit dies über eine Web-Konfiguration durchzuführen, dies muss über ein REST Aufruf geschehen. Dies kann am einfachsten mit Postman erfolgen. Folgende Parameter werden benötigt, hierbei werden beide Callback-URL entsprechend des Endpunktes des Systems angepasst. Personnaliser les points d'extrémité de l'API TynTecIl peut être nécessaire d'ajuster les points terminaux de l'API vers lesquels les messages sont envoyés. Actuellement, TynTec n'offre pas la possibilité de le faire via une configuration web, cela doit être fait via un appel REST. Le moyen le plus simple est de faire appel au facteur. Les paramètres suivants sont requis, les deux URL de rappel sont ajustés en fonction du point final du système.
Chat-Connector KonfigurationFolgende zusätzliche Parameter werden beim Chat-Connector konfiguriert: Configuration du connecteur de chatLes paramètres supplémentaires suivants sont configurés dans le Chat Connector :
|

