| Sv translation | ||||||||||||||||||||||||||||||||||||||||||||||||||||||||||||||||||
|---|---|---|---|---|---|---|---|---|---|---|---|---|---|---|---|---|---|---|---|---|---|---|---|---|---|---|---|---|---|---|---|---|---|---|---|---|---|---|---|---|---|---|---|---|---|---|---|---|---|---|---|---|---|---|---|---|---|---|---|---|---|---|---|---|---|---|
| ||||||||||||||||||||||||||||||||||||||||||||||||||||||||||||||||||
In some installations, where external sites are connected, the telephony can work remotely. This has the advantage that voice data is processed locally at the location, but requires - if the bandwidth is narrow - that the files for operating the telephony server are also partly located locally. The synchronization of the files is done by an rsync client, preferably the product "Acrosync". Furthermore, the usual alias acd-store is changed to point to the local machine. A new alias real-acd-store is set up, so that the access to the central, for rsync and also other reasons, can take place. The only thing to note is that call logs (8-server logs) are no longer stored at the central office. This is done for performance reasons. This means that if a .r5 call log analysis is to be performed, it must be retrieved by hand. File synchronizationFiles are synchronized as follows:
SetupSet up aliasesThe hosts file in c:\windows\system32\drivers\etc\hosts is edited. The following aliases are changed or adapted. This is done per remote Windows server, and must also be done per server individually.
Example entries:
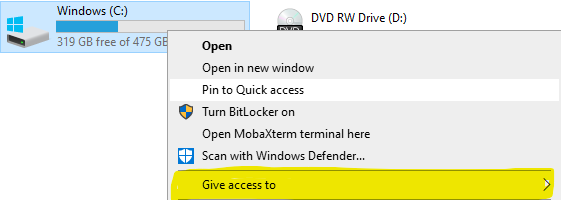
Set up ShareVia Windows Explorer, set up the share. Right click on the C: drive: , then click "Give access to", "Advanced Sharing", and then again "Advanced Sharing".
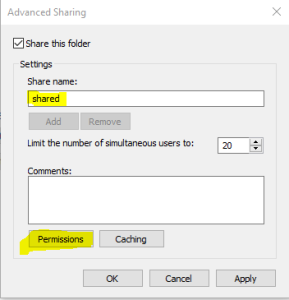
Enter "shared" as the share name:
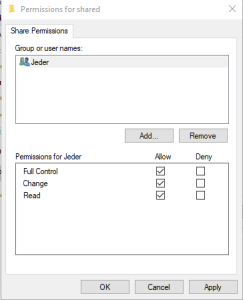
Then go to Permissions, and set "Full Control" for administrators. "Jeder" (everyone) can be removed. The final result will look like this. Attention: in this example the "administrator" was not available. Make sure to remove "jeder" and only have the administrators left with full control.
Click on Apply. Enable access to share via aliasThis is not enough to access the share with the aliases \\acd-store\shared. This requires an additional command to make the alias known to the computer. First determine the Windows computer name with ipconfig. Then, in a .CMD as administrator, type the following command:
Example:
Then, RESTART. It cannot continue without a restart. For example, with:
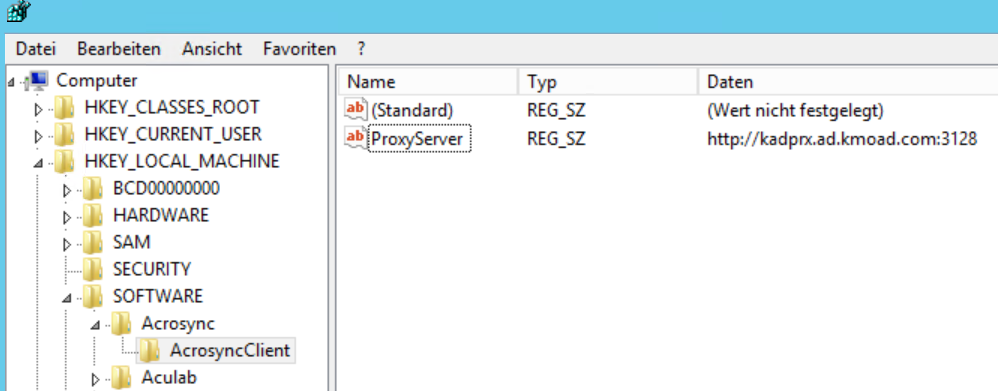
Note: after the restart, the server applications will certainly not work properly, as there is currently no access to the portal software. Installing AcrosyncUnfortunately, the service version of Acrosync cannot run a "permanent" job unless it is started as an application. For this reason Acrosync is not installed as a service. However, the application is installed for "All Users". Note: the option "Install as Service" appears late in the installation. Under no circumstances tick it off! Licensing AcrosyncThe license can be installed as a trial. Attention: if a proxy server is available, the following registry keys must be created first:
Key: ProxyServer Value: http://NameProxyServer:port Example: http://kadprx.ad.kmoad.com:3128
Note: this procedure is only verified with a proxy server without username / password. The application can be installed as a trial first, and the license can be installed later. Create profilesThe profiles that are created synchronize the data in both directions. To speed up this process, the following registry file can be used. ATTENTION: If profiles are exported from another computer, please DO NOT export the license, this will fail. It is best to use just the profiles and the corresponding entries from AcrosyncClient. Then, the Acrosync Client must be started and the password must be entered for each profile. Then press start on each job. It may be that people complain because certain directories do not exist. Then create them using Windows Explorer. First SyncClose the Acrosync client with Quit (via the context menu in the system tray). Initiate the first sync from the command line with the following commands :
Modify StartupWhen the first sync is over, modify the startup.cmd for the 8 server and enter the following command:
Final inspectionThen reboot system, and check if after a few seconds:
Cleaner Set upSet up the following batch file: Attention - /d -10 specifies the number of days before a file is deleted. It must be ensured that the number of days is adjusted according to the local disk, especially for c:\logfiles, since this can also grow accordingly depending on the call volume.
Then set up this file with the scheduler for 00:00 at night, run with elevated privileges (as administrator). OperationsIf files need to be fetched from the central server because, for example, a patch has been applied, then proceed as follows:
ATTENTION: if the client is not started with -a, the jobs are not started automatically, this must be done manually! |
| Sv translation | ||||||||||||||||||||||||||||||||||||||||||||||||||||||||||||||||||
|---|---|---|---|---|---|---|---|---|---|---|---|---|---|---|---|---|---|---|---|---|---|---|---|---|---|---|---|---|---|---|---|---|---|---|---|---|---|---|---|---|---|---|---|---|---|---|---|---|---|---|---|---|---|---|---|---|---|---|---|---|---|---|---|---|---|---|
| ||||||||||||||||||||||||||||||||||||||||||||||||||||||||||||||||||
In manchen Installationen, bei den Außenstandorte angebunden werden, kann die Telefonie abgesetzt arbeiten. Dies hat den Vorteil, dass Sprachdaten lokal am Standort abgearbeitet werden, bedingt jedoch - wenn die Bandbreite schmal ist - dass die Dateien für den Betrieb des Telefonieservers auch teils lokal liegen. Das Abgleichen der Dateien erfolgt durch ein rsync client, vorzugsweise das Produkt "Acrosync". Weiterhin, wird der übliche Alias acd-store so umgestellt, dass es auf den lokalen Rechner zeigt. Ein neuer Alias real-acd-store wird eingerichtet, sodass der Zugriff auf die Zentrale, für den rsync und auch sonstige Gründe, erfolgen kann. Einzig was zu beachten ist, ist dass Call-Logs (8-Server Logs) nicht mehr an der Zentrale gespeichert werden. Dies erfolgt aus Performance-Gründe. D.h. soll eine .r5 Call-Log Analyse erfolgen, muss dies händisch geholt werden. DateiabgleichDateien werden wie folgt abgeglichen:
EinrichtungAliase EinrichtenDie hosts Datei in c:\windows\system32\drivers\etc\hosts wird bearbeitet. Folgende Aliase werden geändert, bzw. angepasst. Dies geschieht pro abgesetzter Windows Server, und muss auch pro Server Individuell geschehen.
Beispieleinträge:
Share einrichtenÜber den Windows Explorer, den Share einrichten. Auf das Laufwerk C: rechts klicken, dann "Freigeben für" auswählen, "Erweiterte Freigabe", und dann nochmal "Erweiterte Freigabe".
Als Freigabenamen "shared" eingeben:
Dann auf Berechtigungen gehen, und für Administratoren "Vollzugriff" einstellen. Jeder kann weg. Das Endergebnis sieht dann so aus:
Auf Übernehmen klicken. Zugriff auf Share über Alias ermöglichenDies reicht nicht aus, damit man auf den Share mit den Alias \\acd-store\shared zugreifen kann. Hierfür ist ein zusätzlicher Befehl notwendig, um den Alias den Rechner bekannt zu machen. Zunächst mit ipconfig den Windows Rechnernamen ermitteln. Dann, in eine .CMD als Administrator, folgender Befehl eingeben:
Beispiel:
Anschließend, NEUSTART. Ohne Neustart geht's nicht weiter. Zum Beispiel, mit:
Beachte: nach dem Neustart, werden die Server-Anwendungen sicher nicht richtig funktionieren, da jetzt aktuell kein Zugriff auf die Portalsoftware gegenen ist. Acrosync InstallierenDie Diensteversion vom Acrosync kann leider nicht ein "Ständiger" Job ausführen, nur wenn es als Anwendung gestartet wird. Aus diesen Grund wird Acrosync nicht als Dienst installiert. Die Applikation wird jedoch für "Alle Benutzer" installiert. Achtung: die Option "Install as Service" taucht spät in der Installation auf. Auf keinen Fall anhaken! Acrosync LizenzierenDie Lizenz kann als Trial installiert werden. Achtung: falls ein Proxyserver vorhanden ist, müssen zuerst folgende Registry-Schlüssel angelegt werden:
Schlüssel: ProxyServer Wert: http://NameProxyServer:port Beispiel: http://kadprx.ad.kmoad.com:3128
Beachte: diese Prozedur ist nur verifiziert mit ein Proxy-Server ohne Benutzernamen / Passwort. Die Anwendung kann erst als Trial installiert werden, und die Lizenz nachträglich installiert werden. Profile AnlegenDie Profile die angelegt werden, synchronisieren die Daten in beide Richtungen. Damit dies schneller erfolgen kann, kann folgende Registry-Datei genutzt werden. ACHTUNG: Falls Profile von einen anderen Rechner exportiert werden, bitte NICHT die Lizenz mit exportieren, das geht schief. Am besten, nur die Profile und die dazugehörige Einträge aus AcrosyncClient. Anschließend, muss der Acrosync Client gestartet werden, und das Passwort muss für jeden Profil eingegeben werden. Dann auf Start drücken bei jeden Job. Es kann sein, dass gemeckert wird, weil gewisse Verzeichnisse nicht existieren. Diese dann über den Windows Explorer anlegen. Erster SyncDen Acrosync client mit Quit (über das Kontextmenü im System-Tray) beenden. Den ersten Sync über die Kommandozeile mit folgende Befehle anstoßen :
Startup modifizierenWenn der erste Sync vorbei ist, dann die startup.cmd für den 8-Server modifizieren, und folgender Befehl eintragen:
EndprüfungDann System neustarten, und prüfen ob nach ein paar Sekunden:
Cleaner EinrichtenFolgende Batchdatei einrichten: Achtung - /d -10 gibt die Anzahl an Tagen an, bevor eine Datei gelöscht wird. Es muss sichergestellt sein, dass die Anzahl an Tagen entsprechend der lokalen Platte angepasst wird, insbesondere bei c:\Logfiles, da dies je nach Call-Aufkommen auch entsprechend wachsen kann.
Diese Datei dann mit den Scheduler für Nachts 00:00 Uhr einrichten, mit erhöhte Privilegien (als Administrator) ausführen. OperationsWenn Dateien vom zentralen Server geholt werden müssen, weil etwa ein Patch eingespielt wurde, dann wie folgt vorgehen:
ACHTUNG: wenn der Client nicht mit -a gestartet wird, werden die Jobs nicht automatisch gestartet, das muss dann manuell erfolgen! |


| Sv translation | ||||||||||||||||||||||||||||||||||||||||||||||||||||||||||||||||||
|---|---|---|---|---|---|---|---|---|---|---|---|---|---|---|---|---|---|---|---|---|---|---|---|---|---|---|---|---|---|---|---|---|---|---|---|---|---|---|---|---|---|---|---|---|---|---|---|---|---|---|---|---|---|---|---|---|---|---|---|---|---|---|---|---|---|---|
| ||||||||||||||||||||||||||||||||||||||||||||||||||||||||||||||||||
Dans certaines installations, où des sites externes sont connectés, la téléphonie peut fonctionner à distance. Cela présente l'avantage que les données vocales sont traitées localement sur le site, mais nécessite - si la bande passante est étroite - que les fichiers nécessaires au fonctionnement du serveur de téléphonie soient également en partie localisés. La synchronisation des fichiers est effectuée par un client rsync, de préférence le produit "Acrosync". De plus, le pseudo habituel de l' acd-store est modifié pour pointer vers la machine locale. Un nouvel alias real-acd-store est mis en place, afin que l'accès à la centrale, pour rsync et d'autres raisons, puisse avoir lieu. La seule chose à noter est que les journaux d'appels (journaux de 8-server) ne sont plus stockés au bureau central. Ceci est fait pour des raisons de performance. Cela signifie que si une analyse de journal d'appel .r5 doit être effectuée, elle doit être récupérée à la main. Synchronisation des fichiersLes fichiers sont synchronisés comme suit:
ConfigurationCréer des aliasLe fichier hosts de c:\windows\system32\drivers\etc\hosts est édité. Les alias suivants sont modifiés ou adaptés. Ceci est fait par serveur Windows distant, et doit également être fait par serveur individuellement.
Exemples d'entrées:
Mettre en place un partageVia l'explorateur Windows, configurez le partage. Cliquez avec le bouton droit de la souris sur le lecteur C: : puis cliquez sur "Donner accès à", "Partage avancé", puis à nouveau sur "Partage avancé".
Entrez "shared" comme nom de l'action:
Allez ensuite dans Permissions, et réglez "Contrôle total" pour les administrateurs. Le "Jeder" (tout le monde) peut être retiré. Le résultat final ressemblera à ceci. Attention : dans cet exemple, l'"administrateur" n'était pas disponible. Veillez à supprimer "jeder" et à ne laisser aux administrateurs qu'un contrôle total.
Cliquez sur Appliquer. Permettre l'accès au partage via un aliasCe n'est pas suffisant pour accéder au partage avec les alias \\acd-store\shared. Cela nécessite une commande supplémentaire pour faire connaître l'alias à l'ordinateur. Déterminez d'abord le nom de l'ordinateur Windows avec ipconfig. Ensuite, dans un .CMD en tant qu'administrateur, tapez la commande suivante:
Exemple:
Alors, redémarrez. Il ne peut pas continuer sans un redémarrage. Par exemple, avec:
Remarque: après le redémarrage, les applications du serveur ne fonctionneront certainement pas correctement, car il n'y a actuellement aucun accès au logiciel du portail. Installation d'AcrosyncMalheureusement, la version de service d'Acrosync ne peut pas exécuter un travail "permanent" à moins qu'il ne soit démarré comme une application. Pour cette raison, Acrosync n'est pas installé en tant que service. Cependant, l'application est installée pour "Tous les utilisateurs". Remarque: l'option "Installer en tant que service" apparaît tard dans l'installation. Ne la cochez en aucun cas! Licence AcrosyncLa licence peut être installée à titre d'essai. Attention: si un serveur proxy est disponible, les clés de registre suivantes doivent d'abord être créées:
Clé: ProxyServer Valeur: http://NameProxyServer:port Exemple : http://kadprx.ad.kmoad.com:3128
Remarque: cette procédure est uniquement vérifiée avec un serveur proxy sans nom d'utilisateur / mot de passe. L'application peut d'abord être installée à titre d'essai, et la licence peut être installée ultérieurement. Créer des profilsLes profils qui sont créés synchronisent les données dans les deux sens. Pour accélérer ce processus, le fichier de registre suivant peut être utilisé. ATTENTION: Si les profils sont exportés à partir d'un autre ordinateur, veuillez NE PAS exporter la licence, cela échouerait. Il est préférable de n'utiliser que les profils et les entrées correspondantes d'AcrosyncClient. Ensuite, le client Acrosync doit être lancé et le mot de passe doit être saisi pour chaque profil. Ensuite, appuyez sur "Start" pour chaque travail. Il se peut que les gens se plaignent parce que certains annuaires n'existent pas. Créez-les ensuite à l'aide de l'explorateur Windows. Premier SyncFermez le client Acrosync avec Quitter (via le menu contextuel dans la barre d'état système). Lancez la première synchronisation à partir de la ligne de commande avec les commandes suivantes :
Modifier le démarrageLorsque la première synchronisation est terminée, modifiez le fichier startup.cmd pour le serveur 8 et entrez la commande suivante :
Inspection finalePuis redémarrez le système, et vérifiez si c'est le cas après quelques secondes :
Mise en place d'un nettoyeurCréez le fichier batch suivant : Attention - /d -10 précise le nombre de jours avant la suppression d'un dossier. Il faut veiller à ce que le nombre de jours soit ajusté en fonction du disque local, en particulier pour c:\logfiles, car il peut également augmenter en fonction du volume d'appels.
Puis configurez ce fichier avec le programmateur pour 00:00 du soir, exécutez avec des privilèges élevés (en tant qu'administrateur). OperationsSi des fichiers doivent être récupérés sur le serveur central parce que, par exemple, un correctif a été appliqué, il faut procéder comme suit :
ATTENTION : si le client n'est pas démarré avec -a, les travaux ne sont pas démarrés automatiquement, cela doit être fait manuellement ! |