| Sv translation | ||||||||||||||||||||||||||||||||||||||||||||||||||||||||||||||||||
|---|---|---|---|---|---|---|---|---|---|---|---|---|---|---|---|---|---|---|---|---|---|---|---|---|---|---|---|---|---|---|---|---|---|---|---|---|---|---|---|---|---|---|---|---|---|---|---|---|---|---|---|---|---|---|---|---|---|---|---|---|---|---|---|---|---|---|
| ||||||||||||||||||||||||||||||||||||||||||||||||||||||||||||||||||
In some installations, where external sites are connected, the telephony can work remotely. This has the advantage that voice data is processed locally at the location, but requires - if the bandwidth is narrow - that the files for operating the telephony server are also partly located locally. The synchronization of the files is done by an rsync client, preferably the product "Acrosync". Furthermore, the usual alias acd-store is changed to point to the local machine. A new alias real-acd-store is set up, so that the access to the central, for rsync and also other reasons, can take place. The only thing to note is that call logs (8-server logs) are no longer stored at the central office. This is done for performance reasons. This means that if a .r5 call log analysis is to be performed, it must be retrieved by hand. File synchronizationFiles are synchronized as follows:
SetupSet up aliasesThe hosts file in c:\windows\system32\drivers\etc\hosts is edited. The following aliases are changed or adapted. This is done per remote Windows server, and must also be done per server individually.
Example entries:
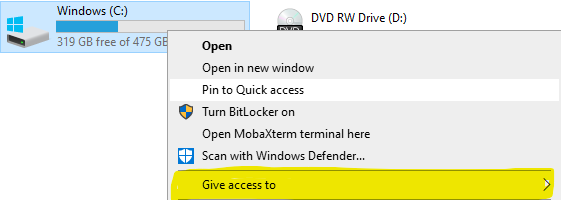
Set up ShareVia Windows Explorer, set up the share. Right click on the C: drive: , then click "Give access to", "Advanced Sharing", and then again "Advanced Sharing".
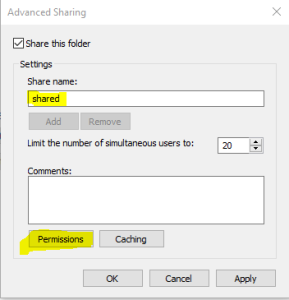
Enter "shared" as the share name:
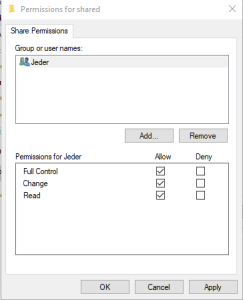
Then go to Permissions, and set "Full Control" for administrators. "Jeder" (everyone) can be removed. The final result will look like this. Attention: in this example the "administrator" was not available. Make sure to remove "jeder" and only have the administrators left with full control.
Click on Apply. Enable access to share via aliasThis is not enough to access the share with the aliases \\acd-store\shared. This requires an additional command to make the alias known to the computer. First determine the Windows computer name with ipconfig. Then, in a .CMD as administrator, type the following command:
Example:
Then, RESTART. It cannot continue without a restart. For example, with:
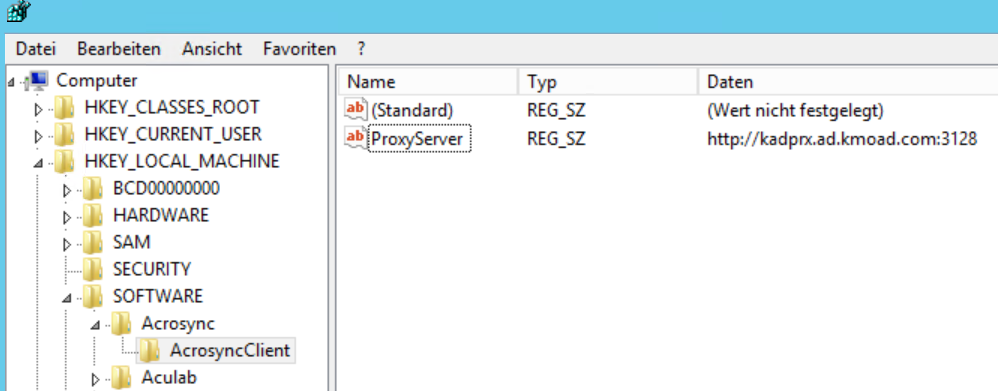
Note: after the restart, the server applications will certainly not work properly, as there is currently no access to the portal software. Installing AcrosyncUnfortunately, the service version of Acrosync cannot run a "permanent" job unless it is started as an application. For this reason Acrosync is not installed as a service. However, the application is installed for "All Users". Note: the option "Install as Service" appears late in the installation. Under no circumstances tick it off! Licensing AcrosyncThe license can be installed as a trial. Attention: if a proxy server is available, the following registry keys must be created first:
Key: ProxyServer Value: http://NameProxyServer:port Example: http://kadprx.ad.kmoad.com:3128
Note: this procedure is only verified with a proxy server without username / password. The application can be installed as a trial first, and the license can be installed later. Create profilesThe profiles that are created synchronize the data in both directions. To speed up this process, the following registry file can be used. ATTENTION: If profiles are exported from another computer, please DO NOT export the license, this will fail. It is best to use just the profiles and the corresponding entries from AcrosyncClient. Then, the Acrosync Client must be started and the password must be entered for each profile. Then press start on each job. It may be that people complain because certain directories do not exist. Then create them using Windows Explorer. First SyncClose the Acrosync client with Quit (via the context menu in the system tray). Initiate the first sync from the command line with the following commands :
Modify StartupWhen the first sync is over, modify the startup.cmd for the 8 server and enter the following command:
Final inspectionThen reboot system, and check if after a few seconds:
Cleaner Set upSet up the following batch file: Attention - /d -10 specifies the number of days before a file is deleted. It must be ensured that the number of days is adjusted according to the local disk, especially for c:\logfiles, since this can also grow accordingly depending on the call volume.
Then set up this file with the scheduler for 00:00 at night, run with elevated privileges (as administrator). OperationsIf files need to be fetched from the central server because, for example, a patch has been applied, then proceed as follows:
ATTENTION: if the client is not started with -a, the jobs are not started automatically, this must be done manually! |
...