| Sv translation | |||||||||||||||||||||||||||||||||||||||||||||||||||||||||||||||||||||||||||||||||||||||||||||||||||||||||||||||||||||||||||||||||||||||||||||||||||||||||||||||||||||||||||||||||||||||||||||||||||||||||||||||||||||||||||||||||||||||||||||||||||||||||||||||||||||||||||||||||
|---|---|---|---|---|---|---|---|---|---|---|---|---|---|---|---|---|---|---|---|---|---|---|---|---|---|---|---|---|---|---|---|---|---|---|---|---|---|---|---|---|---|---|---|---|---|---|---|---|---|---|---|---|---|---|---|---|---|---|---|---|---|---|---|---|---|---|---|---|---|---|---|---|---|---|---|---|---|---|---|---|---|---|---|---|---|---|---|---|---|---|---|---|---|---|---|---|---|---|---|---|---|---|---|---|---|---|---|---|---|---|---|---|---|---|---|---|---|---|---|---|---|---|---|---|---|---|---|---|---|---|---|---|---|---|---|---|---|---|---|---|---|---|---|---|---|---|---|---|---|---|---|---|---|---|---|---|---|---|---|---|---|---|---|---|---|---|---|---|---|---|---|---|---|---|---|---|---|---|---|---|---|---|---|---|---|---|---|---|---|---|---|---|---|---|---|---|---|---|---|---|---|---|---|---|---|---|---|---|---|---|---|---|---|---|---|---|---|---|---|---|---|---|---|---|---|---|---|---|---|---|---|---|---|---|---|---|---|---|---|---|---|---|---|---|---|---|---|---|---|---|---|---|---|---|---|---|---|---|---|---|---|---|---|---|---|---|---|---|---|---|---|---|---|
| |||||||||||||||||||||||||||||||||||||||||||||||||||||||||||||||||||||||||||||||||||||||||||||||||||||||||||||||||||||||||||||||||||||||||||||||||||||||||||||||||||||||||||||||||||||||||||||||||||||||||||||||||||||||||||||||||||||||||||||||||||||||||||||||||||||||||||||||||
Description of the roleThe role WEB is provided by a Java application under a modified Wildfly. The server has read and write access to both the STORE role and the DATA role. Access to the jtel portal and the jtel SOAP interfaces is provided via HTTP on port 8080 and 8081 (for HTTPS access provided by the proxy). User sessions on the portal are bound to the respective web server. This also applies to the SOAP v1 interface. The new SOAP v3 interface, which is available as of version 3.06, allows the execution of SOAP queries of a session on any web server. Linking the data areaLinking the Data area, as descripited on the site Linking STORE (All Linux except STORE). Installing the software - Wildfly installationsTo include the official MySQL software repositories and install the MySQL client, use the following commands:
Since all access to the shared file share is via a Windows-compatible CIFS-UNC, a symbolic link must be created so that such accesses can also be made under UNIX. This is done with the following command which has to be adapted in practice according to the name of the computer for the role STORE:
This allows access to the files in the share with the UNC specification:
Next, the required Java Runtime Environment is installed with the following command:
Next, the customized application server can now be downloaded and installed:
Next, the port shares for the jboss AS service must be entered in the firewall and stored permanently:
Necessary adjustments of the configurationThe configuration of the jboss AS server is done via one or in case of software version >= 3.06 two configuration files. If a version of the software >= 3.06 is used, a copy of the file
Furthermore, adjustments to the configuration file
If, on the other hand, the configuration of the first WEB server is adjusted, some values in the file must be adjusted according to the database server configuration. This can be done with the following commands - <password> replace with the appropriate password:
The values of the first 4 lines must be adjusted according to the database configuration:
After adapting the configuration file
Starting the WEB application serverAt this point the Web Server can be started. Entering the following command updates the to be executed web application and starts the web server:
A correct start can be checked in the log file of the web server. There you should be able to find the following messages after about 45 seconds from the start:
Furthermore, in case of software version >= 3.06 the status of the hazelcast-cluster can be recognized by messages like this
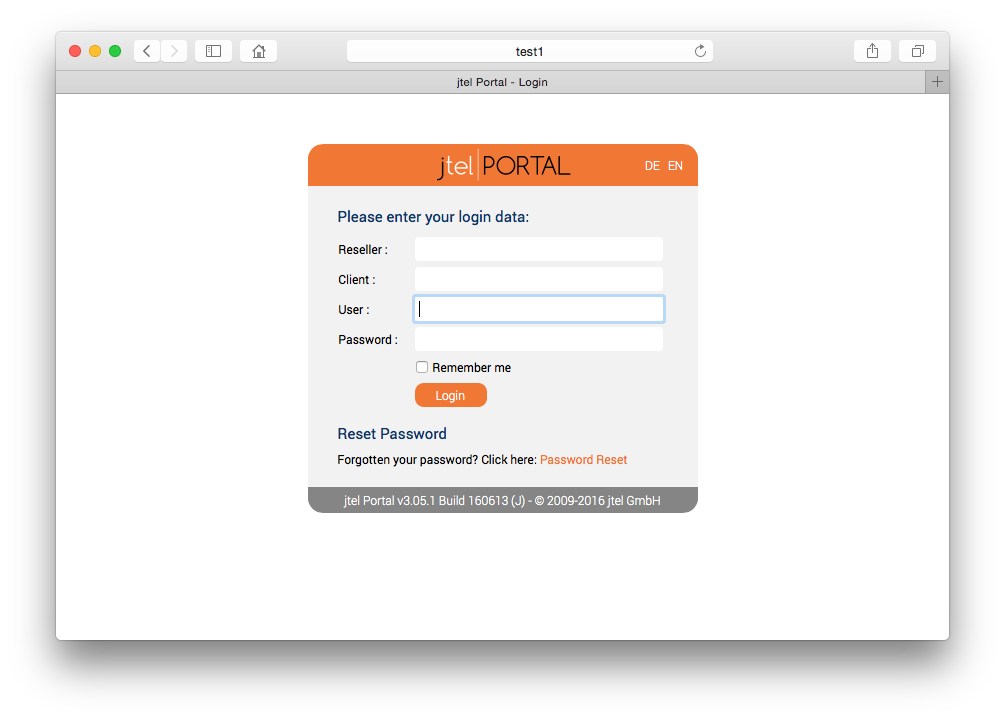
These messages appear every time a node of the cluster is added or removed. In the portal, the parameter "ACD.UDP.Webserver.Use.Hazelcast" must be activated, i.e. set to the value 1, so that the web servers use Hazelcast/UDPListener. The final test to show that the web server has started properly is of course the call directly from the browser. Assuming that the second WEB server has just been installed, the application can be reached in the browser by entering the following URL: http://acd-jb2.example.com:8080/CarrierPortal/sysadmin/login If everything works, you will be welcomed by the login mask:
Installing the software - JBOSS installationsTo include the official MySQL software repositories and install the MySQL client, use the following commands: MySQL 8.x
MySQL 5.6
Beide VariantenSince all access to the common file share takes place via a Windows-compatible CIFS-UNC, a symbolic link must be created so that such accesses can also take place under UNIX. This is done with the following command which has to be adapted in practice according to the name of the computer for the role STORE:
This allows access to the files in the share with the UNC specification:
Next, the required Java Runtime Environment is installed with the following command:
Next, the customized application server can now be downloaded and installed:
Next, the port shares for the jboss AS service must be entered in the firewall and stored permanently:
Next, the daily maintenance scripts are now registered in the cron service:
To simplify the update of the portal software in the jboss AS service, a corresponding script is now created:
Necessary adjustments of the configurationThe configuration of the jboss AS server is done via one or in case of software version >= 3.06 two configuration files. If a version of the software >= 3.06 is used, a copy of the file
Furthermore, adjustments to the configuration file standalone-full.xml are necessary. When installing several servers with the WEB role, it is a good idea to store this file in the file share after initial configuration to speed up the installation. If a customized version already exists there, it can be copied to the target location using the following command:
However, if you adjust the configuration of the first WEB server, some values in the file must be adjusted according to the database server configuration. This can be done with the following commands - <password> replace with the appropriate password:
The values of the first 4 lines must be adjusted according to the database configuration:
After adapting the configuration file
Starting the WEB application serverIf the Centos version is 7.7, you have to apply the following patch before you start jboss
At this point the Web Server can be started. Entering the following command updates the to be executed web application and starts the web server:
A correct start can be checked in the log file of the web server. There you should be able to find the following messages after about 45 seconds from the start:
Furthermore, in case of software version >= 3.06 the status of the hazelcast-cluster can be recognized by messages like this
These messages appear every time a node of the cluster is added or removed. In the portal, the parameter "ACD.UDP.Webserver.Use.Hazelcast" must be activated, i.e. set to the value 1, so that the web servers use Hazelcast/UDPListener. The final test to show that the web server has started properly is of course the call directly from the browser. Assuming that the second WEB server has just been installed, the application can be reached in the browser by entering the following URL: http://acd-jb2.example.com:8080/CarrierPortal/sysadmin/login If everything works, you will be welcomed by the login mask:
|
| Sv translation | |||||||||||||||||||||||||||||||||||||||||||||||||||||||||||||||||||||||||||||||||||||||||||||||||||||||||||||||||||||||||||||||||||||||||||||||||||||||||||||||||||||||||||||||||||||||||||||||||||||||||||||||||||||||||||||||||||||||||||||||||||||||||||||||||||||||||||||||||
|---|---|---|---|---|---|---|---|---|---|---|---|---|---|---|---|---|---|---|---|---|---|---|---|---|---|---|---|---|---|---|---|---|---|---|---|---|---|---|---|---|---|---|---|---|---|---|---|---|---|---|---|---|---|---|---|---|---|---|---|---|---|---|---|---|---|---|---|---|---|---|---|---|---|---|---|---|---|---|---|---|---|---|---|---|---|---|---|---|---|---|---|---|---|---|---|---|---|---|---|---|---|---|---|---|---|---|---|---|---|---|---|---|---|---|---|---|---|---|---|---|---|---|---|---|---|---|---|---|---|---|---|---|---|---|---|---|---|---|---|---|---|---|---|---|---|---|---|---|---|---|---|---|---|---|---|---|---|---|---|---|---|---|---|---|---|---|---|---|---|---|---|---|---|---|---|---|---|---|---|---|---|---|---|---|---|---|---|---|---|---|---|---|---|---|---|---|---|---|---|---|---|---|---|---|---|---|---|---|---|---|---|---|---|---|---|---|---|---|---|---|---|---|---|---|---|---|---|---|---|---|---|---|---|---|---|---|---|---|---|---|---|---|---|---|---|---|---|---|---|---|---|---|---|---|---|---|---|---|---|---|---|---|---|---|---|---|---|---|---|---|---|---|---|
| |||||||||||||||||||||||||||||||||||||||||||||||||||||||||||||||||||||||||||||||||||||||||||||||||||||||||||||||||||||||||||||||||||||||||||||||||||||||||||||||||||||||||||||||||||||||||||||||||||||||||||||||||||||||||||||||||||||||||||||||||||||||||||||||||||||||||||||||||
Beschreibung der RolleDie Rolle WEB wird durch eine Java-Applikation unter einen modifizierten Wildfly zur Verfügung gestellt. Der Server greift schreibend und lesend sowohl auf die Rolle STORE als auch auf die Rolle DATA zu. Der Zugriff auf das jtel Portal und die jtel SOAP Schnittstellen wird mittels HTTP auf Port 8080 und 8081 (für durch den Proxy bereitgestellte HTTPS Zugriffe) zur Verfügung gestellt. Benutzer-Sitzungen auf das Portal sind an dem jeweiligen Web-Server gebunden. Dies gilt auch für die SOAP v1 Schnittstelle. Die neue SOAP v3 Schnittstelle, die ab Version 3.06 zur Verfügung steht, erlaubt hingegen das Ausführen der SOAP-Abfragen einer Sitzung auf beliebige Web Server. Anbinden des DatenbereichesDatenbereich anbinden, wie auf der Seite Anbindung des Datenbereiches (Alle Linux ausser STORE) beschrieben. Installation der Software - Wildfly InstallationenDas Einbinden der offiziellen MySQL Software Repositores und die Installation des MySQL-Clients erfolgt mit folgenden Befehlen:
Da alle Zugriffe auf die gemeinsame Dateifreigabe über einen Windows-kompatiblen CIFS-UNC erfolgen, muss ein symbolischer Link erzeugt werden, so dass derartige Zugriffe auch unter UNIX erfolgen können. Dies erfolgt über folgenden Befehl der in der Praxis entsprechend des Namens des Rechners für die Rolle STORE anzupassen ist:
Dies ermöglicht den Zugriff auf die Dateien in der Freigabe mit der UNC Angabe:
Als nächstes wird die benötigte Java Laufzeitumgebung mit folgendem Befehl installiert:
Als nächstes kann nun der angepasste Application Server heruntergeladen und installiert werden:
Als nächstes müssen in der Firewall die Port-Freigaben für den jboss AS Dienst eingetragen und persistent gespeichert werden:
Erforderliche Anpassungen der KonfigurationDie Konfiguration des jboss AS Servers erfolgt über eine bzw. im Falle von Software Version >= 3.06 zwei Konfigurationsdateien. Wird eine Version der Software >= 3.06 verwendet, ist auch im Konfigurationsverzeichnis des jboss AS eine Kopie der Datei
Des weiteren sind Anpassungen an der Konfigurationsdatei
Passt man hingegen die Konfiguration des ersten WEB-Servers an, so müssen einige Werte in der Datei entsprechend der Datenbankserverkonfiguration angepasst werden. Dies kann mit folgenden Befehlen erfolgen - <password> mit den entsprechenden Passwort ersetzen:
Die Werte der ersten 4 Zeilen müssen entsprechend der Datenbankkonfiguration entsprechend angepasst werden:
Nach der Anpassung der Konfigurationsdatei
Starten des WEB Applikations-ServersAn diesem Punkt kann der Web Server gestartet werden. Die Eingabe des folgenden Befehls aktualisiert die auszuführende Web-Applikation und startet den Webserver:
Ein ordnungsgemäßer Start kann in der Protokolldatei des Web-Servers geprüft werden. Dort sollten sich nach ca 45 Sekunden ab dem Start folgende Meldungen finden lassen:
Der weiteren kann im Falle von Software-Version >= 3.06 der Status des hazelcast-Clusters an Meldungen wie dieser erkennt werden:
Diese Meldungen erscheinen jedes Mal, wenn ein Knoten des Clusters hinzugekommen, oder weggefallen ist. Im Portal muss der Parameter "ACD.UDP.Webserver.Use.Hazelcast" aktiviert werden, d.h. auf den Wert 1 gesetzt werden, damit die WebServer Hazelcast/UDPListener nutzen. Der endgültige Test um zu zeigen, dass der Webserver ordnungsgemäß gestartet ist, ist natürlich der Aufruf direkt aus dem Browser. Unter der Annahme, dass gerade der zweite WEB-Server installiert wurde, kann man im Browser die Applikation durch Aufruf der folgenden URL erreichen: http://acd-jb2.example.com:8080/CarrierPortal/sysadmin/login Wenn alles funktioniert, wird man von der Login-Maske begrüßt:
Installation der Software - JBOSS InstallationenDas Einbinden der offiziellen MySQL Software Repositores und die Installation des MySQL-Clients erfolgt mit folgenden Befehlen: MySQL 8.x
MySQL 5.6
Beide VariantenDa alle Zugriffe auf die gemeinsame Dateifreigabe über einen Windows-kompatiblen CIFS-UNC erfolgen, muss ein symbolischer Link erzeugt werden, so dass derartige Zugriffe auch unter UNIX erfolgen können. Dies erfolgt über folgenden Befehl der in der Praxis entsprechend des Namens des Rechners für die Rolle STORE anzupassen ist:
Dies ermöglicht den Zugriff auf die Dateien in der Freigabe mit der UNC Angabe:
Als nächstes wird die benötigte Java Laufzeitumgebung mit folgendem Befehl installiert:
Als nächstes kann nun der angepasste Application Server heruntergeladen und installiert werden:
Als nächstes müssen in der Firewall die Port-Freigaben für den jboss AS Dienst eingetragen und persistent gespeichert werden:
Als nächstes werden nun die täglichen Wartungs-Skripte im cron-Dienst angemeldet:
Um die Aktualisierung der Portal-Software im jboss AS Dienstes zu vereinfachen, wird nun noch ein entsprechendes Skript erstellt:
Erforderliche Anpassungen der KonfigurationDie Konfiguration des jboss AS Servers erfolgt über eine bzw. im Falle von Software Version >= 3.06 zwei Konfigurationsdateien. Wird eine Version der Software >= 3.06 verwendet, ist auch im Konfigurationsverzeichnis des jboss AS eine Kopie der Datei
Des weiteren sind Anpassungen an der Konfigurationsdatei
Passt man hingegen die Konfiguration des ersten WEB-Servers an, so müssen einige Werte in der Datei entsprechend der Datenbankserverkonfiguration angepasst werden. Dies kann mit folgenden Befehlen erfolgen - <password> mit den entsprechenden Passwort ersetzen:
Die Werte der ersten 4 Zeilen müssen entsprechend der Datenbankkonfiguration entsprechend angepasst werden:
Nach der Anpassung der Konfigurationsdatei
Starten des WEB Applikations-ServersWenn die Centos-Version 7.7 ist, müssen Sie den folgenden Patch ausführen, bevor Sie jboss starten
An diesem Punkt kann der Web Server gestartet werden. Die Eingabe des folgenden Befehls aktualisiert die auszuführende Web-Applikation und startet den Webserver:
Ein ordnungsgemäßer Start kann in der Protokolldatei des Web-Servers geprüft werden. Dort sollten sich nach ca 45 Sekunden ab dem Start folgende Meldungen finden lassen:
Der weiteren kann im Falle von Software-Version >= 3.06 der Status des hazelcast-Clusters an Meldungen wie dieser erkennt werden:
Diese Meldungen erscheinen jedes Mal, wenn ein Knoten des Clusters hinzugekommen, oder weggefallen ist. Im Portal muss der Parameter "ACD.UDP.Webserver.Use.Hazelcast" aktiviert werden, d.h. auf den Wert 1 gesetzt werden, damit die WebServer Hazelcast/UDPListener nutzen. Der endgültige Test um zu zeigen, dass der Webserver ordnungsgemäß gestartet ist, ist natürlich der Aufruf direkt aus dem Browser. Unter der Annahme, dass gerade der zweite WEB-Server installiert wurde, kann man im Browser die Applikation durch Aufruf der folgenden URL erreichen: http://acd-jb2.example.com:8080/CarrierPortal/sysadmin/login Wenn alles funktioniert, wird man von der Login-Maske begrüßt:
|
| Sv translation | |||||||||||||||||||||||||||||||||||||||||||||||||||||||||||||||||||||||||||||||||||||||||||||||||||||||||||||||||||||||||||||||||||||||||||||||||||||||||||||||||||||||||||||||||||||||||||||||||||||||||||||||||||||||||||||||||||||||||||||||||||||||||||||||||||||||||||||||||
|---|---|---|---|---|---|---|---|---|---|---|---|---|---|---|---|---|---|---|---|---|---|---|---|---|---|---|---|---|---|---|---|---|---|---|---|---|---|---|---|---|---|---|---|---|---|---|---|---|---|---|---|---|---|---|---|---|---|---|---|---|---|---|---|---|---|---|---|---|---|---|---|---|---|---|---|---|---|---|---|---|---|---|---|---|---|---|---|---|---|---|---|---|---|---|---|---|---|---|---|---|---|---|---|---|---|---|---|---|---|---|---|---|---|---|---|---|---|---|---|---|---|---|---|---|---|---|---|---|---|---|---|---|---|---|---|---|---|---|---|---|---|---|---|---|---|---|---|---|---|---|---|---|---|---|---|---|---|---|---|---|---|---|---|---|---|---|---|---|---|---|---|---|---|---|---|---|---|---|---|---|---|---|---|---|---|---|---|---|---|---|---|---|---|---|---|---|---|---|---|---|---|---|---|---|---|---|---|---|---|---|---|---|---|---|---|---|---|---|---|---|---|---|---|---|---|---|---|---|---|---|---|---|---|---|---|---|---|---|---|---|---|---|---|---|---|---|---|---|---|---|---|---|---|---|---|---|---|---|---|---|---|---|---|---|---|---|---|---|---|---|---|---|---|
| |||||||||||||||||||||||||||||||||||||||||||||||||||||||||||||||||||||||||||||||||||||||||||||||||||||||||||||||||||||||||||||||||||||||||||||||||||||||||||||||||||||||||||||||||||||||||||||||||||||||||||||||||||||||||||||||||||||||||||||||||||||||||||||||||||||||||||||||||
Description du rôleLe rôle WEB est fourni par une application Java sous un Wildfly modifié. Le serveur dispose d'un accès en lecture et en écriture aux deux rôles MAGASIN et DONNÉES. L'accès au portail jtel et aux interfaces SOAP de jtel est fourni via HTTP sur les ports 8080 et 8081 (pour l'accès HTTPS fourni par le proxy). Les sessions d'utilisateurs sur le portail sont liées au serveur web respectif. Cela s'applique également à l'interface SOAP v1. La nouvelle interface SOAP v3, qui est disponible à partir de la version 3,06, permet l'exécution de requêtes SOAP d'une session sur n'importe quel serveur web. Relier le zones de donnéesRelier la zone de données, telle que décrite sur le site Linking STORE (All Linux except STORE). Installation du logiciel - Installations de WildflyPour inclure les dépôts officiels de logiciels MySQL et installer le client MySQL, utilisez les commandes suivantes:
Comme tous les accès au partage de fichiers se font par l'intermédiaire d'un CIFS-UNC compatible avec Windows, un lien symbolique doit être créé afin que ces accès puissent également se faire sous UNIX. Cela se fait avec la commande suivante qui doit être adaptée en pratique en fonction du nom de l'ordinateur pour le rôle STORE:
Cela permet d'accéder aux fichiers dans le partage avec la spécification UNC:
Ensuite, l'environnement d'exécution Java requis est installé avec la commande suivante:
Ensuite, le serveur d'applications personnalisées peut maintenant être téléchargé et installé:
Ensuite, les parts de port pour le service jboss AS doivent être saisies dans le pare-feu et stockées de manière permanente :
Les ajustements nécessaires de la configurationLa configuration du serveur jboss AS se fait via un ou, dans le cas de la version du logiciel >= 3,06, deux fichiers de configuration. Si une version du logiciel >= 3,06 est utilisée, une copie du fichier
En outre, les ajustements du fichier de configuration
Si, en revanche, la configuration du premier serveur WEB est ajustée, certaines valeurs du fichier doivent être ajustées en fonction de la configuration du serveur de base de données. Cela peut être fait avec les commandes suivantes - <mot de passe> remplacer par le mot de passe approprié:
Les valeurs des 4 premières lignes doivent être ajustées en fonction de la configuration de la base de données:
Après avoir adapté le fichier de configuration
Démarrer le serveur d'application WEBÀ ce stade, le serveur Web peut être lancé. La saisie de la commande suivante met à jour l'application web à exécuter et démarre le serveur web:
Un démarrage correct peut être vérifié dans le fichier journal du serveur web. Vous devriez pouvoir y trouver les messages suivants après environ 45 secondes de démarrage:
En outre, dans le cas de la version du logiciel >= 3,06, le statut de la hazelcast-cluster peut être reconnu par des messages comme celui-ci
Ces messages apparaissent chaque fois qu'un nœud de la grappe est ajouté ou retiré. Dans le portail, le paramètre "ACD.UDP.Webserver.Use.Hazelcast" doit être activé, c'est-à-dire mis à la valeur 1, pour que les serveurs web utilisent Hazelcast/UDPListener. Le dernier test pour montrer que le serveur web a bien démarré est bien sûr l'appel directement depuis le navigateur. En supposant que le deuxième serveur WEB vient d'être installé, l'application peut être atteinte dans le navigateur en entrant l'URL suivante: http://acd-jb2.example.com:8080/CarrierPortal/sysadmin/login Si tout fonctionne, vous serez accueilli par le masque de connexion:
Installation du logiciel - Installations JBOSSPour inclure les dépôts officiels de logiciels MySQL et installer le client MySQL, utilisez les commandes suivantes: MySQL 8.x
MySQL 5,6
Les deux variantesÉtant donné que tous les accès au partage de fichiers commun se font par l'intermédiaire d'un CIFS-UNC compatible avec Windows, un lien symbolique doit être créé afin que ces accès puissent également se faire sous UNIX. Cela se fait avec la commande suivante qui doit être adaptée en pratique en fonction du nom de l'ordinateur pour le rôle STORE :
Cela permet d'accéder aux fichiers dans le partage avec la spécification UNC:
Ensuite, l'environnement d'exécution Java requis est installé avec la commande suivante:
Ensuite, le serveur d'applications personnalisées peut maintenant être téléchargé et installé:
Ensuite, les parts de port pour le service jboss AS doivent être saisies dans le pare-feu et stockées de manière permanente :
Ensuite, les scripts de maintenance quotidienne sont maintenant enregistrés dans le service cron:
Pour simplifier la mise à jour du logiciel du portail dans le service jboss AS, un script correspondant est maintenant créé:
Les ajustements nécessaires de la configurationLa configuration du serveur jboss AS se fait via un ou, dans le cas de la version du logiciel >= 3,06, deux fichiers de configuration. Si une version du logiciel >= 3,06 est utilisée, une copie du fichier
En outre, des ajustements au fichier de configuration standalone-full.xml sont nécessaires. Lors de l'installation de plusieurs serveurs avec le rôle WEB, il est conseillé de stocker ce fichier dans le partage de fichiers après la configuration initiale pour accélérer l'installation. Si une version personnalisée y existe déjà, elle peut être copiée à l'emplacement cible à l'aide de la commande suivante :
Cependant, si vous ajustez la configuration du premier serveur WEB, certaines valeurs du fichier doivent être ajustées en fonction de la configuration du serveur de base de données. Cela peut être fait avec les commandes suivantes - <mot de passe>. Remplacez par le mot de passe approprié:
Les valeurs des 4 premières lignes doivent être ajustées en fonction de la configuration de la base de données:
Après avoir adapté le fichier de configuration
Démarrer le serveur d'application WEBSi la version Centos est 7,7, vous devez appliquer le patch suivant avant de commencer jboss
À ce stade, le serveur Web peut être lancé. La saisie de la commande suivante met à jour l'application web à exécuter et démarre le serveur web:
Un démarrage correct peut être vérifié dans le fichier journal du serveur web. Vous devriez pouvoir y trouver les messages suivants après environ 45 secondes de démarrage:
En outre, dans le cas de la version du logiciel >= 3,06, le statut de la hazelcast-cluster peut être reconnu par des messages comme celui-ci
Ces messages apparaissent chaque fois qu'un nœud de la grappe est ajouté ou retiré. Dans le portail, le paramètre "ACD.UDP.Webserver.Use.Hazelcast" doit être activé, c'est-à-dire mis à la valeur 1, pour que les serveurs web utilisent Hazelcast/UDPListener. Le dernier test pour montrer que le serveur web a bien démarré est bien sûr l'appel directement depuis le navigateur. En supposant que le deuxième serveur WEB vient d'être installé, l'application peut être atteinte dans le navigateur en entrant l'URL suivante: http://acd-jb2.example.com:8080/CarrierPortal/sysadmin/login Si tout fonctionne, vous serez accueilli par le masque de connexion:
|