...
| Sv translation |
|---|
|
| Note |
|---|
| title | | Translations Ignore |
|---|
| Code Block |
|---|
title |
|---|
c:\8Server\deploy\OEM\JTEL\first_install.cmd c:\8Server\deploy\OEM\JTEL\copy_keyfile_en_mcp_v67.cmd |
| Translations Ignore |
|---|
| Code Block |
|---|
title | c:\8Server\deploy\OEM\JTEL\first_install.cmd c:\8Server\deploy\OEM\JTEL\copy_keyfile_en_daemon.cmd |
| Translations Ignore |
|---|
| Code Block |
|---|
title | C:\8Server\deploy\OEM\JTEL\Required\vcredist_2012_x64_11.0.61030.exe /passive /norestart C:\8Server\deploy\OEM\JTEL\Required\vcredist_2012_x86_11.0.61030.exe /passive /norestart C:\8Server\deploy\OEM\JTEL\Required\vcredist_2015_x64_14.0.24123.exe /install /passive /norestart C:\8Server\deploy\OEM\JTEL\Required\vcredist_2015_x86_14.0.24123.exe /install /passive /norestart C:\8Server\deploy\OEM\JTEL\Required\ww_icl_redist_ia32_2017.1.143.msi /quiet /passive CDescription du rôle
Les serveurs TEL sont chargés d'exécuter les applications de flux d'appels et les fonctions d'administration et de contrôle central sous la forme de scripts R5. En outre, les connecteurs pour la synchronisation des différents bentzers et des états de téléphonie des systèmes téléphoniques sont généralement installés sur ces serveurs.
Mise en place de la synchronisation du temps (service de temps alternatif)
portal.Daemon.TimeServiceMonitor.r5 s'arrêter en 8-serveurs s'ils sont installés.
Télécharger et installer Time Service :
http://cdn.jtel.de/downloads/NTP/ntp-4.2.8p10-win32-setup.exe
Toujours sur le prochain, jusqu'à la sélection des serveurs de temps. Indiquez d'abord le serveur client (si disponible), puis les serveurs de temps ptb : ptbtime1.ptb.de,ptbtime2.ptb.de,ptbtime3.ptb.de
Ensuite, terminez l'installation.
Installer un moniteur :
http://cdn.jtel.de/downloads/NTP/ntp-time-server-monitor-104.exe
Assurez-vous que le service fonctionne. Vérifiez sur le moniteur qu'au moins un des serveurs de temps est "vert".
Attention :
- S'assurer que le paramètre dans le portail Portal.Alarming.Time.WindowsTimeService est fixé à 0.
Configuration des sources de données
Ensuite, les sources de données doivent être configurées dans l'administrateur ODBC.
Téléchargez et importez le fichier de registre suivant :
https://cdn.jtel.de/downloads/configs/odbc_ini_v52.reg
Note : Les fichiers de configuration pour les nouveaux pilotes ODBC sont également disponibles. Cependant, il est recommandé de travailler avec cette version en raison de problèmes de mémoire dans le pilote ODBC de MySQL. Même avec les derniers pilotes 8.x, des problèmes de mémoire surviennent lorsque les connexions aux bases de données sont interrompues.
Installation du 8Server
Clonage de Dépôt
- https://bitbucket.org/jtelgmbh/8-server-deploy.git dans le répertoire à créer c:\8Server\deploy
- Passez à la libération souhaitée, beispielsweise release/rc-5.23.9 (actuellement recommandé)
| Note |
|---|
|
Ces deux actions requièrent la connaissance des droits d'accès valables au serveur logiciel central de jtel. |
Installer un logiciel
Téléphonie et démons :
| Translations Ignore |
|---|
| Code Block |
|---|
| title | Installation d'un 8-server pour la téléphonie et les démons |
|---|
| c:\8Server\deploy\OEM\JTEL\first_install.cmd c:\8Server\deploy\OEM\JTEL\ |
|
Required\wwiclredistintel64
Seulement les démons :2017.1.143.msi /quiet /passive
| Translations Ignore |
|---|
| Code Block |
|---|
| title | Installation d'un 8-server pour les fonctions d'administration et de contrôle |
|---|
| c:\8Server\deploy\OEM\JTEL\first_install.cmd c:\8Server\deploy\OEM\JTEL\copy_keyfile_en_daemon.cmd |
|
Installer les Runtimes C++
Installez les Runtimes suivants :gihal # If it starts, press CTRL+C then cancel
[SIP] { netport = 0 channel_count = 30 default_vmp_set = "VMP_SET1" default_rtp_ip = "0.0.0.0" default_rtp_dscp = 46 defaultSignallingGateway = "" numberOnly = FALSE rfc2833RxToneEvent = TRUE rfc2833RxInbandToneRegeneration = TRUE rfc2833TxToneConversion = TRUE } |
| Translations Ignore |
|---|
| Code Block |
|---|
title | DISABLE_ERROR_DIALOG = 2 |
| Translations Ignore |
|---|
| Code Block |
|---|
title | CONFIG_DIR = ../gi2/config LOG_DIR = ../log |
| Translations Ignore |
|---|
| Code Block |
|---|
title | ROOT { StdCall_MCP { bool Use_RemoteHAL = TRUE; integer LocalStream_RX_Port = 0; integer Dispatcher_ThreadCount = 4; bool Auto_SETUP_ACK = FALSE; string Alert_DefaultFile = "c:\8Server\Voice\System\070.wav"; integer Stream_Receiver_MaxUnconfirmedPackets = 8; integer Stream_Receiver_MaxBufferSize = 16384; integer Stream_Sender_Timeout = 2000; integer Stream_Sender_MaxBufferSize = 16384; integer SIP_Interceptor_Port = 5060; bool Enable_SIP_Interceptor = TRUE; integer Start_SIP_Interceptor_After_Command = 1; bool Enable_SIP_Registrar = FALSE; bool Enable_L3_Monitor = FALSE; string Default_SIP_Contact = "<sip:10.4.11.81>"; string Startup | C:\8Server\deploy\OEM\JTEL\Required\vcredist_2012_x64_11.0.61030.exe /passive /norestart C:\8Server\deploy\OEM\JTEL\Required\vcredist_2012_x86_11.0.61030.exe /passive /norestart C:\8Server\deploy\OEM\JTEL\Required\vcredist_2015_x64_14.0.24123.exe /install /passive /norestart C:\8Server\deploy\OEM\JTEL\Required\vcredist_2015_x86_14.0.24123.exe /install /passive /norestart C:\8Server\deploy\OEM\JTEL\Required\ww_icl_redist_ia32_2017.1.143.msi /quiet /passive C:\8Server\deploy\OEM\JTEL\Required\ww_icl_redist_intel64_2017.1.143.msi /quiet /passive |
|
Installation du serveur média Aculab
Installation AIT
Installer le paquet v67
- Début AIT
- "Connexion" -> "Travailler hors-ligne".
- "Fichier" -> " »Importer" -> Charger le fichier du paquet Aculab...".
c:\8Server\deploy\oem\jtel\aculab\v67.apf
Zielpfad:« Installer"- Confirmer l'installation de tous les pilotes (requêtes Windows)
Configuration d'Aculab
- Début ACT
- "Prosody S" ... « Ajouter...":
Le numéro de série peut être choisi librement. Choisissez jtel comme clé de sécurité.
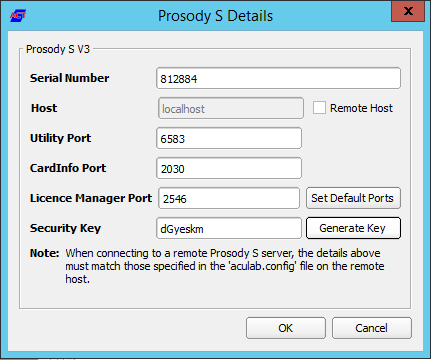 Image Added
- "Paramètres IP", "Activer SIP sur l'hôte" activer:
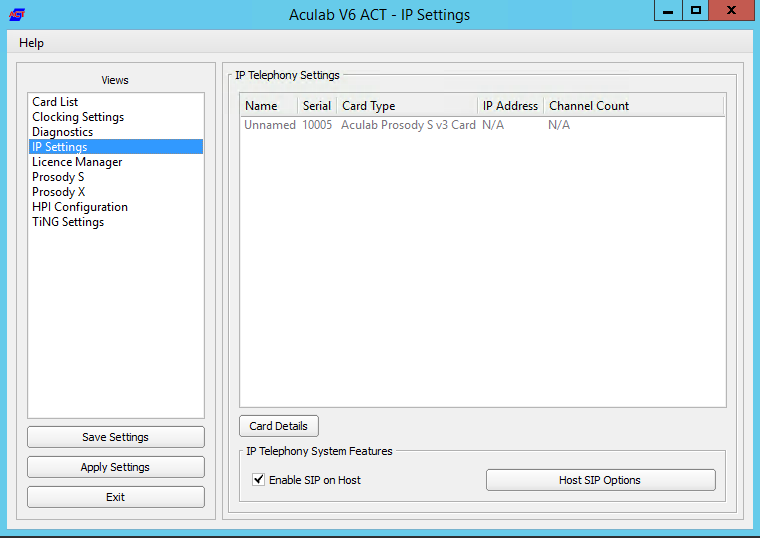 Image Added
- "Gestionnaire de licences", Licence d'importation (Installer les clés de licence...)
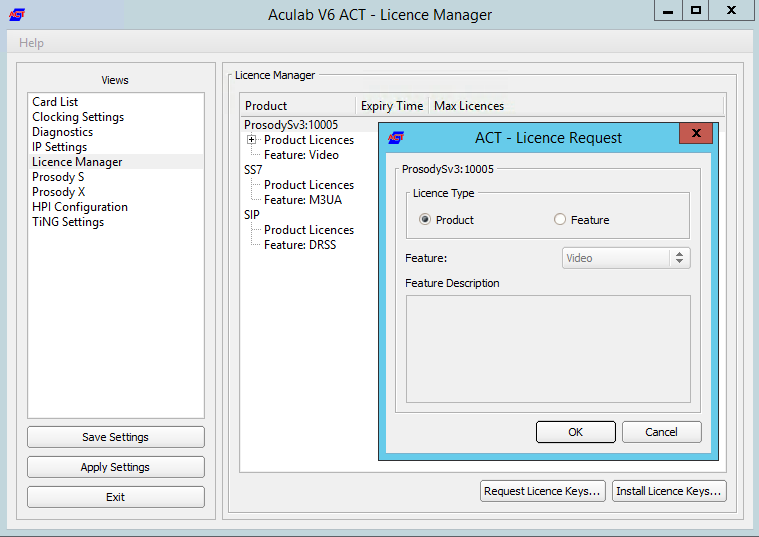 Image Added
- "Sauvegarder les paramètres" ensuite "Appliquer les paramètres".
Scripts de démarrage
Le cas échéant, dans c:\8Server\bin\startup.cmd ajuster "utilisation nette".
Liens
lien de
c:\8Server\bin\startup_launcher.cmd
Mettez-le sur le bureau et après shell:startup.
Configuration Aculab pour 8-server
Créer la configuration de giAculab (cmd als ADMIN):
Attention : parfois, Windows n'avale pas le changement de chemin à 100% immédiatement. Sinon (si gihal.exe n'est pas trouvé), redémarrez.
| Translations Ignore |
|---|
| Code Block |
|---|
| gihal # If it starts, press CTRL+C then cancel |
|
giAculab.cfg doit maintenant être adapté.
Copiez la zone de réglages ci-dessous et remplacez-la dans le fichier cible.
- channel_count à la Fixer le nombre de canaux SIP
- default_rtp_ip doit, pour les machines Multi-Homed, être réglé sur l'adresse IP de la carte réseau pour la téléphonie
| Translations Ignore |
|---|
| Code Block |
|---|
| title | Changes to C: \\ 8Server \\ gi2 \\ config \\ giAculab.cfg |
|---|
| [SIP] { netport = 0 channel_count = 30 default_vmp_set = "VMP_SET1" default_rtp_ip = "0.0.0.0" default_rtp_dscp = 46 defaultSignallingGateway = "" numberOnly = FALSE rfc2833RxToneEvent = TRUE rfc2833RxInbandToneRegeneration = TRUE rfc2833TxToneConversion = TRUE } |
|
Un autre changement concerne le dossier C:\8Server\gi2\bin\gi2.ini: ici, la valeur devrait être DISABLE_ERROR_DIALOG soit adapté comme suit :
| Translations Ignore |
|---|
| Code Block |
|---|
| title | Changes to C: \\ 8Server \\ gi2 \\ bin \\ gi2.ini |
|---|
| DISABLE_ERROR_DIALOG = 2 |
|
En outre, un dossier C:\8Server\bin\gi2.ini avec le contenu suivant :
| Translations Ignore |
|---|
| Code Block |
|---|
| title | Changes to C: \\ 8Server \\ bin \\ gi2.ini |
|---|
| CONFIG_DIR = ../gi2/config LOG_DIR = ../log |
|
Le dernier dossier auquel des ajustements manuels doivent être apportés est C:\8Server\config\StdCall_MCP.cfg
Mettez notamment en évidence les paramètres suivants :
- Enable_SIP_Registrar - pour les installations avec des enregistrements entrants (en particulier Panasonic)
- Default_SIP_Contact - entrez ici l'adresse IP de l'interface SIP
- Startup_Command4 etStartup_Sleep4 - supprimersi la machine n'a pas besoin de s'enregistrer auprès du monde extérieur (actuellement toutes les installations sauf NFON)
- Total_Channel_Count - Correspond au nombre total de chaînes SIP
- Inbound_Use_Channels - Correspond à nAgents + nSupervisor + nQueueChannels
- Outbound_Use_Channels - Correspond à nAgents + nSupervisor + nCallTransferChannels
- Note: Total_Channel_Count = Inbound_Use_Channels + Outbound_Use_Channels
| Translations Ignore |
|---|
| Code Block |
|---|
| title | Changes to C: \\ 8Server \\ config \\ StdCall_MCP.cfg |
|---|
| ROOT { StdCall_MCP { bool Use_RemoteHAL = TRUE; integer LocalStream_RX_Port = 0; integer Dispatcher_ThreadCount = 4; bool Auto_SETUP_ACK = FALSE; string Alert_DefaultFile = "c:\8Server\Voice\System\070.wav"; integer Stream_Receiver_MaxUnconfirmedPackets = 8; integer Stream_Receiver_MaxBufferSize = 16384; integer Stream_Sender_Timeout = 2000; integer Stream_Sender_MaxBufferSize = 16384; integer SIP_Interceptor_Port = 5060; bool Enable_SIP_Interceptor = TRUE; integer Start_SIP_Interceptor_After_Command = 1; bool Enable_SIP_Registrar = FALSE; bool Enable_L3_Monitor = FALSE; string Default_SIP_Contact = "<sip:10.4.11.81>"; string Startup_Command0 = "c:/windows/system32/taskkill.exe /im gihal.exe /f"; integer Startup_Sleep0 = 2000; string Startup_Command1 = "c:/aculab/v67/bin/amd64/aculabservicemanager -stop sip"; integer Startup_Sleep1 = 2000; string Startup_Command2 = "c:/aculab/v67/bin/amd64/aculabservicemanager -start sip"; integer Startup_Sleep2 = 2000; string Startup_Command3 = "c:/8Server/gi2/bin/giHal.exe -w -tingtrace"; integer Startup_Sleep3 = 5000; string Startup_Command4 = "c:/8Server/bin/startup_registrations.cmd"; integer Startup_Sleep4 = 1000; string Shutdown_Command0 = "c:/windows/system32/taskkill.exe /im gihal.exe /f"; integer |
|
StartupShutdown_Sleep0 = 2000; string |
|
Startupaculab/v67bin/amd64/aculabservicemanager -stop sipsystem32/taskkill.exe /im giacu.exe /f"; integer |
|
StartupShutdown_Sleep1 = 2000; string |
|
StartupShutdown_Command2 = "c:/aculab/v67/bin/amd64/aculabservicemanager - |
|
startStartupShutdown_Sleep2 = 2000; Controller1 |
|
stringStartupCommand3"c:/8Server/gi2/bin/giHal.exe -w -tingtrace"; integer Startup_Sleep3 = 5000; string Startup_Command4 = "c:/8Server/bin/startup_registrations.cmd"; integer Startup_Sleep4 = 1000; string Shutdown_Command0 = "c:/windows/system32/taskkill.exe /im gihal.exe /f"; integer Shutdown_Sleep0 = 2000; string Shutdown_Command1 = "c:/windows/system32/taskkill.exe /im giacu.exe /f"; integer Shutdown_Sleep1 = 2000; string Shutdown_Command2 = "c:/aculab/v67/bin/amd64/aculabservicemanager -stop sip"; integer Shutdown_Sleep2 = 2000; Controller1 { integer Total_Channel_Count = 0; integer Inbound_Use_Channels = 0; integer Outbound_Use_Channels = 0; string HAL_HostName = "127.0.0.1"; bool SIP_URL_Cleaner = TRUE; bool Ignore_L1Status = TRUE; bool RFC2833_DTMF_Detection = TRUE; }; }; }; 0; integer Inbound_Use_Channels = 0; integer Outbound_Use_Channels = 0; string HAL_HostName = "127.0.0.1"; bool SIP_URL_Cleaner = TRUE; bool Ignore_L1Status = TRUE; bool RFC2833_DTMF_Detection = TRUE; }; }; }; |
|
Symmetrisches RTP
Nous installons tous les systèmes avec RTP symétrique.
Cela nécessite qu'un nouveau fichier de configuration nommé C:\Aculab\v67\cfg\mhp.cfg et créé avec le contenu suivant :
| Translations Ignore |
|---|
| Code Block |
|---|
| title | File C: \\ aculab \\ v67 \\ cfg \\ mhp.cfg |
|---|
| LocalRtpSymmetric=1 |
|
8-Server du serveur
À partir de cette URL, importez le fichier de registre :
MySQL 8.x
http://cdn.jtel.de/downloads/configs/8server_config_v8.reg
MySQL 5.x
http://cdn.jtel.de/downloads/configs/8server_config.reg
Commencer 8-Serveur comme ADMIN (clic droit sur robot5.exe dans le répertoire c:\8Server\Config).
IMPORTANT : N'utilisez pas startup.cmd ou startup_launcher.cmd !
Paramètres généraux, Général
- " ID Machine" dernier octet de l'adresse IP
Division des composants Internet
Uniquement pour les machines à plusieurs lignes : augmenter la valeur de "UDP" si nécessaire.
Zone de réglages UDP
Uniquement pour le fonctionnement de multiples 8-Server :
- Entrez l'adresse de diffusion du segment LAN
- Déterminer le port 20202
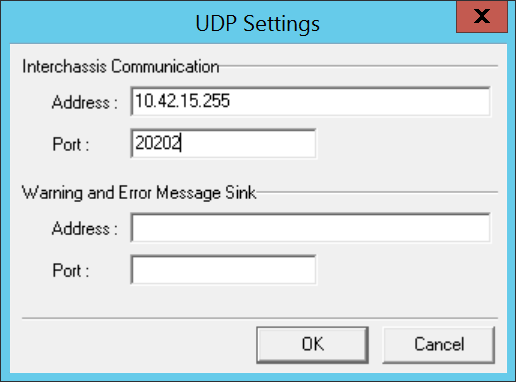 Image Added
Espace Processus de démons
Si nécessaire, retirez certains des démons d'un serveur de démons pur ou d'un serveur de téléphonie pur.
LocalRtpSymmetric=1 |
| Liste des démons d'un serveur combiné |
| \\acd-store\shared\JTELCarrierPortal\AppServer\acd\Daemons\acd.Daemon.AcdEvents.Cleaner.r5 \\acd-store\shared\JTELCarrierPortal\AppServer\acd\Daemons\acd.Daemon.AcdEvents.Distribute.r5 \\acd-store\shared\JTELCarrierPortal\AppServer\acd\Daemons\acd.Daemon.DailyAutoGroupLogout.r5 \\acd-store\shared\JTELCarrierPortal\AppServer\acd\Daemons\acd.Daemon.DailyAutoUserLogout.r5 |
|
| Translations Ignore |
|---|
| Code Block |
|---|
title | \\acd-store\shared\JTELCarrierPortal\AppServer\acd\Daemons\acd.Daemon. |
|
AcdEvents.CleanerGroupDistribute.r5 \\acd-store\shared\JTELCarrierPortal\AppServer\acd\Daemons\acd.Daemon. |
|
AcdEventsDistributeWarning.r5 \\acd-store\shared\JTELCarrierPortal\AppServer\acd\Daemons\acd.Daemon. |
|
DailyAutoGroupLogoutUDP.r5 \\acd-store\shared\JTELCarrierPortal\AppServer\conf\ConfServer.Daemon.UDP.r5 \\acd |
|
\Daemons\acd-store\shared\JTELCarrierPortal\AppServer\Portal.Daemon.8Server. |
|
DailyAutoUserLogoutLogFileCleaner.r5 \\acd-store\shared\JTELCarrierPortal\AppServer\Portal.Daemon.Audio.Converter.r5 \\acd |
|
\Daemons\acd-store\shared\JTELCarrierPortal\AppServer\Portal.Daemon.ChangeEvent. |
|
GroupDistributeManager.r5 \\acd-store\shared\JTELCarrierPortal\AppServer\Portal.Daemon.EventSpool.SMS.r5 \\acd |
|
\Daemons\acd-store\shared\JTELCarrierPortal\AppServer\Portal.Daemon. |
|
LongCallsWarningSMTP.r5 \\acd-store\shared\JTELCarrierPortal\AppServer\Portal.Daemon.Recordings.Cleaner.r5 \\acd |
|
\Daemons\acd-store\shared\JTELCarrierPortal\AppServer\Portal.Daemon.Recordings. |
|
UDPManager.r5 \\acd-store\shared\JTELCarrierPortal\AppServer\ |
|
conf\ConfServerUDPReportSubscriptions2.r5 \\acd-store\shared\JTELCarrierPortal\AppServer\Portal.Daemon.SystemStartSequence. |
|
8ServerLogFileCleanerv2.r5 \\acd-store\shared\JTELCarrierPortal\AppServer\Portal.Daemon.SystemStartSequence. |
|
AudioConverterv2.r5 \\acd-store\shared\JTELCarrierPortal\AppServer |
|
\Portal\TimeServiceMonitor\portal.Daemon.TimeServiceMonitor.r5 C:\8Server\Samples\LogFileCleaner\8Server.Daemon. |
|
ChangeEventManager.r5
Pour un serveur de téléphonie pure, au moins les démons suivants doivent être saisis (les chemins sont basés sur la configuration d'exemple) :
| Translations Ignore |
|---|
| Code Block |
|---|
| title | Liste des démons d'un serveur de téléphonie |
|---|
| \\acd-store\shared\JTELCarrierPortal\AppServer\ |
|
PortalEventSpool.SMSUDP.r5 \\acd-store\shared\JTELCarrierPortal\AppServer\conf\ |
|
PortalEventSpoolSMTP.r5 \\acd-store\shared\JTELCarrierPortal\AppServer\Portal.Daemon.SystemStartSequence. |
|
RecordingsCleanerv2.r5 \\acd-store\shared\JTELCarrierPortal\AppServer |
|
\Portal\TimeServiceMonitor\portal.Daemon.TimeServiceMonitor.r5 C:\8Server\Samples\LogFileCleaner\8Server.Daemon. |
|
Recordings| Code Block |
|---|
title |
Pour un serveur de démons, au moins les démons suivants doivent être saisis (les chemins sont basés sur la configuration d'exemple) :
Manager.r5 | Translations Ignore |
|---|
| Code Block |
|---|
| title | Liste des démons dans un serveur de démons |
|---|
|
|
\\acd-store\shared\JTELCarrierPortal\AppServer\acd\Daemons\ |
|
PortalReportSubscriptions2Cleaner.r5 \\acd-store\shared\JTELCarrierPortal\AppServer\acd\ |
|
PortalSystemStartSequenceCleaner.v2Distribute.r5 \\acd-store\shared\JTELCarrierPortal\AppServer\acd\Daemons\ |
|
PortalSystemStartSequence.Update.v2DailyAutoGroupLogout.r5 \\acd-store\shared\JTELCarrierPortal\AppServer\acd\ |
|
TimeServiceMonitorportalTimeServiceMonitor.r5 C:\8Server\Samples\LogFileCleaner\8Server.Daemon.LogFileCleaner.mySQL.r5| Translations Ignore |
|---|
DailyAutoUserLogout.r5 \\acd-store\shared\JTELCarrierPortal\AppServer\acd\Daemons\acd.Daemon.GroupDistribute.r5 \\acd-store\shared\JTELCarrierPortal\AppServer\acd\Daemons\acd.Daemon. |
|
LongCalls.Warning.r5 \\acd-store\shared\JTELCarrierPortal\AppServer\acd\ |
|
acd.Daemon.UDP.r5 \\acd-store\shared\JTELCarrierPortal\AppServer\Portal.Daemon. |
|
LogFileCleaner.r5 \\acd-store\shared\JTELCarrierPortal\AppServer\ |
|
\\acd-store\shared\JTELCarrierPortal\AppServer\Portal.Daemon. |
|
| Translations Ignore |
|---|
| Code Block |
|---|
title | \\acd-store\shared\JTELCarrierPortal\AppServer\ |
|
acd\Daemons\acdAcdEventsCleanerSMS.r5 \\acd-store\shared\JTELCarrierPortal\AppServer\ |
|
acd\Daemons\acdAcdEventsDistributeSMTP.r5 \\acd-store\shared\JTELCarrierPortal\AppServer\ |
|
acd\Daemons\acdPortal.Daemon.Recordings. |
|
DailyAutoGroupLogoutCleaner.r5 \\acd-store\shared\JTELCarrierPortal\AppServer\ |
|
acd\Daemons\acdDailyAutoUserLogoutRecordings.Manager.r5 \\acd-store\shared\JTELCarrierPortal\AppServer\ |
|
acd\Daemons\acdGroupDistributeReportSubscriptions2.r5 \\acd-store\shared\JTELCarrierPortal\AppServer\ |
|
acd\Daemons\acdLongCallsSystemStartSequence.Cleaner. |
|
Warningv2.r5 \\acd-store\shared\JTELCarrierPortal\AppServer\ |
|
acd\Daemons\acdUDPSystemStartSequence.Update.v2.r5 \\acd-store\shared\JTELCarrierPortal\AppServer\TimeServiceMonitor\ |
|
Portalportal.Daemon.TimeServiceMonitor.r5 C:\8Server\Samples\LogFileCleaner\8Server.Daemon.LogFileCleaner |
|
.r5 \\acd-store\shared\JTELCarrierPortal\AppServer\Portal.Daemon.Audio.Converter.r5 \\acd-store\shared\JTELCarrierPortal\AppServer\Portal.Daemon.ChangeEvent.Manager.r5
Cela complète la configuration de base interactive du 8-Server. Le 8-Server peut maintenant être résilié afin qu'une licence valide puisse être générée et importée.
Demande de licence 8-Server
La demande de licence se fait par le biais du programme C:\8Server\bin\KeyOrder6.exe directement depuis l'Explorateur :
Le fichierC:\8Server\bin\8server.key sera envoyé sur support@jtel.de
Dès qu'un fichier de licence valide est disponible, il doit être importé dans le répertoire.C:\8Server\Config
Le Platform UDP Listener est ensuite installé avec les commandes suivantes :
| Translations Ignore |
|---|
| Code Block |
|---|
| title | Installation de la plate-forme UDP Listener |
|---|
| C: md \PlatformUDPlistener xcopy /E \\acd-store\shared\JTELCarrierPortal |
|
\AppServer\Portal.Daemon.EventSpool.SMS.r5\Utils\Install\PlatformUDPListener C:\PlatformUDPlistener copy \\acd-store\shared\ |
|
JTELCarrierPortal\AppServer\Portal.Daemon.EventSpool.SMTP.r5 \\acd-store\shared\JTELCarrierPortal\AppServer\Portal.Daemon.Recordings.Cleaner.r5 \\acd-store\shared\JTELCarrierPortal\AppServer\Portal.Daemon.Recordings.Manager.r5 \\acd-store\shared\JTELCarrierPortal\AppServer\Portal.Daemon.ReportSubscriptions2.r5 \\acd-store\shared\JTELCarrierPortal\AppServer\Portal.Daemon.SystemStartSequence.Cleaner.v2.r5 \\acd-store\shared\JTELCarrierPortal\AppServer\Portal.Daemon.SystemStartSequence.Update.v2.r5 \\acd-store\shared\JTELCarrierPortal\AppServer\TimeServiceMonitor\portal.Daemon.TimeServiceMonitor.r5 C:\8Server\Samples\LogFileCleaner\8Server.Daemon.LogFileCleaner.mySQL.r5hazelcast.xml C:\PlatformUDPlistener\conf |
|
Liens
lien de
c:\PlatformUDPListener\startListener.bat
A mettre sur le bureau aussi bien qu'aprèsshell:startup
Test
Lancez l'auditeur UDP de la plate-forme. Tous les nœuds TEL devraient maintenant se trouver dans le cluster. Si le serveur web et le DBM étaient précédemment installés, ces nœuds devraient maintenant être également actifs dans le cluster.
Démarrage de Windows
La condition pour l'installation par nous, est un compte d'administrateur local.
En outre, il est recommandé de ne pas inclure la machine dans le domaine du client. Ici, il y a simplement la possibilité que trop de politiques crachent dans notre soupe.
Machine sans connexion "Administrateur"
Cela concerne principalement les machines qui sont dans le domaine du client.
Pour que le 8-Server fonctionne correctement, il doit être lancé avec "Run as administrator".
Toutefois, il existe un moyen de le faire automatiquement.
La condition est que nous puissions modifier les paramètres de contrôle du compte utilisateur, si cela n'est pas possible, le client DOIT l'ajuster. Sinon, à ce stade : STOP.
Modification des paramètres de contrôle des comptes d'utilisateur
Cliquez sur le menu Démarrer ou appuyez sur la touche Windows.
Ensuite, entrez :
Contrôle de compte d'utilisateur (Windows allemand) ou Contrôle de compte d'utilisateur.
Voir capture d'écran :
Sélectionnez l'élément de menu approprié, puis réglez le contrôle de compte d'utilisateur sur le niveau le plus bas - voir la capture d'écran.
Installer Autostart
http://cdn.jtel.de/downloads/tools/AutoLogon.zip
Décompressez, et configurez un connexion automatique pour l'utilisateur (l'administrateur ou l'utilisateur jtel).
Ensuite, testez :
- Redémarrer la machine
- Après le démarrage de la machine, l'utilisateur doit s'être connecté automatiquement et tous les services concernés doivent fonctionner
Pare-feu Windows
Si le pare-feu de Windows doit rester activé, quelques ajustements doivent être faits.
Exécutez les commandes suivantes en tant qu'administrateur dans la fenêtre cmd :| Translations Ignore |
|---|
| Code Block |
|---|
title | C: md \PlatformUDPlistener xcopy /E \\acd-store\shared\JTELCarrierPortal\Utils\Install\PlatformUDPListener C:\PlatformUDPlistener copy \\acd-store\shared\hazelcast.xml C:\PlatformUDPlistener\conf| Translations Ignore |
|---|
| Code Block |
|---|
| title | Ajustements du pare-feu de Windows - s'exécuter en tant qu'administrateur en cmd |
|---|
| netsh advfirewall firewall add rule name="ICMPv4" protocol=icmpv4:8,any dir=in action=allow edge=yes netsh advfirewall firewall add rule name="Hazelcast" dir=in action=allow protocol=TCP localport=5701-5801 edge=no netsh advfirewall firewall add rule name="RTP" dir=in action=allow protocol=UDP localport=30000-34999 edge=yes netsh advfirewall firewall add rule name="SIP" dir=in action=allow protocol=UDP localport=5060 edge=yes netsh advfirewall firewall add rule name="UDP Local" dir=in action=allow protocol=UDP localport=1-65535 edge=no |
|
Confinement du port d'Aculab
Pour que l'UDP de Remote arrive à certains ports d'Aculab, la configuration d'Aculab doit également être ajustée.
Avec notepad++ modifier le fichier suivant : C:\aculab\v67\cfg\aculab.config et régler la portée du numér de port de 30000 à 34999 :
| Translations Ignore |
|---|
| Code Block |
|---|
| title | C:\aculab\v67\cfg\aculab.config |
|---|
| ... <rxrange minvalue="30000" maxvalue="34999"/> ... |
|